OneSpan Sign Developer: Integrate with Oracle PL/SQL – Part 2

In the first part of this blog series, we demonstrated how to connect to the OneSpan Sign server through Oracle PL/SQL and invoke API Calls. If you are new to Oracle PL/SQL programming or encountered connection errors like “HTTP request failed”, the part 1 blog is a good reference to read first.
We will continue to integrate with OneSpan Sign’s API through Oracle PL/SQL and showcase how to create a transaction as well as how to upload document binary data. Without further ado, let’s get started.
Setting the Request Header
This guide will breakdown the necessary code section by section. If you prefer, you can find the whole script in this forum post.
In the first couple lines, the connection info for your OneSpan Sign connection is defined in addition to other necessary constants and object types that will be used in following code.
create or replace procedure create_package2
as
  oss_api_url constant varchar2(256) := 'https://sandbox.esignlive.com/api';
  oss_api_key constant varchar2(256) := 'your_api_key';

  l_newline varchar2(50) := chr(13) || chr(10);
  lco_boundary constant varchar2(30) := 'gc0p4Jq0M2Yt08jU534c0p';

  l_http_request utl_http.req;
  l_request_body clob;
  l_request_body_length number;

  l_http_response utl_http.resp;
  l_response_header_name varchar2(256);
  l_response_header_value varchar2(1024);
  l_response_body varchar2(32767);

  l_offset number := 1;
  l_amount number := 2000;
  l_buffer varchar2(2000);

  v_blob      blob;
  v_buffer    raw(32767);
  v_file      bfile := bfilename('MYDIR', 'SampleDoc.pdf');
  v_length    integer;
  v_offset    number(15) := 1;
  v_amount    number(15) := 32767;
If you’re using the production environment, use the url “https://apps.esignlive.com/api”. Make sure you replace the placeholder text with your API_KEY. You can find this value in the ACCOUNT page when signed into your OneSpan Sign account.
For other variables, those starting with “l_” will be used to build the HTTP request, and the ones starting with “v_” will be specifically used to upload the document binary data. This naming convention can help organize the coding and ensure that it will be easy to follow.
Now, we are ready to construct the procedure. The following section illustrates how to initialize the request object and to build the request header.
begin
  l_http_request := utl_http.begin_request(
                      url => oss_api_url || '/packages',
                      method => 'POST',
                      http_version => 'HTTP/1.1'
                    );
  utl_http.set_wallet('file:C:\wallet5', NULL);
  utl_http.set_header(l_http_request, 'Authorization', 'Basic ' || oss_api_key);
  utl_http.set_header(l_http_request, 'Content-Type', 'multipart/form-data; boundary="' || lco_boundary || '"');
  utl_http.set_header(l_http_request, 'Transfer-Encoding', 'chunked');
Note:
- Remember to set a wallet for your HTTPS connection
- You must explicitly set “Transfer-Encoding” to “chunked”. (Refer to this official documentation for reason)
Out Stream Document Binary
Before we continue to code, let’s have a quick review of the construction of a request body: 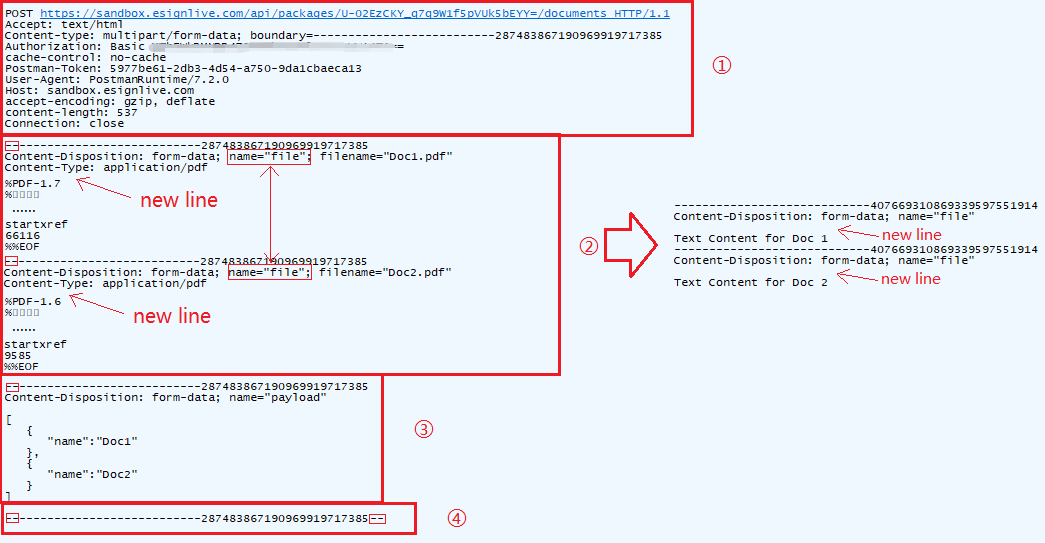
The picture above gives you an idea of what a “multipart/form-data” HTTP request body should look like, how you can name your content-disposition so that it’ll be recognized by OneSpan Sign system, where you need to add new line, and how to use boundary to separate the different parts.
For a more complete description of these details, refer to our blog “Upload Multiple Documents with REST”.
The key function we leveraged to output the request body is “utl_http.write_raw(REQ r, RAW data)”. This allows us to pass in the request object and a raw type data. By combining with “utl_raw.cast_to_raw(l_buffer))” function, we can convert varchar/string to raw.
  l_request_body := l_newline
|| '--' || lco_boundary || l_newline
|| 'Content-Disposition: form-data; name="file"; filename="file.pdf"' || l_newline
|| 'Content-Type: application/pdf' || l_newline
|| l_newline;

  l_request_body_length := dbms_lob.getlength(l_request_body);

  while l_offset < l_request_body_length loop
    dbms_lob.read(l_request_body, l_amount, l_offset, l_buffer);
    utl_http.write_raw(l_http_request, utl_raw.cast_to_raw(l_buffer));
    l_offset := l_offset + l_amount;
  end loop;
To output the document binary data, we first read the document from the file path and loaded as a BLOB object. We will then loop through the length of the file to read a certain offset from blob to RAW type and to send out the HTTP request in a chunk each time.
  dbms_lob.createtemporary(v_blob, true, dbms_lob.call);
  dbms_lob.open(v_file, dbms_lob.lob_readonly);
  dbms_lob.open(v_blob, dbms_lob.lob_readwrite);
  v_length := dbms_lob.getlength(v_file);
  dbms_lob.loadfromfile(v_blob, v_file, v_length);

  while v_offset < v_length loop
      dbms_lob.read(v_blob, v_amount, v_offset, v_buffer);
      utl_http.write_raw(l_http_request, v_buffer);
      v_offset := v_offset + v_amount;
  end loop;
Don’t forget to close the stream at the end.
  dbms_lob.close(v_file);
  dbms_lob.close(v_blob);
Build Request Payload
Afterwards, we will send out the “payload” portion in a similar fashion. Refer to the request body picture above to make sure there’s no small mistakes in the middle of the code. Printing out your request body is a good way to self-inspect whether the code works.
l_request_body :=
 l_newline
 || l_newline
|| '--' || lco_boundary || l_newline
|| 'Content-Disposition: form-data; name="payload"' || l_newline
|| l_newline
|| '{"name":"transaction created from Oracle","documents":[{"name":"document1"}]}' || l_newline
|| '--' || lco_boundary || '--';

  l_request_body_length := dbms_lob.getlength(l_request_body);
  l_offset := 1;

  while l_offset < l_request_body_length loop
    dbms_lob.read(l_request_body, l_amount, l_offset, l_buffer);
    utl_http.write_raw(l_http_request, utl_raw.cast_to_raw(l_buffer));
    l_offset := l_offset + l_amount;
  end loop;
Almost done! The only left work is to print out the response parameters and to handle the exceptions. This will be covered in the next blog.
Run the Code
Execute the procedure and the response status will be printed out in the console.
SET SERVEROUTPUT ON
EXEC create_package2();
If you made the API call successfully, you will see status “200” with package ID in the response body: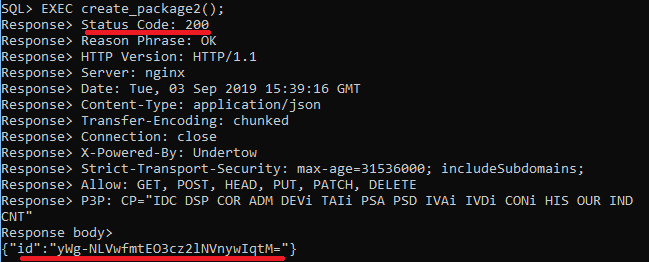
If it doesn’t, never mind, the error message will also be displayed. 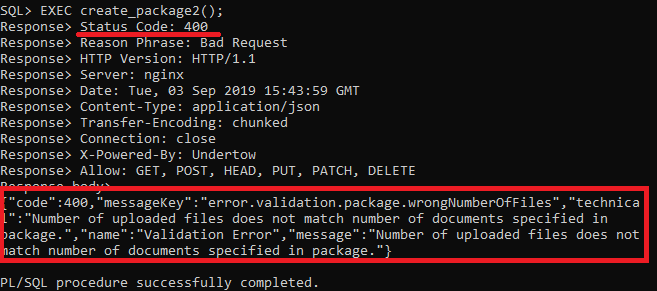
If you have any questions regarding this blog or anything else concerning integrating OneSpan Sign into your application, visit the Developer Community Forums. Your feedback matters to us!

OneSpan Developer Community
Join the OneSpan Developer Community! Forums, blogs, documentation, SDK downloads, and more.
Join Today