OneSpan Sign How To: Sign All Documents

With OneSpan Sign’s SDK 11 now released, I thought this would a good moment to write a quick blog about the sign all feature that was added in this release. In short, this feature enables all documents in a transaction (previously document package) to be signed in one call, instead of navigating through documents successively, and signing each signature sequentially.
For example, say you are a manager of an insurance company and you have over a hundred applications pending approval. The sign all feature enables you to sign each application in a single transaction in a one call. In other words, this feature gives you the capability to rubber stamp documents.
Note that this feature is only available in the version 11 of sandbox and production (i.e. https://sandbox.onespan.com and https://apps.onespan.com). In this blog, I will show you how to use the sign all feature with the Java and .NET SDK.
The Code
You can go ahead and skip to the section which applies to your method. I will cover the same information in each segment. You can get the complete example code from the Developer Community Code Share: Java, and .NET.
Java SDK
First, I’ll start with the Java SDK. In my example I’ve setup, there are two recipients (i.e. signers) in the transaction: the sender (myself) and a client. Also, there are two documents in the transaction. A signature for each recipient is required per document. Furthermore, I’ve used text anchors to position the signatures on the documents. If you need more information on text anchors, you can read my previous blog. Below is a sample code on how I created my transaction:
        //Package
		PackageBuilder packageToBuild = PackageBuilder.newPackageNamed("Sign Documents Test");

		//Sender
		SignerBuilder signer1 = SignerBuilder.newSignerWithEmail("[email protected]")
				.withFirstName("Haris")
				.withLastName("Haidary")
				.withCustomId("Sender");
		//Client
		SignerBuilder signer2 = SignerBuilder.newSignerWithEmail("[email protected]")
				.withFirstName("John")
				.withLastName("Smith")
				.withCustomId("Signer");

		//Sender signature on first document
		SignatureBuilder signature1 = SignatureBuilder.signatureFor("[email protected]")
				.withPositionAnchor(TextAnchorBuilder.newTextAnchor("Signature of the Contractor")
                        .atPosition(TextAnchorPosition.TOPLEFT)
                        .withSize(150, 40)
                        .withOffset(0, -50)
                        .withCharacter(0)
                        .withOccurence(0));

		//Client signature on first document
		SignatureBuilder signature2 = SignatureBuilder.signatureFor("[email protected]")
				.withPositionAnchor(TextAnchorBuilder.newTextAnchor("Signature of the Client")
                        .atPosition(TextAnchorPosition.TOPLEFT)
                        .withSize(150, 40)
                        .withOffset(0, -50)
                        .withCharacter(0)
                        .withOccurence(0));

        //First document
		DocumentBuilder document1 = DocumentBuilder.newDocumentWithName("Cleaning Contract")
				.fromFile("DOC_FILE_PATH")
				.withSignature(signature1)
				.withSignature(signature2);

        //Build package
		DocumentPackage packageToSend = packageToBuild.withSigner(signer1).withSigner(signer2).withDocument(document1).withDocument(document2).build();
		//Create and send package
		PackageId packageId = client.createAndSendPackage(packageToSend);

		//sign all documents for sender
		client.signDocuments(packageId);
The last line in the sample code above will automatically sign all documents for the sender. It is important to note this feature will not work for capture signatures. If you need a comparison to the basic document object creation or if this your first time creating a package with the Java SDK, see this blog.

OneSpan Developer Community
Join the OneSpan Developer Community! Forums, blogs, documentation, SDK downloads, and more.
Join Today.NET SDK
Next, I’ll go over the .NET SDK. In my example I’ve setup, there are two recipients (i.e. signers) in the transaction: the sender (myself) and a client. Also, there are two documents in the transaction. A signature for each recipient is required per document. Furthermore, I’ve used text anchors to position the signatures on the documents. If you need more information on text anchors, you can read my previous blog. Below is a sample code on how I created my transaction:
        //Package
        PackageBuilder packageToBuild = PackageBuilder.NewPackageNamed("Sign Documents Test");

        //Sender
        SignerBuilder signer1 = SignerBuilder.NewSignerWithEmail("[email protected]")
                .WithFirstName("Haris")
                .WithLastName("Haidary")
                .WithCustomId("Sender");
        //Client
        SignerBuilder signer2 = SignerBuilder.NewSignerWithEmail("[email protected]")
                .WithFirstName("John")
                .WithLastName("Smith")
                .WithCustomId("Signer");

        //Sender signature on first document
        SignatureBuilder signature1 = SignatureBuilder.SignatureFor("[email protected]")
                .WithPositionAnchor(TextAnchorBuilder.NewTextAnchor("Signature of the Contractor")
                        .AtPosition(TextAnchorPosition.TOPLEFT)
                        .WithSize(150, 40)
                        .WithOffset(0, -50)
                        .WithCharacter(0)
                        .WithOccurrence(0));

        //Client signature on first document
        SignatureBuilder signature2 = SignatureBuilder.SignatureFor("[email protected]")
                .WithPositionAnchor(TextAnchorBuilder.NewTextAnchor("Signature of the Client")
                        .AtPosition(TextAnchorPosition.TOPLEFT)
                        .WithSize(150, 40)
                        .WithOffset(0, -50)
                        .WithCharacter(0)
                        .WithOccurrence(0));


        //First document
        DocumentBuilder document1 = DocumentBuilder.NewDocumentNamed("Cleaning Contract")
                .FromFile("DOC_FILE_PATH")
                .WithSignature(signature1)
                .WithSignature(signature2);

        //Build package
        DocumentPackage packageToSend = packageToBuild.WithSigner(signer1).WithSigner(signer2).WithDocument(document1).WithDocument(document2).Build();

        //Create and send package
        PackageId packageId = client.CreateAndSendPackage(packageToSend);

        //Sign all documents for sender
        client.SignDocuments(packageId);
The last line in the sample code above will automatically sign all documents for the sender. It is important to note this feature will not work for capture signatures. If you need a comparison to the basic document object creation or if this your first time creating a package with the .NET SDK, see this blog.
Running Your Code
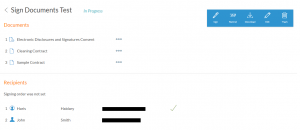
You can now go ahead and run your code. Once you’ve done so, if you login to OneSpan Sign, you will see a checkmark next to the sender in your transaction view. This confirms that all signatures for the sender has been signed.
If you have questions regarding this blog or anything else concerning integrating OneSpan Sign into your application, visit the developer community forums: https://developer.onespan.com. That's it from me. Thank you for reading! If you found this post helpful, please share it on Facebook, Twitter, or LinkedIn.
Haris Haidary
Junior Technical Evangelist