OneSpan Sign How To: Création d'une application Web Simple Node.js

Node.js est un runtime open source construit sur le moteur JavaScript V8 de Chrome pour le développement d'applications Web côté serveur. JavaScript est sans doute le langage de programmation le plus populaire. Par conséquent, si vous connaissez déjà JavaScript, vous pouvez ramasser Node.js assez facilement. La bibliothèque Node.js est très rapide sur l'exécution du code (Chrome V8 JavaScript Engine) et permet un codage asynchrone et événementiel (c'est-à-d. non-blocage). Cela devient très pratique quand il s'agit de construire des applications web en temps réel. Dans ce blog, je vais vous montrer comment créer une application web simple dans Node.js.
Exigences
Avant de plonger dans le code, vous devrez configurer votre environnement pour créer votre application web Node.js. Pour ce blog, vous aurez besoin de Node.js et d'un éditeur de texte.
Node.js (en)
Vous pouvez télécharger l'installateur à partir du lien ci-dessous. Node.js est disponible pour Windows, Mac et Linux. Afin d'exécuter cet exemple, vous devrez installer v5.12.
Texte sublime
Vous aurez également besoin d'un éditeur de texte. Pour ce blog, je vais utiliser Sublime Text. Vous pouvez télécharger une copie gratuite à partir du lien ci-dessous.

OneSpan Sign Developer Community
Rejoignez la communauté OneSpan Sign Developer! Forums, blogs, documentation, téléchargements SDK, et plus encore.
Joignez-vous aujourd'huiLe code
Une fois que vous avez installé Node.js, vous pouvez faire une vérification rapide pour vérifier l'intégrité de l'installation en entrant ce qui suit dans une fenêtre de commande rapide:
Nœud
console.log ("bonjour monde!");
L'utilisation de la commande de nœud sans arguments ouvre une shell interactive où vous pouvez exécuter le code JavaScript brut. Voici capture d'écran de ce que vous pouvez vous attendre:
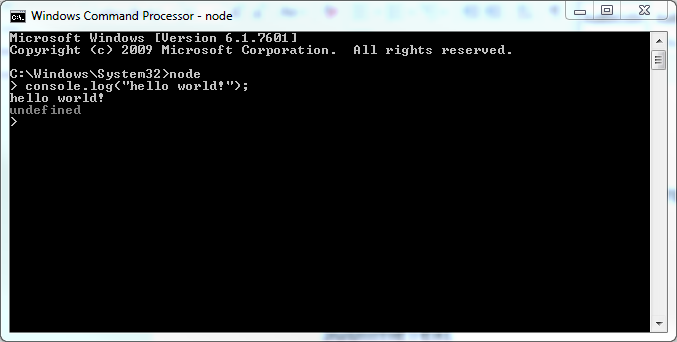
Il imprime également "indéfini" parce que la commande de nœud affiche également la valeur de retour de chaque commande et console.log ne retourne rien.
Nous sommes maintenant prêts à plonger dans le code. Créez un nouveau dossier à l'endroit de votre choix (p. ex. C: 'Users'hhaidary'Desktop'nodejs). Assurez-vous d'enregistrer tous vos fichiers dans le même répertoire. La première étape consiste à créer votre formulaire HTML. À l'aide de Sublime Text, créez un nouveau fichier HTML appelé "form.html" et copiez ce qui suit :
tête
Veuillez remplir le formulaire suivant :
Prénom:
Nom de famille :
Adresse e-mail :
Société:
Adresse:
Ville:
État:
Zip:
Pays:
Numéro de téléphone :
Numéro de politique :
corps html
Enregistrer le fichier HTML dans le dossier que vous venez de créer (c'est-à-dire "nodejs"). Node.js en soi n'est pas capable de traiter le travail requis pour traiter les données du formulaire. Vous devrez installer un module tiers pour analyser les données de formulaire. Dans votre fenêtre de commande, changez votre répertoire (si vous ne l'avez pas déjà fait) à l'endroit où vous avez enregistré votre fichier HTML (c'est-à-dire "nodejs") et entrez ce qui suit:
npm installer@latest formidable - enregistrer
Pendant que nous sommes sur le sujet des modules, allez-y et aussi installer le module de demande:
npm installer@latest la demande --enregistrer
Le module de demande vous permet de faire des appels http dans Node.js. Il est de loin le client http le plus simple et le plus facile disponible. Un module peut être interprété comme un fichier de classe. Allez-y et créez un nouveau fichier nommé "server.js" et ajoutez le code suivant:
var http ('http');
var fs 'exiger('fs');
var esl 'require('./ESLPackageCreation.js');

var serveur http.createServer (fonction (req, res)
    si (req.method.toLowerCase() 'get')
        displayForm (res);
    - d'autre si (req.method.toLowerCase() 'post')
        var signerToken - esl.processAllFieldsOfTheForm (req, res);
    }

});

affichage de fonctionForm (res)
    fs.readFile('form.html', fonction (err, données)
        res.writeHead(200,
            'Content-Type': 'texte/html',
                'Content-Length': data.length
        });
        res.write (données);
        res.end();
    });
}

server.listen(8888);
console.log ("Écoute sur le port 8888...");
Dans le code d'exemple ci-dessus, un serveur HTTP est créé avec un rappel qui appelle la fonction displayForm. L'objet res est passé comme un paramètre afin que la réponse soit renvoyée au client. Ensuite, la fonction displayForm lit le fichier form.html et renvoie les données au client. Lorsqu'un utilisateur clique sur le bouton soumettre dans le formulaire, une demande de publication est soumise avec les informations à la même URL. Le rappel sur le serveur http appelle la fonction processForm dans l'éventualité d'une demande de publication. Cette fonction provient du module "ESLPackageCreation.js". Créons ce module.
Créez un nouveau fichier dans Sublime Text et copiez les éléments suivants :
requête var = exiger ('request');
var formidable 'exiger('formidable');
var fs 'exiger('fs');
var http ('http');


var document - fs.readFileSync ('sample_contract2.pdf');
var jeton;
var packageid;
var api_key 'your_api_key';

var eslFunctions - module.exports
{

  processForm: fonction (req, res)
  {

  	var forme - nouveau formidable. IncomingForm();

    form.parse(req, fonction (err, champs)

    	var jsonPayload - ''''roles''' ' ' ' ' ' ' ' ' ' ' ' ' ' ' ' ' ' ' ' ' ' ' ' ' ' ' ' ' ' ' ' ' ' ' ' ' ' ' ' ' ' ' ' ' ' ' ' ' ' ' ' ' ' ' ' ' ' ' ' ' ' ' ' '@example' ' ' ' ' ' ' ' ' ' ' ' ' ' ' ' ' ' ' ' ' ' ' ' ' ' ' ' ' ' ' ' ' ' ' ' ' ' ' ' ' ' ' ' ' ' ' ' ' ' ' ' ' ' ' ' ' ' ' ' ' ' ' ' ' ' ' ' ' ' ' ' ' ' ' ' ' ' ' ' ' ' ' ' ' ' ' ' ' ' ' ' ' ' ' ' ' ' ' ' ' ' ' ' ' ' ' ' ' ' ' ' ' ' ' ' ' ' ' ' ' ' ' ' ' ' ' ' ' ' ' ' ' ' ' ' ' ' ' ' ' ' ' ' ' ' ' ' ' ' ' ' ' ' ' ' ' ' ' ' ' ' ' ' ' ' ' ' ' ' ' ' ' ' ' ' ' ' ' ' ' ' ' ' ' ' ' ' ' ' ' ' ' ' ' ' ' ' ' ' ' ' ' ' ' ' "id": "Sender1", "type": "SIGNER", "signers": [ - "premier nom": "Haris", "lastName": "Haidary", "email": "sender .com", "id": "Sender1" - ] "documents": [ ' ' ' ' ' ' ' ' last_name first_name ' ' ' ' ' ' ' ' ' ' ' ' ' ' ' ' ' ' ' ' ' ' ' ' ' ' ' ' ' ' ' ' ' ' ' ' ' ' ' ' ' ' ' ' ' ' ' ' ' ' ' ' ' ' ' ' ' ' ' ' ' ' ' ' ' ' ' ' ' ' « valeur » : « Fields.address », « nom » : « adresse », "valeur": "' ''fields.city '' ' ' ' ' ' ' ' ' ' ' ' ' ' ' ' ' ' ' ' ' ' ' ' ' ' ' ' ' ' ' ' ' ' ' ' ' ' ' ' ' ' ' ' ' ' ' ' ' ' ' ' ' ' ' ' ' ' ' ' ' ' ' ' ' ' ' ' ' ' ' ' ' ' ' ' ' ' ' ' ' ' ' ' ' ' ' ' ' ' ' ' ' ' ' ' ' ' ' ' ' ' ' ' ' ' ' ' ' ' ' ' ' ' ' ' ' ' ' ' ' ' ' ' ' ' ' ' ' ' ' ' ' ' ' ' ' ' ' ' ' ' ' ' ' ' ' ' ' ' ' ' ' ' ' ' ' ' ' ' ' ' ' ' ' ' ' ' ' ' ' ' ' ' ' ' ' ' ' ' ' ' ' ' ' ' ' ' ' ' ' ' ' ' ' ' ' ' ' ' ' ' ' ' ' ' ' ' ' ' ' ' ' ' ' ' ' ' ' ' ' ' ' ' ' ' ' ' ' ' ' ' ' ' ' ' ' ' ' ' ' ' ' ' ' ' ' ' ' ' ' ' ' ' ' ' ' ' ' ' ' ' ' ' ' ' "valeur": "' '' ''fields.phoneNumber '' ' ' ' ' ' ' ' ' ' ' ' ' ' ' policy_number phone_number ' ' ' ' ' ' ' ' ' ' ' ' ' ' ' ' ' ' ' ' ' ' ' ' ' ' ' ' ' ' ' ' ' ' ' ' ' ' ' ' ' ' ' ' ' ' ' ' ' ' ' ' ' ' ' ' ' ' ' ' ' ' ' ' ' ' ' ' ' ' ' ' ' ' ' ' ' ' ' ' ' ' ' ' ' ' ' ' ' ' ' ' ' ' ' ' ' ' ' ' ' ' ' ' ' ' ' ' ' ' ' ' ' ' ' ' ' ' ' ' ' ' ' ' ' ' ' ' ' ' ' ' ' ' ' ' ' ' ' ' ' ' ' ' ' ' ' ' ' ' ' ' ' ' ' ' ' ' ' ' ' ' ' ' ' ' ' ' ' ' ' ' ' ' ' ' ' ' ' ' ' ' ' ' ' ' ' ' ' ' ' ' ' ' ' ' ' ' ' ' ' ' ' ' ' ' ' ' ' ' ' ' ' ' ' ' ' ' ' ' ' ' ' ' ' ' ' ' ' ' ' ' ' ' ' ' ' ' ' ' ' ' ' ' ' ' ' ' ' ' ' ' ' ' ' ' ' ' ' ' ' ' ' ' ' ' ' ' ' ' ' ' ' ' ' Exemple de contrat", "id" : "contrat", "extrait": vrai , "nom": "NodeJS Exemple", "type": "PACKAGE", "statut": "SENT" ;

		options var
		{
			méthode: «Post» ,
			URl: 'https://sandbox.esignlive.com/api/packages',
			En-têtes:
			{
			    accepter: 'application/json',
			    autorisation: 'Basic ' - api_key,
			    'type de contenu': 'multipart/form-data; ---011000010110000110101001010101001
			  formDonnées:
			   Fichier :
			      Valeur : document,
			        options: 'nom de fichier: '0': ', contentType: null ',
			     charge utile: jsonPayload
		};

		demande (options, fonction (erreur, réponse, corps)
		{
			si (erreur) lancent une nouvelle erreur (erreur);

			var tmp - JSON.parse (corps);
			packageid - tmp['id'];
			console.log ("L'id paquet est: " - packageid);
			eslFunctions.getSignerToken (res);

		});

    });

  },

  getSignerToken: fonction (res)
  {

  	options var
  	{
  		méthode: «Post» ,
		url: 'https://sandbox.esignlive.com/api/signerAuthenticationTokens',
		En-têtes:
		{
		    'content-type': 'application/json',
		    accepter: 'application/json',
		    autorisation: 'Basic ' ' ' api_key',
		  	corps:
		  		packageId: packageid,
		     	signataire: 'Signer1'
		    },
		  	json: vrai
	};

	demande (options, fonction (erreur, réponse, corps)
		si (erreur) lancent une nouvelle erreur (erreur);

		jeton - corps['valeur'];
		console.log ("Le jeton de session est: " jeton);
		eslFunctions.complete (res);

	});

  },

  complète: fonction (res)

		res.writeHead(200,
	            'content-type': 'texte/html'
	        });
	    res.write('');
	    res.write('
'); res.write('
'); res.write('); res.write('
Merci d'avoir rempli le formulaire! Veuillez signer le document ci-dessous :
Maintenant, passons en revue le code en détail. Dans la fonction processForm, un objet est créé pour le formulaire entrant. Sur cet objet, nous passons l'objet res (c.-à-d. la réponse) et mettons un rappel sur celui-ci qui sera appelé lorsque la forme est anatérée et retour des champs paratés. Les valeurs de champ paresed sont ensuite utilisées pour construire la charge utile json nécessaire pour créer et envoyer votre colis à l'aide du module de demande. Une fois le paquet créé, l'id de paquet retourné par le signe de OneSpan est employé pour créer un jeton de signataire qui servira à intégrer la cérémonie de signature dans un iframe. Une fois le jeton de signataire créé, l'objet res utilisé pour écrire un nouvel en-tête HTTP (code de statut 200). Enfin, la ligne res.end() écrit le corps et ferme la réponse.
Exécution de votre projet
Vous êtes maintenant prêt à exécuter votre application web Node.js. Dans votre fenêtre de commande rapide (en supposant que votre répertoire actuel est l'endroit où vous avez enregistré vos fichiers), entrez la ligne suivante:
node server.js (en)
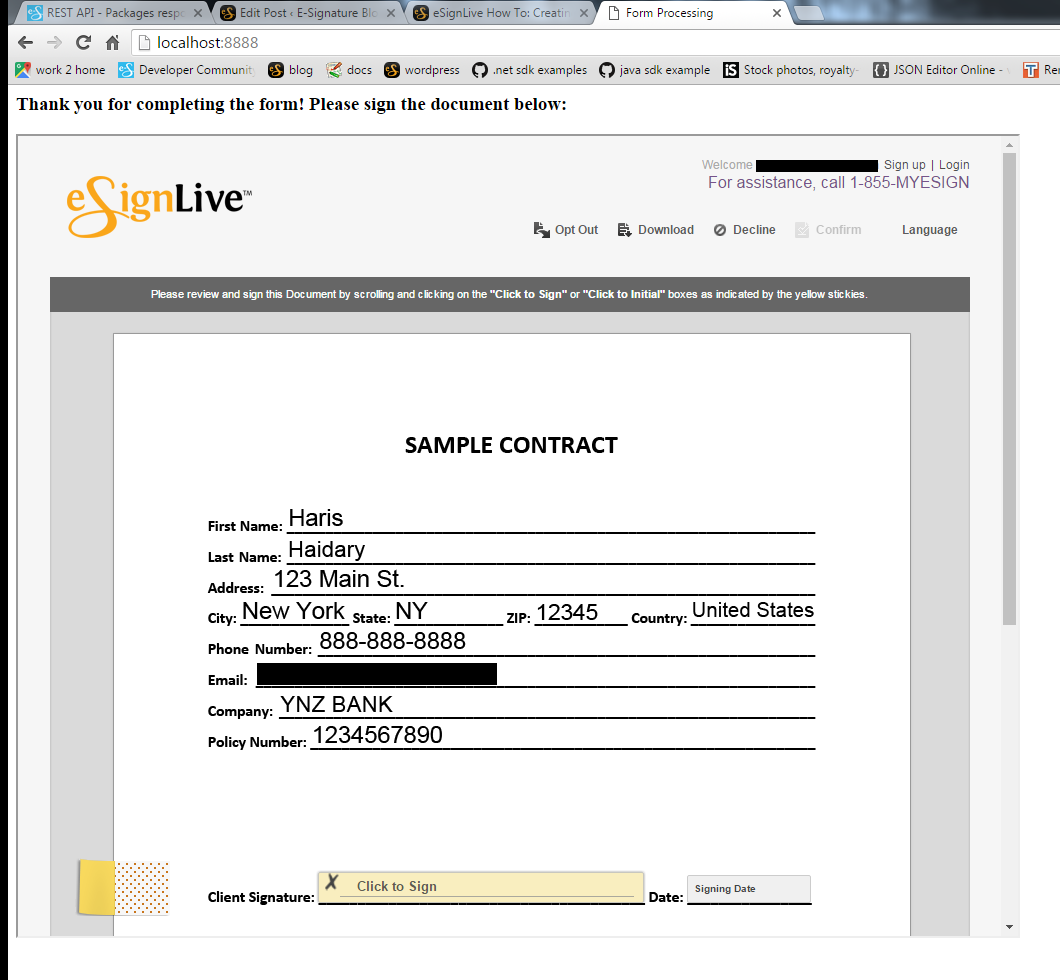
Maintenant, entrez "localhost:8888" dans votre navigateur web. Vous devriez être en mesure de voir votre formulaire. Allez-y et remplissez quelques exemples d'informations et cliquez sur Soumettre.

Une fois que vous avez touché Soumettre, vous serez redirigé vers la cérémonie de signature OneSpan Sign. Vous serez présenté avec un contrat d'échantillon avec les champs peuplés avec les données que vous avez entrés dans votre formulaire et le contrat prêt à être signé.
Vous pouvez télécharger le projet complet à partir de la part de code communautaire des développeurs, ici.
Si vous avez des questions concernant ce blog ou toute autre chose concernant l'intégration de OneSpan Sign dans votre application, visitez les forums de la communauté des développeurs:
https://developer.esignlive.com. C'est moi qui l'ai fait. Merci de lire! Si vous avez trouvé ce message utile, s'il vous plaît le partager sur Facebook, Twitter, ou LinkedIn.
Haris Haidary
Évangéliste technique junior
LinkedIn - France Twitter (en)