OneSpan Sign How To: Managing Senders

OneSpan Sign vous offre la possibilité d'ajouter des expéditeurs à votre compte, ce qui leur permet de créer et d'envoyer des paquets de documents pour signature. En tant que propriétaire de compte, vous aurez accès aux paquets créés par vos expéditeurs. Bien que, vous ne serez en mesure de récupérer les paquets créés par vos expéditeurs à travers les SDKs / API. Si vous souhaitez accéder à partir de l'interface du jour des paquets créés par vos expéditeurs, vous aurez besoin de vos expéditeurs pour vous déléguer l'accès. C'est également le cas pour la situation inverse. Pour plus d'informations sur la délégation d'accès, consultez ce blog précédent.
Il existe trois types d'expéditeurs : Propriétaire, Admin et Expéditeurs de base. Le propriétaire est le titulaire du compte et ne peut pas être changé. Un administrateur peut inviter les utilisateurs à être des expéditeurs dans le compte et nommer des expéditeurs en tant qu'administrateurs. Tous les types de comptes peuvent créer et envoyer des paquets. Il est également important de noter qu'un expéditeur ne peut être membre que d'un seul compte. Dans ce blog, je vais vous montrer comment gérer vos expéditeurs avec le OneSpan Sign Java SDK, .NET SDK, et REST API.
Expéditeurs dans l'interface uI
Avant d'entrer dans le code, vous devez localiser votre section d'expéditeurs dans votre interface utilisateur. Après vous être déconnecter de votre compte OneSpan Sign, cliquez sur ACCOUNT dans votre barre d'outils, puis sur l'onglet Senders. Après avoir mis en œil votre code, vous devriez trouver vos expéditeurs ici. 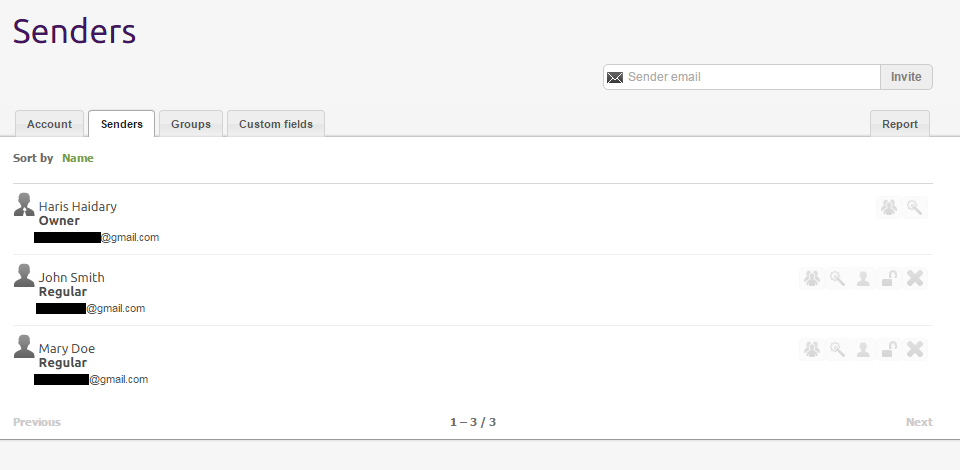
Le code
Maintenant que notre objectif est fixé, commençons avec le code. Je vais couvrir exactement les mêmes informations pour chaque méthode. N'hésitez pas à passer à la section qui s'applique à vous. Le code complet pour ce blog peut être trouvé dans le Partage de Code Communautaire Développeur: Java, .NET, et REST. SDK Java Je vais commencer par le Java SDK. Pour inviter un utilisateur à être un expéditeur dans votre compte, vous devrez créer un objet AccountMember. Ensuite, vous faites appel à votre OneSpan Sign AccountService pour envoyer l'invitation. Lorsqu'un nouvel expéditeur est invité à rejoindre un compte, il est par défaut ajouté dans un état inactif. L'expéditeur recevra un e-mail contenant un lien qu'il devra cliquer pour activer son compte. Vous pouvez sauter l'étape de vérification en définissant l'état à ACTIVE lors de la création de votre objet AccountMember, si votre expéditeur a déjà un compte OneSpan Sign.
Membre du compteMembre membre ' AccountMemberBuilder.newAccountMember("[email protected]")
				.avecFirstName ("John")
				.avecLastName ("Smith")
				.withCompany ("ABC Bank")
				.avecTitle ("CEO")
				.withStatus (SenderStatus.ACTIVE)
				.construire();

client.getAccountService().inviteUser (membre);
Vous pouvez également récupérer vos expéditeurs en faisant appel à votre OneSpan Sign AccountService. Voici un exemple de code sur la façon de récupérer tous vos expéditeurs, qui vient comme une page de OneSpan Sign, avec leurs e-mails et ids. L'ID de l'expéditeur est requis pour mettre à jour ou supprimer un expéditeur. Dans le code ci-dessous, le nombre d'expéditeurs retournés dans la PageRequest est réglé à 5. Le nombre maximum d'expéditeurs que vous pouvez récupérer par page est de 50. La première valeur dans la PageRequest (variable 'i') est le point de départ de la liste globale des expéditeurs qui doivent être retournés. Cette variable est incrémentée que nous passons à travers nos expéditeurs pour garder une trace de l'endroit où nous sommes dans la liste globale des expéditeurs
int i 1; Comptede la carteMembres - client.getAccountService().getSenders(Direction.ASCENDING, nouvelle PageRequest(i,5)); ,> tandis!accountMembersque ( .isEmpty()) pour (Map.Entryentry : accountMembers.entrySet()) ,> { System.out.println (entry.getKey() - " / " - entry.getValue().getId()); i; } accountMembers - client.getAccountService().getSenders(Direction.ASCENDING, new PageRequest(i,5)); }
Comme mentionné ci-dessus, vous aurez besoin de l'ID de l'expéditeur pour mettre à jour votre expéditeur. Notez que l'adresse e-mail ne peut pas être mise à jour une fois que vous avez créé votre expéditeur. Vous devrez créer un nouvel expéditeur, dans ce cas.
SenderInfo mis à jourSenderInfo - SenderInfoBuilder.newSenderInfo("[email protected]")
                .withName ( "John", "Smith" ) )
                .withTitle( "CEO" )
                .withCompany ("XYZ Bank")
                .construire();

client.getAccountService().updateSender (updatedSenderInfo, "senderId");
De même, vous aurez également besoin de l'ID de l'expéditeur pour supprimer votre expéditeur. Si votre expéditeur a des paquets dans sa boîte de réception ou dans l'état du projet, l'expéditeur sera verrouillé au lieu d'être supprimé, et ne sera plus en mesure de créer ou d'envoyer des paquets.
client.getAccountService().deleteSender("senderId");Enfin, voici un exemple de code sur la façon dont vous créeriez un paquet de documents à envoyer par un expéditeur particulier à partir de votre compte :
DocumentPackage packageToSend - PackageBuilder.newPackageNamed ("Exemple de contrat de nettoyage")
			.withSenderInfo(SenderInfoBuilder.newSenderInfo("[email protected]"))
			.withSigner(SignerBuilder.newSignerWithEmail("[email protected]")
					.avecFirstName ("Mary")
					.avecLastName ("Doe")
					.withCustomId("client"))
			.withSigner(SignerBuilder.newSignerWithEmail("[email protected]")
					.avecFirstName ("John")
					.avecLastName ("Smith")
					.withCustomId ("entrepreneur"))
			.withDocument(DocumentBuilder.newDocumentWithName("Contract.pdf")
					.fromStream (nouveau FileInputStream("DOC_FILE_PATH"), DocumentType.PDF)
					.enableExtraction())
				.construire();
SDK .NET Ensuite, je vais continuer avec le .NET SDK. Pour inviter un utilisateur à être un expéditeur dans votre compte, vous devrez créer un objet AccountMember. Ensuite, vous faites appel à votre OneSpan Sign AccountService pour envoyer l'invitation. Lorsqu'un nouvel expéditeur est invité à rejoindre un compte, il est par défaut ajouté dans un état inactif. L'expéditeur recevra un e-mail contenant un lien qu'il devra cliquer pour activer son compte. Vous pouvez sauter l'étape de vérification en définissant l'état à ACTIVE lors de la création de votre objet AccountMember, si votre expéditeur a déjà un compte OneSpan Sign.
Membre du compteMembre membre du compte ' AccountMemberBuilder.NewAccountMember("[email protected]")
				. WithFirstName (" John ")
				. WithLastName ("Smith")
				. WithCompany («ABC Bank»)
				. WithTitle ("CEO")
				. WithStatus (SenderStatus.ACTIVE)
				. Build ();

Client. AccountService.InviteUser (membre);
Vous pouvez également récupérer vos expéditeurs en faisant appel à votre OneSpan Sign AccountService. Voici un exemple de code sur la façon de récupérer tous vos expéditeurs, qui vient comme une page de OneSpan Sign, avec leurs e-mails et ids. L'ID de l'expéditeur sera requis pour mettre à jour ou supprimer un expéditeur. Dans le code ci-dessous, le nombre d'expéditeurs retournés dans la PageRequest est réglé à 5. Le nombre maximum d'expéditeurs que vous pouvez récupérer par page est de 50. La première valeur dans la PageRequest (variable 'i') est le point de départ de la liste globale des expéditeurs qui doivent être retournés. Cette variable est incrémentée que nous passons à travers nos expéditeurs pour garder une trace de l'endroit où nous sommes dans la liste globale des expéditeurs
int i 1; CompteIDictionaryMembres et client. AccountService.GetSenders(Direction.ASCENDING, nouvelle PageRequest(i, 5)); ,> tandis que (accountMembers.Count ! { foreach (entrée KeyValuePairdans accountMembers) ,> { Debug.WriteLine (entrée. Clé ' ' ' ' ' ' ' ' ' ' ' ' ' ' ' ' ' ' ' ' ' ' ' ' ' Value.Id); i; } compteMembres et client. AccountService.GetSenders(Direction.ASCENDING, nouvelle PageRequest(i, 5)); }
Comme mentionné ci-dessus, vous aurez besoin de l'ID de l'expéditeur pour mettre à jour votre expéditeur. Notez que l'adresse e-mail ne peut pas être mise à jour une fois que vous avez créé votre expéditeur. Vous devrez créer un nouvel expéditeur dans ce cas.
SenderInfo mis à jourSenderInfo - SenderInfoBuilder.NewSenderInfo ("[email protected]")
                . WithName ( "John", "Smith" )
                . WithTitle ( "CEO" )
                . WithCompany ("XYZ Bank")
                . Build ();

Client. AccountService.UpdateSender (mise à jourSenderInfo, « senderId »);
De même, vous aurez également besoin de l'ID de l'expéditeur pour supprimer votre expéditeur. Si votre expéditeur a des paquets dans sa boîte de réception ou dans l'état du projet, l'expéditeur sera verrouillé au lieu d'être supprimé, et ne sera plus en mesure de créer ou d'envoyer des paquets.
Client. AccountService.DeleteSender("senderId");Enfin, voici un exemple de code sur la façon dont vous créeriez un paquet de documents à envoyer par un expéditeur particulier à partir de votre compte :
DocumentPackage packageToSend - PackageBuilder.NewPackageNamed ("Exemple de contrat de nettoyage")
                . WithSenderInfo (SenderInfoBuilder.NewSenderInfo("[email protected]"))
                . WithSigner(SignerBuilder.NewSignerWithEmail("[email protected] ")
                        . WithFirstName ("Mary")
                        . WithLastName ("Doe")
                        . WithCustomId ("client"))
                . WithSigner(SignerBuilder.NewSignerWithEmail("[email protected]")
                        . WithFirstName (" John ")
                        . WithLastName ("Smith")
                        . WithCustomId («entrepreneur»))
                . WithDocument (DocumentBuilder.NewDocumentNamed("Contract.pdf")
                        . FromStream (nouveau FileStream ("DOC_FILE_PATH", FileMode.Open), DocumentType.PDF)
                        . ActiverL'extraction())
                . Build ();

OneSpan Sign Developer Community
Rejoignez la communauté OneSpan Sign Developer! Forums, blogs, documentation, téléchargements SDK, et plus encore.
Joignez-vous aujourd'huiAPI REST
Enfin, je vais passer en charge l'API REST. Pour inviter un utilisateur à être un expéditeur dans votre compte, vous devrez construire le JSON ci-dessous. Ensuite, vous faites votre demande POST à: https://sandbox.onespan.com/api/account/senders. Lorsqu'un nouvel expéditeur est invité à rejoindre un compte, il est par défaut ajouté dans un état inactif. L'expéditeur recevra un e-mail contenant un lien qu'il devra cliquer pour activer son compte. Vous pouvez sauter l'étape de vérification en définissant l'état à ACTIVE lors de la construction de votre JSON, si votre expéditeur a déjà un compte OneSpan Sign.
[code language"javascript"] "email" : "[email protected]", "firstName" : "John", "lastName" : "Smith", "company" : "ABC Bank", "title" : "CEO", "status" : "ACTIVE"
Vous pouvez également récupérer vos expéditeurs en faisant une demande GET à: https://sandbox.onespan.com/api/account/senders?from=0&to=10. Dans mon exemple, j'ai choisi de récupérer mes 10 premiers expéditeurs. Vous pouvez personnaliser les paramètres de requête à votre goût. Pour plus d'informations sur les paramètres de requête disponibles, rendez-vous sur notre documentation.
Pour mettre à jour votre expéditeur, vous aurez besoin de votre ID d'expéditeur, que vous pouvez récupérer à partir de la demande ci-dessus. Notez que l'adresse e-mail ne peut pas être mise à jour une fois que vous avez créé votre expéditeur. Vous devrez créer un nouvel expéditeur dans ce cas. Pour mettre à jour votre expéditeur, vous faites une demande POST à https://sandbox.onespan.com/api/account/senders/'senderId' avec le JSON suivant :
[code language"javascript"] "firstName" : "John", "lastName" : "Smith", "company" : "XYZ Bank", "title" : "CEO",
De même, vous aurez également besoin de l'ID de l'expéditeur pour supprimer votre expéditeur. Si votre expéditeur a des paquets dans sa boîte de réception ou dans l'état du projet, l'expéditeur sera verrouillé au lieu d'être supprimé, et ne sera pas en mesure de créer ou d'envoyer des paquets. Pour supprimer votre expéditeur, vous devrez supprimer la demande à: https://sandbox.onespan.com/api/account/senders/ 'senderId'.
Enfin, voici un exemple JSON sur la façon dont vous créeriez un paquet de documents à envoyer par un expéditeur particulier à partir de votre compte :
[code language"javascript"] "sender": "email": "[email protected]" "documents": [ - "extrait": vrai, "nom": "Contrat" - ], "statut": "DRAFT", "rôles": [ - "id": "entrepreneur", "type": "SENDER", "signataires": [ ' "email": "[email protected]", "firstName": "John", "lastName": "Smith", "id": "entrepreneur" "nom": "entrepreneur" , "id": "client", "type": "SIGNER", "signataires": [ - "email": "[email protected]", "firstName": "Mary", "lastName": "Doe", "id": "client" - ], "nom": "client" "Exemple de contrat de nettoyage"
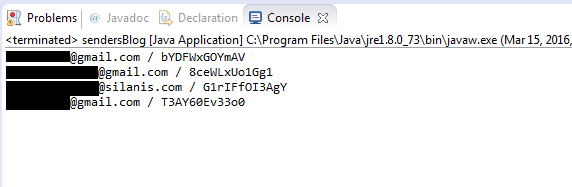
Exécution de votre code
Vous pouvez maintenant aller de l'avant et exécuter votre code. Vous devriez être en mesure de voir votre expéditeur nouvellement créé dans votre compte OneSpan Sign, comme mentionné dans le segment "Senders dans l'interface du jour". Pour les SDK Java et .NET, j'ai inclus le code qui imprime les e-mails et ids de l'expéditeur. Voici une capture d'écran de ce que la sortie ressemble.
Si vous avez des questions concernant ce blog ou toute autre chose concernant l'intégration de OneSpan Sign dans votre application, visitez les forums de la communauté des développeurs: https://developer.onespan.com. C'est moi qui l'ai fait. Merci de lire! Si vous avez trouvé ce message utile, s'il vous plaît le partager sur Facebook, Twitter, ou LinkedIn.
Haris Haidary
Évangéliste technique junior
LinkedIn - France Twitter (en)