OneSpan Signe Comment: Utilisation de facteur pour tester l'API oneSpan Sign

Postman est une application client HTTP conçue pour tester les services Web. En d'autres termes, il s'agit d'un outil utile pour le développement et la mise à l'essai d'API RESTful. Postman facilite le test, le développement et le document des API en permettant aux utilisateurs de mettre rapidement en place des demandes HTTP simples et complexes.
Il dispose d'une interface utilisateur très simple, propre et intuitive qui permet aux utilisateurs de commencer à construire et tester des appels API très rapidement. En outre, tous les appels API envoyés par Postman sont stockés dans l'histoire, ce qui vous permet de gagner du temps en éliminant la nécessité de retaper des appels API entiers. Enfin, le visualiseur de réponse vous permet de lire facilement la réponse renvoyée à partir de l'API à laquelle vous appelez. Dans ce blog, je vais vous montrer comment créer et envoyer un paquet en utilisant Postman.
Créer et envoyer un paquet
Si vous n'avez pas déjà Postman installé sur votre ordinateur, vous pouvez le télécharger gratuitement à partir du liensuivant .
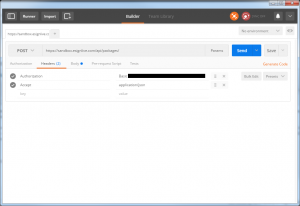
La première chose que vous voudrez faire est de sélectionner "POST" comme méthode HTTP et entrez "https://sandbox.esignlive.com/api/packages/" comme URL de demande. Ensuite, sélectionnez l'onglet En-têtes et ajoutez les deux en-têtes suivants :
Autorisation api_key de base
Accepter l'application/json
Assurez-vous de remplacer le api_key placeholder par votre propre valeur. Voici à quoi devrait ressembler votre facteur jusqu'à présent :
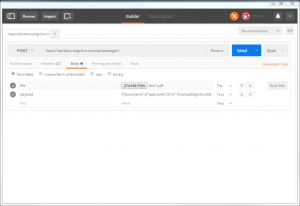
Ensuite, sélectionnez l'onglet Corps et choisissez les « données de forme » comme type de corps. Entrez « fichier » comme première clé et modifiez le type de valeur correspondant en « fichier ». Sélectionnez "Choisissez des fichiers" et naviguez sur le document que vous souhaitez télécharger. Ensuite, entrez "charge utile" comme deuxième clé et copier-coller l'exemple JSON ci-dessous:
{
  "documents": [
    {
      "approbations": [
        {
          "id": "ExempleSignatureId",
          "rôle": "Signer1",
          "champs": [
            {
              "page": 0,
              "top": 200,
              "sous-type": "LABEL",
              "hauteur": 50,
              "gauche": 100,
              "largeur": 200,
              "id": "myLabelField",
              "type": "INPUT",
              "valeur": "Exemple de valeur de champ d'étiquette"
            },
            {
              "page": 0,
              "top": 100,
              "sous-type": "FULLNAME",
              "hauteur": 50,
              "gauche": 100,
              "largeur": 200,
              "type": "SIGNATURE",
              "nom": "ExempleSignatureId"
            }
          ],
          "nom": ""
        }
      ],
      "id": "échantillon-contrat",
      "nom": "Test Document"
    }
  ],
  "statut": "DRAFT",
  "type": "PACKAGE",
  "rôles": [
    {
      "id": "Signer1",
      "type": "SIGNER",
      "signataires": [
        {
          "email": "[email protected]",
          "Prénom": "John",
          "LastName": "Smith",
          "id": "Signer1"
        }
      ],
      "nom": "Signer1"
    }
  ],
  "nom": "Exemple package"
}
Voici à quoi devrait ressembler votre onglet Corps :
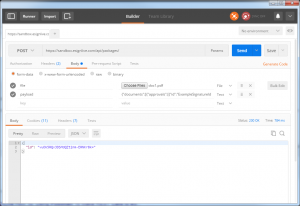
Maintenant, vous êtes prêt à envoyer votre demande. Cliquez sur le bouton Envoyer. OneSpan Sign vous retournera ensuite un id paquet en réponse, qui sera imprimé dans le visualiseur de réponse, comme indiqué ci-dessous :
Si vous avez des questions concernant ce blog ou toute autre chose concernant l'intégration oneSpan Sign dans votre application, visitez les forums de la communauté des développeurs: https://developer.OneSpan.com.
C'est moi qui l'ai fait. Merci de lire! Si vous avez trouvé ce message utile, s'il vous plaît le partager sur Facebook, Twitter, ou LinkedIn.
Haris Haidary
Évangéliste technique junior
LinkedIn - France Twitter (en)

OneSpan Sign Developer Community
Rejoignez la communauté OneSpan Sign Developer! Forums, blogs, documentation, téléchargements SDK, et plus encore.
Joignez-vous aujourd'hui