OneSpan Signe Comment: Champs d'injection

Avec OneSpan Sign, vous avez la possibilité de personnaliser votre document. Une des nombreuses façons de le faire est avec l'injection sur le terrain. Cette fonctionnalité estampille les valeurs directement sur le document pendant le téléchargement du document. Par exemple, un signataire peut avoir un numéro d'agent, et ce numéro d'agent doit apparaître dans le document final à côté de sa signature. En injectant le numéro d'agent d'un signataire sur le document, ce nouveau texte fera partie du document sous-jacent et ne pourra pas être falsifié.
Pour activer l'injection sur le terrain, vous aurez besoin d'un PDF avec des champs de formulaire. En outre, les noms de vos champs de formulaire dans votre FICHIER PDF doivent être les mêmes que les noms de champ injectés dans votre code. Notez que l'injection actuelle de données dans un document, à l'aide de OneSpan Sign, ne peut être effectuée que lors du téléchargement de votre document et ne peut être effectuée par l'intermédiaire de l'API / SDKs. Dans ce blog, je vais vous montrer comment utiliser les champs injectés avec le Java SDK, .NET SDK, et REST API.
Le code
Avec notre ensemble objectif, vous pouvez aller de l'avant et passer à la section qui s'applique à votre méthode. Je vais couvrir exactement le même contenu dans chaque segment. Le code complet pour ce blog peut être trouvé dans le Partage de Code Communautaire Développeur: Java, .NET, et REST.
Java SDK
Je vais commencer par le Java SDK. Dans mon exemple, j'ai choisi d'injecter des champs de texte car c'est probablement ce que vous finirez par faire. Cependant, vous pouvez injecter n'importe quel type de champ non lié que vous aimez. Vous pouvez trouver une liste complète des champs non liés de OneSpan Sign ici. Le code de l'échantillon ci-dessous vous montre comment modifier le bloc de document pour l'injection de champs de texte. La méthode withName() est l'endroit où vous entrez le nom de votre champ de formulaire PDF à qui vous souhaitez injecter du texte, tel qu'il est nommé dans votre formulaire PDF. La méthode withValue() est le texte que vous souhaitez tamponner sur votre document. Si vous avez besoin d'une comparaison avec la création d'objet de document de base ou si c'est la première fois que vous créez un package avec le Java SDK, consultez ce blog.
.withDocument(DocumentBuilder.newDocumentWithName("Contrat d'échantillon")
		.enableExtraction()
		.fromStream(fs, DocumentType.PDF)
		.withInjectedField (FieldBuilder.textField()
				.withName("Texte1")
				.withValue("200 E MAIN ST, PHOENIX AZ, 85123 USA"))
		.withInjectedField (FieldBuilder.textField()
				.withName("Text2")
				.withValue ("Lawn tondeuse"))
		.withInjectedField (FieldBuilder.textField()
				.withName("Text3")
				.withValue ("Engrais"))
		.withInjectedField (FieldBuilder.textField()
				.withName("Text4")
				.withValue("100"))
		.withInjectedField (FieldBuilder.textField()
				.withName("Text5")
				.withValue("12 12 12")))

OneSpan Sign Developer Community
Rejoignez la communauté OneSpan Sign Developer! Forums, blogs, documentation, téléchargements SDK, et plus encore.
Joignez-vous aujourd'huiSDK .NET Ensuite, je vais couvrir le .NET SDK. Dans mon exemple, j'ai choisi d'injecter des champs de texte car c'est probablement ce que vous finirez par faire. Cependant, vous pouvez injecter n'importe quel type de champ non lié que vous aimez. Vous pouvez trouver une liste complète des champs non liés de OneSpan Sign ici. Le code de l'échantillon ci-dessous vous montre comment modifier le bloc de document pour l'injection de champs de texte. La méthode withName() est l'endroit où vous entrez le nom de votre champ de formulaire PDF à qui vous souhaitez injecter du texte, tel qu'il est nommé dans votre formulaire PDF. La méthode withValue() est le texte que vous souhaitez tamponner sur votre document. Si vous avez besoin d'une comparaison avec la création d'objet document de base ou si c'est la première fois que vous créez un package avec le .NET SDK, voir ce blog.
. WithDocument (DocumentBuilder.NewDocumentNamed("contrat d'échantillon")
                . ActiverL'extraction()
                . FromStream(fs, DocumentType.PDF)
                . WithinjectedField (FieldBuilder.TextField()
                    . WithId ("Text1")
                    . WithName ("Text1")
                    . WithValue ("200 E MAIN ST, PHOENIX AZ, 85123 USA"))
                . WithinjectedField (FieldBuilder.TextField()
                    . WithId ("Text2")
                    . WithName ("Text2")
                    . WithValue ("Lawn tondeuse"))
                . WithinjectedField (FieldBuilder.TextField()
                    . WithId ("Text3")
                    . WithName ("Text3")
                    . WithValue («Engrais»))
                . WithinjectedField (FieldBuilder.TextField()
                    . WithId ("Text4")
                    . WithName ("Text4")
                    . AvecValue ("100"))
                . WithinjectedField (FieldBuilder.TextField()
                    . WithId ("Text5")
                    . WithName ("Text5")
                    . AvecValue ("12 12 12"))
API REST
Enfin, je vais passer en charge l'API REST. J'ai inclus le JSON qui créera votre paquet de documents avec des champs de texte injectés pour plus de commodité. Dans mon exemple, j'ai choisi d'injecter des champs de texte car c'est probablement ce que vous finirez par faire. Cependant, vous pouvez injecter n'importe quel type de champ non lié que vous aimez. Vous pouvez trouver une liste complète des champs non liés de OneSpan Sign ici. Notez également que les cases à cocher et les boutons radio sont simplement des cases à cocher avec une valeur « X » lorsqu'elles sont sélectionnées. L'exemple JSON ci-dessous vous montre comment modifier l'objet document pour l'injection de champs de texte. Dans l'objet des champs, l'attribut de nom est l'endroit où vous entrez le nom de votre champ de formulaire PDF à lequel vous souhaitez injecter du texte. L'attribut de valeur est l'endroit où vous entrez le texte que vous souhaitez injecter sur votre document. Si vous avez besoin d'une comparaison avec la création d'objets de document de base ou si c'est la première fois que vous créez un package avec l'API REST, consultez ce blog.
{
  "documents": [
    {
      "champs": [
        {
          "valeur": "200 E MAIN ST, PHOENIX AZ, 85123 USA",
          "nom": "Texte1"
        },
        {
          "valeur": "Lawn tondeuse",
          "nom": "Texte2"
        },
        {
          "valeur": "Engrais",
          "nom": "Text3"
        },
        {
          "valeur": "100",
          "nom": "Text4"
        },
        {
          "valeur": "12 12 12",
          "nom": "Texte5"
        }
      ],
      "extrait": vrai,
      "nom": "Contrat d'échantillon"
    }
  ],
  "type": "PACKAGE",
  "statut": "DRAFT",
  "rôles": [
    {
      "id": "client",
      "index": 0,
      "type": "SIGNER",
      "signataires": [
        {
          "email": "[email protected]",
          "Prénom": "John",
          "LastName": "Smith",
          "id": "client"
        }
      ],
      "nom": "client"
    },
    {
      "id": "entrepreneur",
      "index": 1,
      "type": "SENDER",
      "signataires": [
        {
          "email": "[email protected]",
          "premier nom": "Haris",
          "dernier nom": "Haidary",
          "id": "entrepreneur"
        }
      ],
      "nom": "entrepreneur"
    }
  ],
  "nom": "Field Injection Exemple"
}
Exécution de votre code
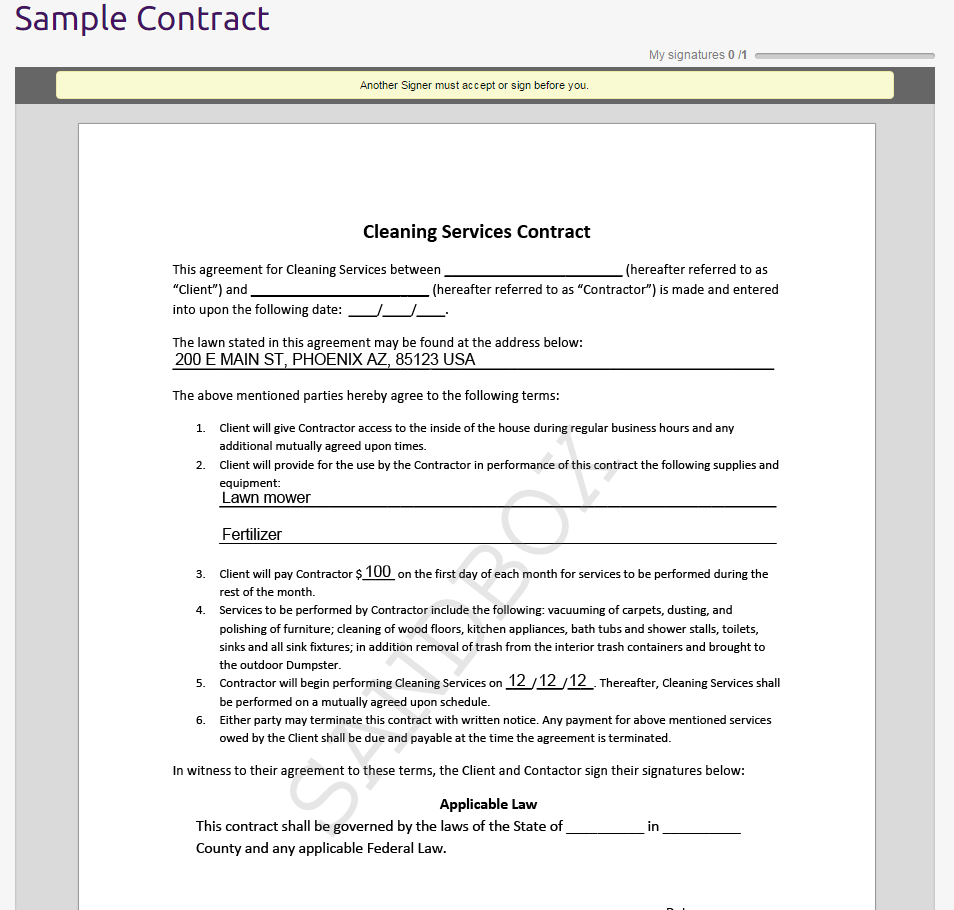
Une fois que vous avez exécuté votre code, si vous vous connectez à OneSpan Sign, vous devez trouver les champs de texte appropriés estampillés dans le document dans votre paquet de documents OneSpan Sign, comme on peut le voir ci-dessous.
Si vous avez des questions concernant ce blog ou quoi que ce soit d’autre concernant l’intégration OneSpan Sign dans votre application, visitez les forums communautaires développeur: https://community.onespan.com. C'est moi qui l'ai fait. Merci de lire! Si vous avez trouvé ce message utile, s'il vous plaît le partager sur Facebook, Twitter, ou LinkedIn.
Haris Haidary
Évangéliste technique junior
LinkedIn - France Twitter (en)