Signe OneSpan pour les nouveaux utilisateurs: Comment créer et envoyer votre premier paquet (Java SDK)

Mes premiers blogs quelques couverts la création, l’envoi , la signature, l’archivage, et la visualisation du résumé des preuves d’un paquet OneSpan Sign Document, en utilisant l’interface uI. Avec cela complet, il est maintenant temps d'entrer dans les API. Ma principale langue d'utilisation au cours des 7 dernières années et de l'école a été Java, donc je vais commencer avec le Java SDK.
Si vous n'avez pas de compte Sandbox, s'il vous plaît voir mon premier blog. Sinon, continuez, ci-dessous.
Exigences
Tout d'abord, nous allons couvrir quelques exigences pour suivre avec ce blog.
Téléchargement du Java SDK
Avant que nous puissions utiliser le Java SDK, vous devrez le télécharger. Sur le lien suivant, vous trouverez des liens vers le téléchargement Java SDK, le Java Doc JavaDoc et les exemples Java GitHub. Vous verrez également des téléchargements et des informations pour le .NET SDK et Mobile SDK.
Téléchargement d'un Java IDE
Je vais utiliser l'Eclipse IDE dans ce blog. Vous pouvez utiliser un autre, mais tout dans ce blog sera décrit en utilisant Eclipse. Voici un lien pour télécharger Eclipse. J'utilise le "Eclipse pour Java et Les développeurs de rapports" parce que je l'utilise pour l'outil de rapport BIRT, plus tard dans cet exemple.
Allez-y et installez Eclipse en décomplaçant le fichier zip à votre emplacement préféré. J'ai choisi "C:/Eclipse/".

OneSpan Sign Developer Community
Rejoignez la communauté OneSpan Sign Developer! Forums, blogs, documentation, téléchargements SDK, et plus encore.
Joignez-vous aujourd'huiCréer et envoyer un paquet
Maintenant que nous avons tous les éléments essentiels pour terminer le tutoriel, nous pouvons aller de l'avant et commencer.
Créer et configurer un projet Java
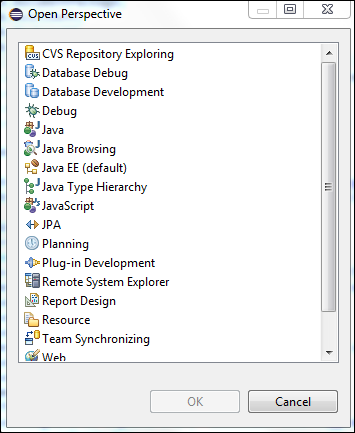
Ouvrez Eclipse en exécutant eclipse.exe à partir de la racine "éclipse" dossier. Une fois qu'il a démarré: si elle n'est pas déjà ouverte, ouvrez la perspective Java. Vous pouvez le faire en allant à la fenêtre - Perspective ouverte - Autre ... - Java.
Une fois que vous avez la perspective Java ouverte, vous devriez voir une vue appelée "Package Explorer" sur le côté gauche de l'écran. Cliquez à droite à l'intérieur de cette fenêtre et aller à Nouveau - Java Project. Cela ouvrira une fenêtre comme celle ci-dessous:

Nommez votre projet ce que vous voulez. J'ai utilisé, "CreateAndSendPackage". Puis, frappez ensuite.
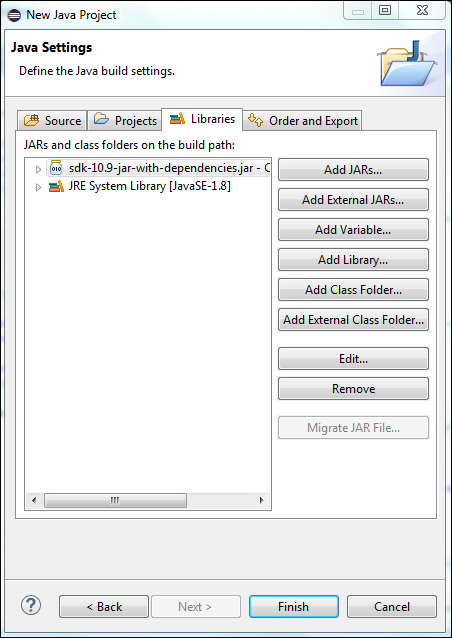
Choisissez l'onglet Bibliothèques, cliquez sur le "Add External JARs..." bouton, naviguez vers l'endroit où vous avez enregistré votre SDK, et sélectionnez le pot "sdk--jar-with-dependencies". Après avoir sélectionné "Open", vous verrez que le pot SDK a été ajouté à votre chemin de construction.
Sélectionnez Finition.
Votre nouveau projet a été ajouté à votre vue Package Explorer.
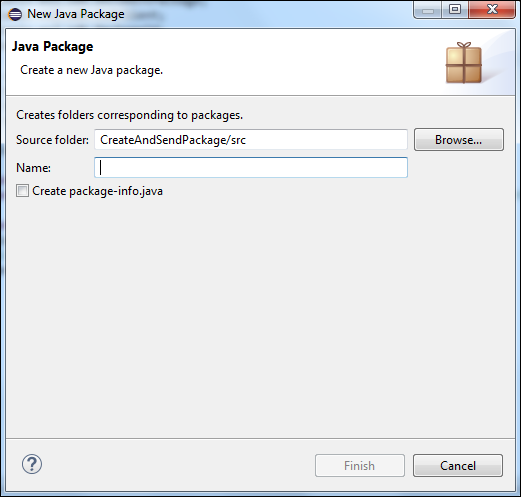
Élargissez le paquet en cliquant sur la flèche vers la gauche, cliquez à droite sur le dossier "src" et allez à Nouveau - Paquet. Entrez ce que vous voulez pour le nom du paquet. J'ai entré "com.esignlive.example". Sélectionnez Finition.
Cliquez à droite sur votre nouveau package dans l'Explorer de paquet et allez à nouveau -' Fichier pour créer un nouveau fichier Java. Entrez un nom pour le fichier. J'ai nommé le fichier, "SimpleCreateAndSendPackage.java". Sélectionnez Finition.
Enfin, ajoutez un exemple de fichier PDF que vous souhaitez avoir signé à votre projet avec un simple copier-coller de votre système de fichiers dans votre projet dans l'explorateur paquet. J'ai utilisé BIRT (Projet de rapport Eclipse) pour créer l'exemple d'accord PDF qui est utilisé dans ce blog.
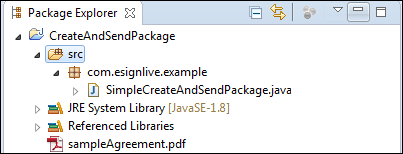
Cela complète la configuration et la configuration. Votre projet devrait maintenant ressembler à ceci :
Vous êtes maintenant prêt à écrire le code dans votre classe Java.
Le code
Ouvrez votre fichier "SimpleCreateAndSendPackage.java" dans Eclipse. Copiez le code ci-dessous dans l'éditeur de fichiers. Nous discuterons du code plus en détail, plus bas.
paquet com.esignlive.exemple;

import com.silanis.esl.sdk.DocumentPackage;
import com.silanis.esl.sdk.EslClient;
import com.silanis.esl.sdk.PackageId;
import com.silanis.esl.sdk.SessionToken;

import static com.silanis.esl.sdk.builder.DocumentBuilder.newDocumentWithName;
import static com.silanis.esl.sdk.builder.PackageBuilder.newPackageNamed;
import static com.silanis.esl.sdk.builder.SignatureBuilder.signatureFor;
import static com.silanis.esl.sdk.builder.SignerBuilder.newSignerWithEmail;

classe publique SimpleCreateAndSendPackage (en)

    finale statique publique String API_KEY "";
    finale publique statique string API_URL - "https://sandbox.esignlive.com/api";
    USE https://apps.e-signlive.com/api POUR PRODUCTION

    public statique vide principal( String[] args )
        EslClient eslClient - nouveau EslClient ( API_KEY, API_URL);
        Construire l'objet DocumentPackage
        DocumentPackage documentPackage - newPackageNamed( "Test Package API" )
                .withSigner( newSignerWithEmail( "[email protected]" )
                        .withCustomId( "Signer" )
                        .withFirstName ( "SignerFirstName" )
                        .withLastName ( "SignerLastName" ) ) )
                .withSigner( newSignerWithEmail( "[email protected]" )
                        .avecFirstName ( "YourFirstName" )
                        .withLastName ( "YourLastName" ) ) )
                .withDocument( newDocumentWithName( "sampleAgreement" )
                        .fromFile( "sampleAgreement.pdf" )
                        .withSignature( signaturePour( "[email protected]" )
                                .onPage( 0 )
                                .atPosition( 175, 165 ) ) )
                        .withSignature( signaturePour( "[email protected]")
                        		.onPage( 0 )
                        		.atPosition( 550, 165 ))))
                .construire();

        Émettre la demande au serveur OneSpan Sign pour créer le DocumentPackage
        PackageId packageId - eslClient.createPackage ( documentPackage);

        Envoyer le paquet à signer par les participants
        eslClient.sendPackage ( packageId);
    }
}
Vous verrez dans la première ligne de la classe que vous aurez besoin de votre clé API. Pour trouver ceci, connectez-vous à votre compte OneSpan Sign et cliquez sur "ACCOUNT" à partir du menu supérieur. Votre clé API y est répertoriée. Par défaut, la valeur est cachée. Sélectionnez "Unlock" pour afficher la valeur. Maintenant, remplacez par votre valeur clé API.
La ligne suivante est le API_URL. Si vous utilisez le Sandbox, comme moi, l'URL correcte est déjà en place. Si en production, vous devez utiliser l'URL commentée.
Parce que c'est un exemple très basique, le reste du code est également dans la méthode principale.
EslClient eslClient - nouveau EslClient ( API_KEY, API_URL);La ligne de code ci-dessus crée notre client De signe OneSpan à l’aide de la clé API de votre compte OneSpan Sign et de l’URL API appropriée que vous avez définie ci-dessus.
Le prochain bloc de code est l'endroit où vous créez réellement le paquet de documents. Dans ce bloc, vous donnez un nom à votre colis.
DocumentPackage documentPackage - newPackageNamed( "Test Package API" )Ensuite, deux signataires sont ajoutés au paquet. L'un étant vous-même et l'autre étant la personne à qui vous allez envoyer le colis pour signature. Dans ce bloc, vous remplacerez les adresses e-mail et les noms par vos informations de test.
.withSigner( newSignerWithEmail( "[email protected]" )
        .withCustomId( "Signer" )
        .withFirstName ( "SignerFirstName" )
        .withLastName ( "SignerLastName" ) ) )
.withSigner( newSignerWithEmail( "[email protected]" )
        .avecFirstName ( "YourFirstName" )
        .withLastName ( "YourLastName" ) ) )
Nous ajoutons notre document à signer et plaçons également les blocs de signature pour nos signataires. Encore une fois, n'oubliez pas de remplacer les valeurs de l'échantillon dans ce bloc avec vos informations de test.
.withDocument( newDocumentWithName( "sampleAgreement" )
        .fromFile( "sampleAgreement.pdf" )
        .withSignature( signaturePour( "signers.email.com" )
                .onPage( 0 )
                .atPosition( 175, 165 ) ) )
        .withSignature( signaturePour( "your.email.com")
                .onPage( 0 )
                .atPosition( 550, 165 ))))
Enfin, nous construisons notre paquet.
.construire();Maintenant que l’objet du paquet de documents est prêt, nous pouvons accéder à notre client OneSpan Sign, créer notre paquet et l’envoyer aux signataires.
Émettre la demande au serveur OneSpan Sign pour créer le DocumentPackage
PackageId packageId - eslClient.createPackage ( documentPackage);

Envoyer le paquet à signer par les participants
eslClient.sendPackage ( packageId);
Exécution du Code
Une fois votre classe Java terminée, vous pouvez aller de l'avant et exécuter votre application simple. Il ya quelques façons que vous pouvez le faire à partir d'Eclipse. Dans la barre d'outils, vous pouvez sélectionner le bouton d'exécution, vous pouvez sélectionner Exécuter - ' Exécuter à partir de la barre de menu, ou vous pouvez cliquer à droite sur votre classe Java dans l'Explorer de paquet et choisir Run As - Application Java.
Félicitations! Vous avez maintenant créé et envoyé un paquet avec le Java SDK. Si vous allez vérifier notre boîte de réception de compte OneSpan Sign Sandbox, vous verrez que le paquet a été créé et en attente de signature.

Merci pour la lecture! Si vous avez des questions, n'hésitez pas à poster des questions dans la section commentaires. La prochaine fois, je vais continuer avec ce qui se passe ensuite avec ce paquet, comme, montrant comment vérifier l'état d'un paquet et le téléchargement du paquet complété. Si vous voulez aller de l'avant et jouer avec les API un peu plus, jetez un oeil à la documentation et les exemples disponibles. Vous trouverez des liens à l'emplacement que nous avons téléchargé le SDK, ci-dessus. Liens vers tous les messages de cette série de blog peut être trouvé, ci-dessous.
Michael Williams
Twitter - France Facebook - France LinkedIn (en)
OneSpan Sign for New Users Blog Series
- Créer et envoyer un paquet à l'aide de l'interface triique
- Vous avez envoyé un paquet, qu'est-ce que maintenant? (UI)
- Créer et envoyer un paquet avec le Java SDK
- Vérifiez l'état du paquet et téléchargez des fichiers avec le Java SDK
- Créez et envoyez un paquet avec le SDK .NET
- Vérifiez l'état du paquet et téléchargez des fichiers avec le SDK .NET
- Créer et envoyer un paquet à l'aide de REST avec C #
- Vérifier l'état du paquet et télécharger des fichiers à l'aide de REST avec C #
- Créer et envoyer un paquet à l'aide de REST avec Java
- Vérifiez l'état du paquet et téléchargez des fichiers à l'aide de REST avec Java