How to Onboard a Notary
1. The Admin section allows administrators to onboard a notary from a single location without having to switch between accounts. After being onboarded to OneSpan Notary, the notary can complete their commission details in a self-service section quickly and easily.
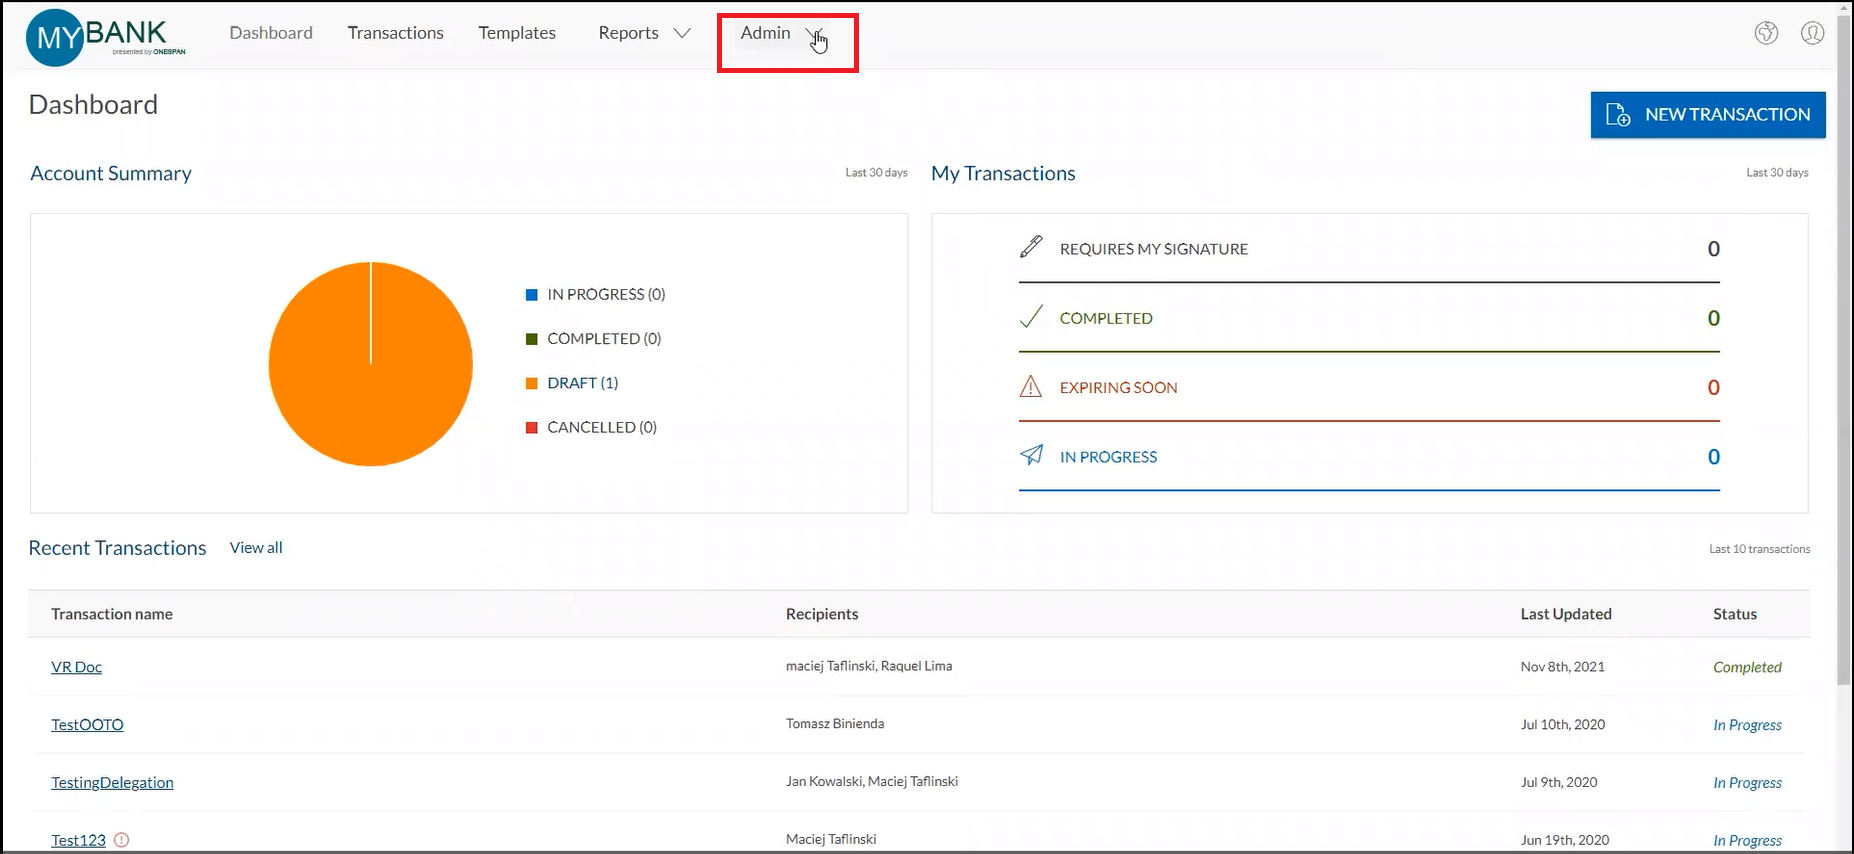
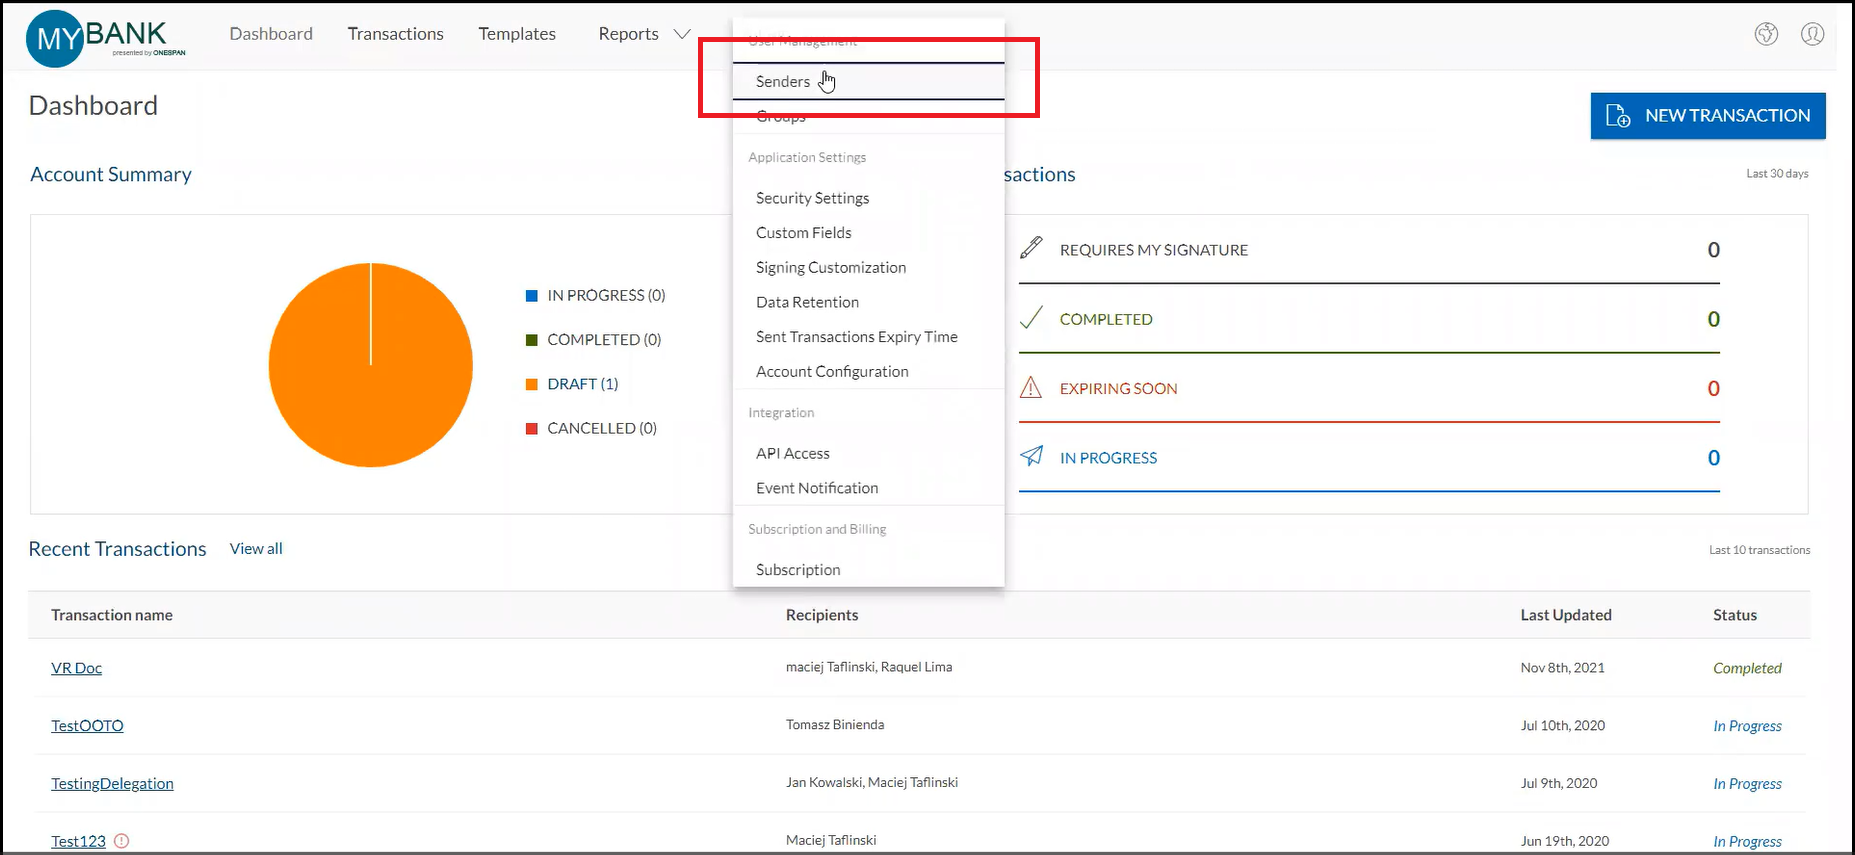
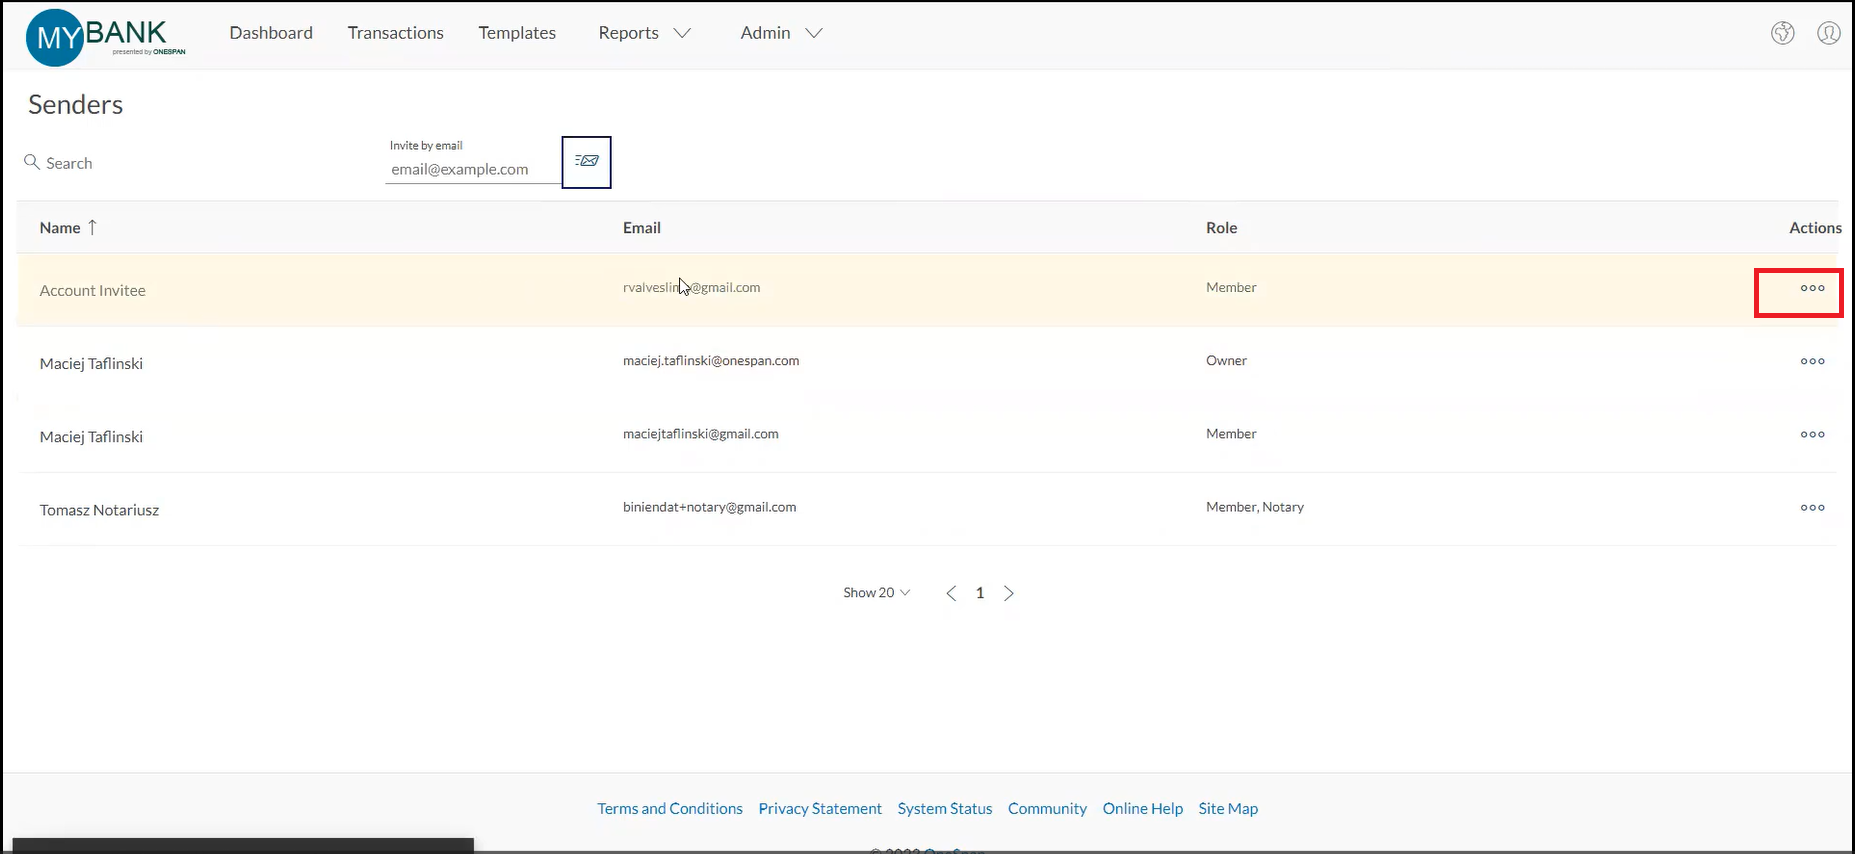
2. As the administrator for your organization’s OneSpan Sign account, access the Admin section from the top menu and select ‘Senders’.
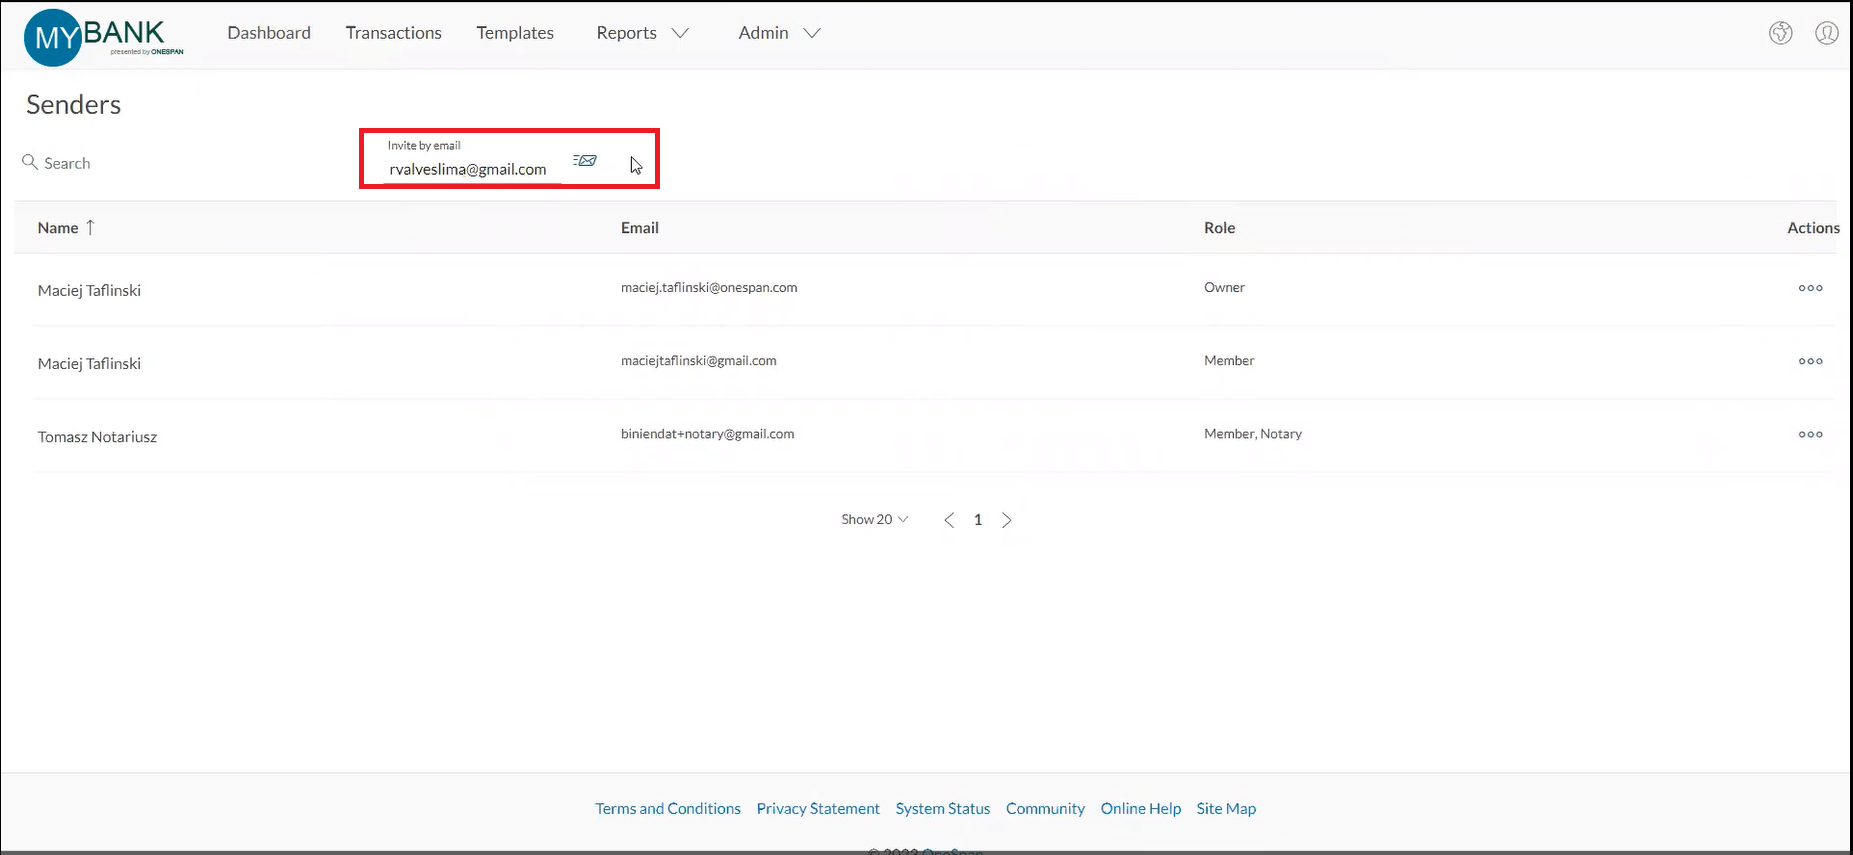
3. Enter the email address of the Notary you would like to add to OneSpan Notary. Click the envelope icon to send an invitation to the Notary inviting them to register their account.
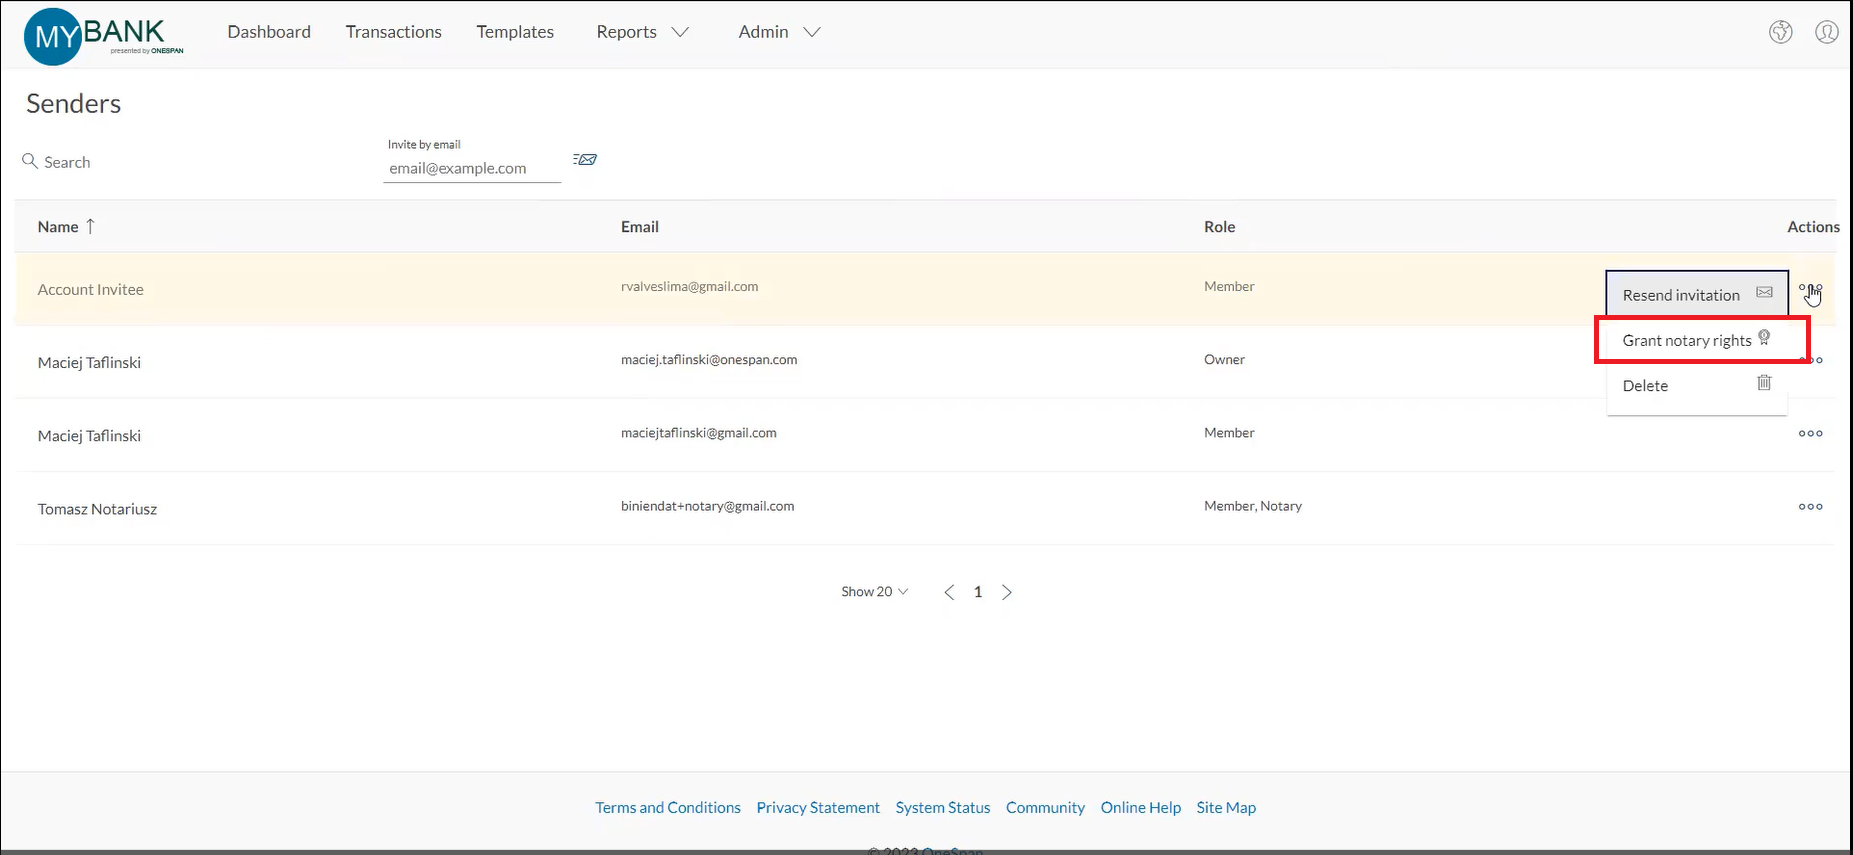
4. In the actions section, select ‘Grant notary rights’ and confirm that you want to grant notary rights to the notary.
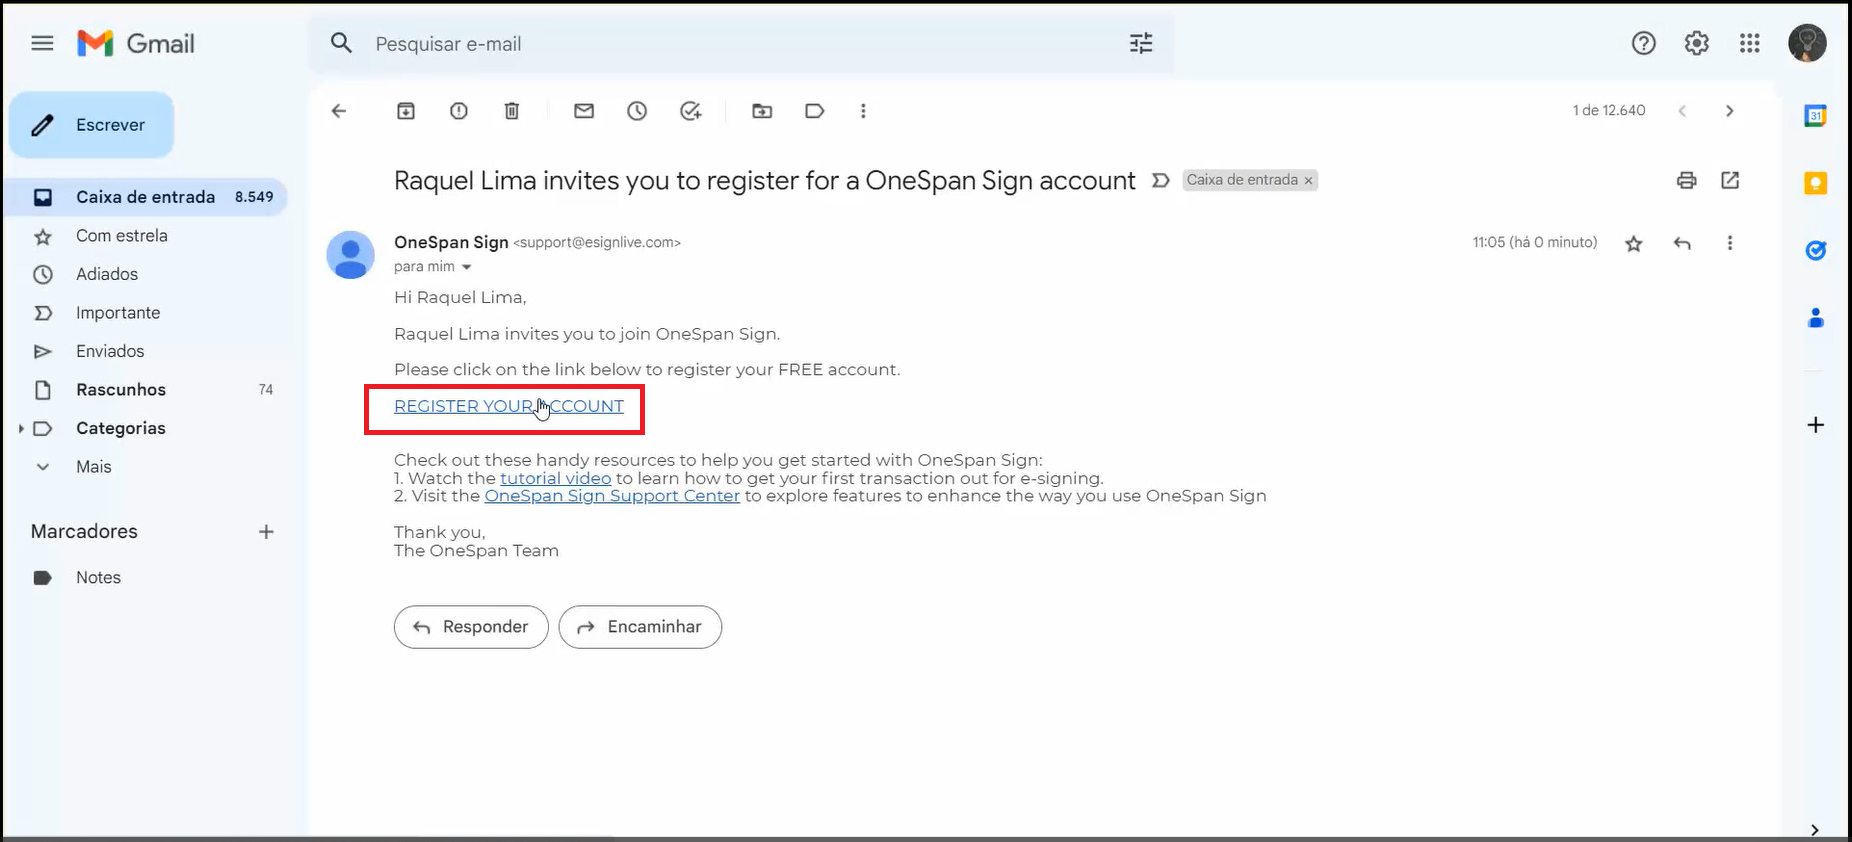
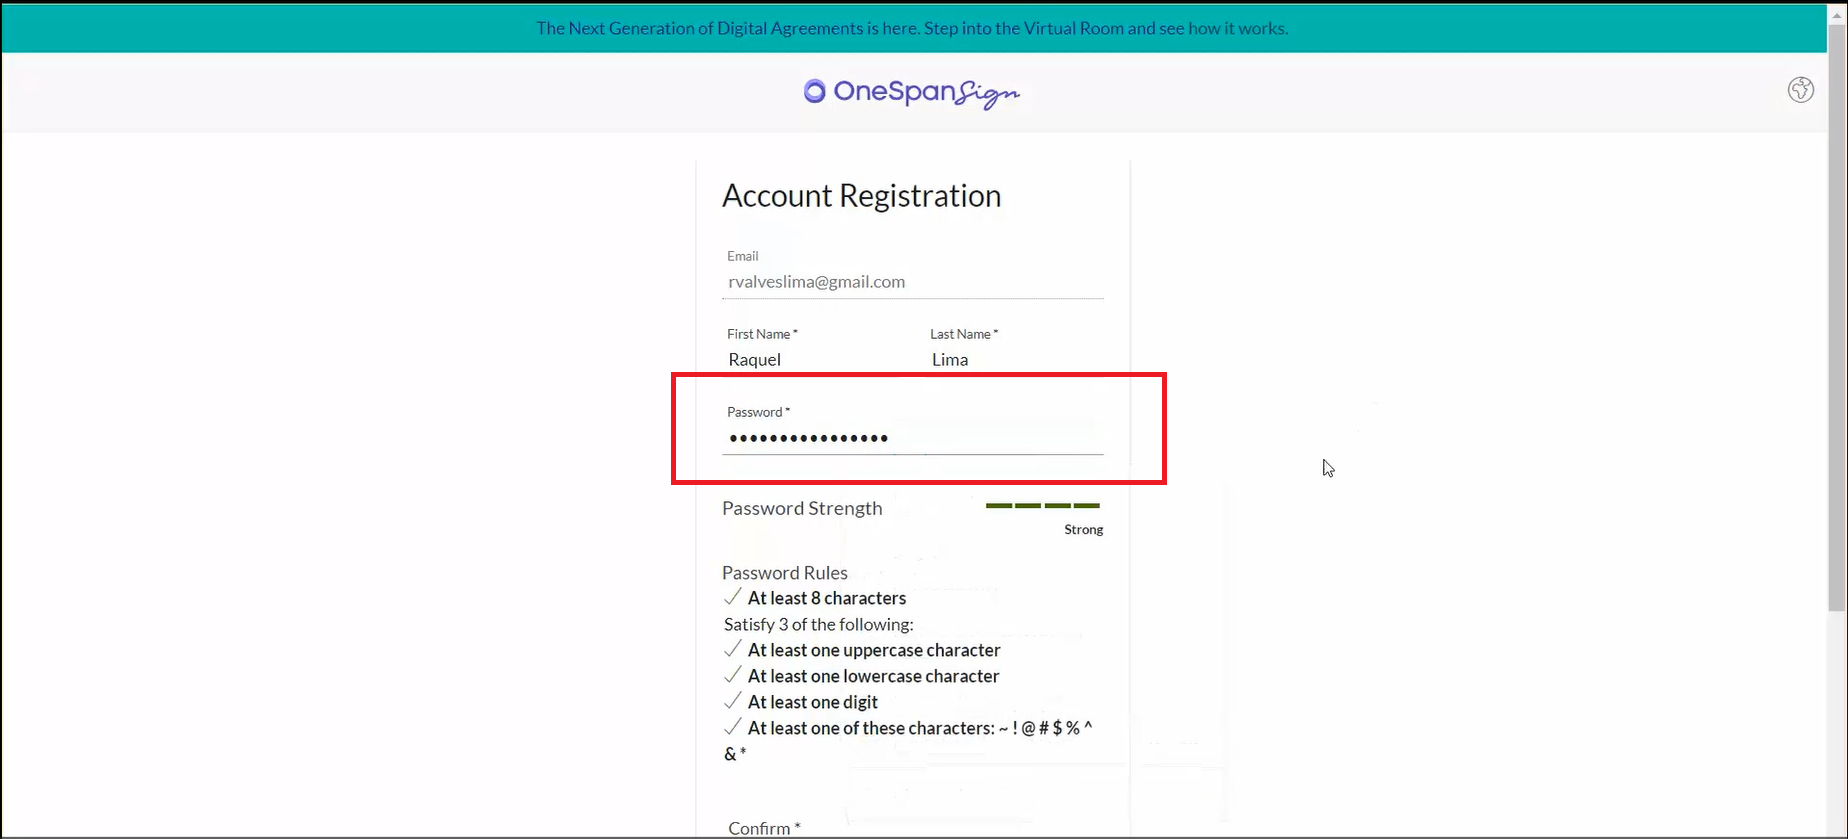
5. An email invite is sent to the Notary inviting them to register for a OneSpan Sign account. The notary registers their account by creating a password to access OneSpan Notary.
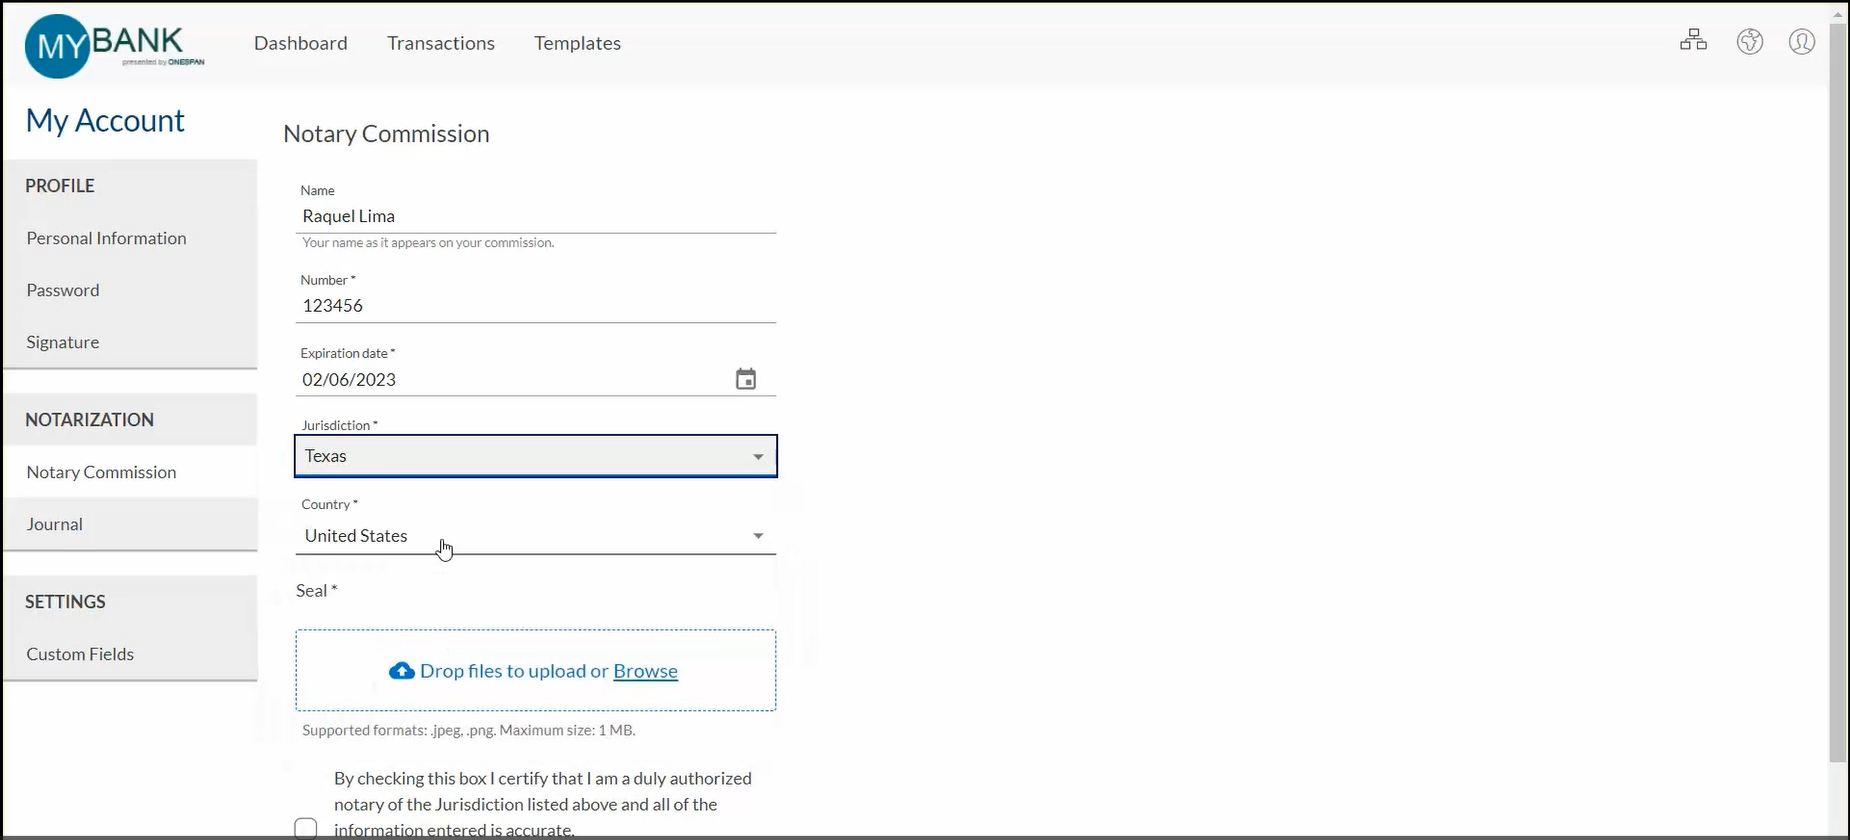
6. Next, the notary is brought to the ‘My Account’ section to fill in their account details such as their name, notary commission number, commission expiration date, jurisdiction, country, and to upload their notary seal.
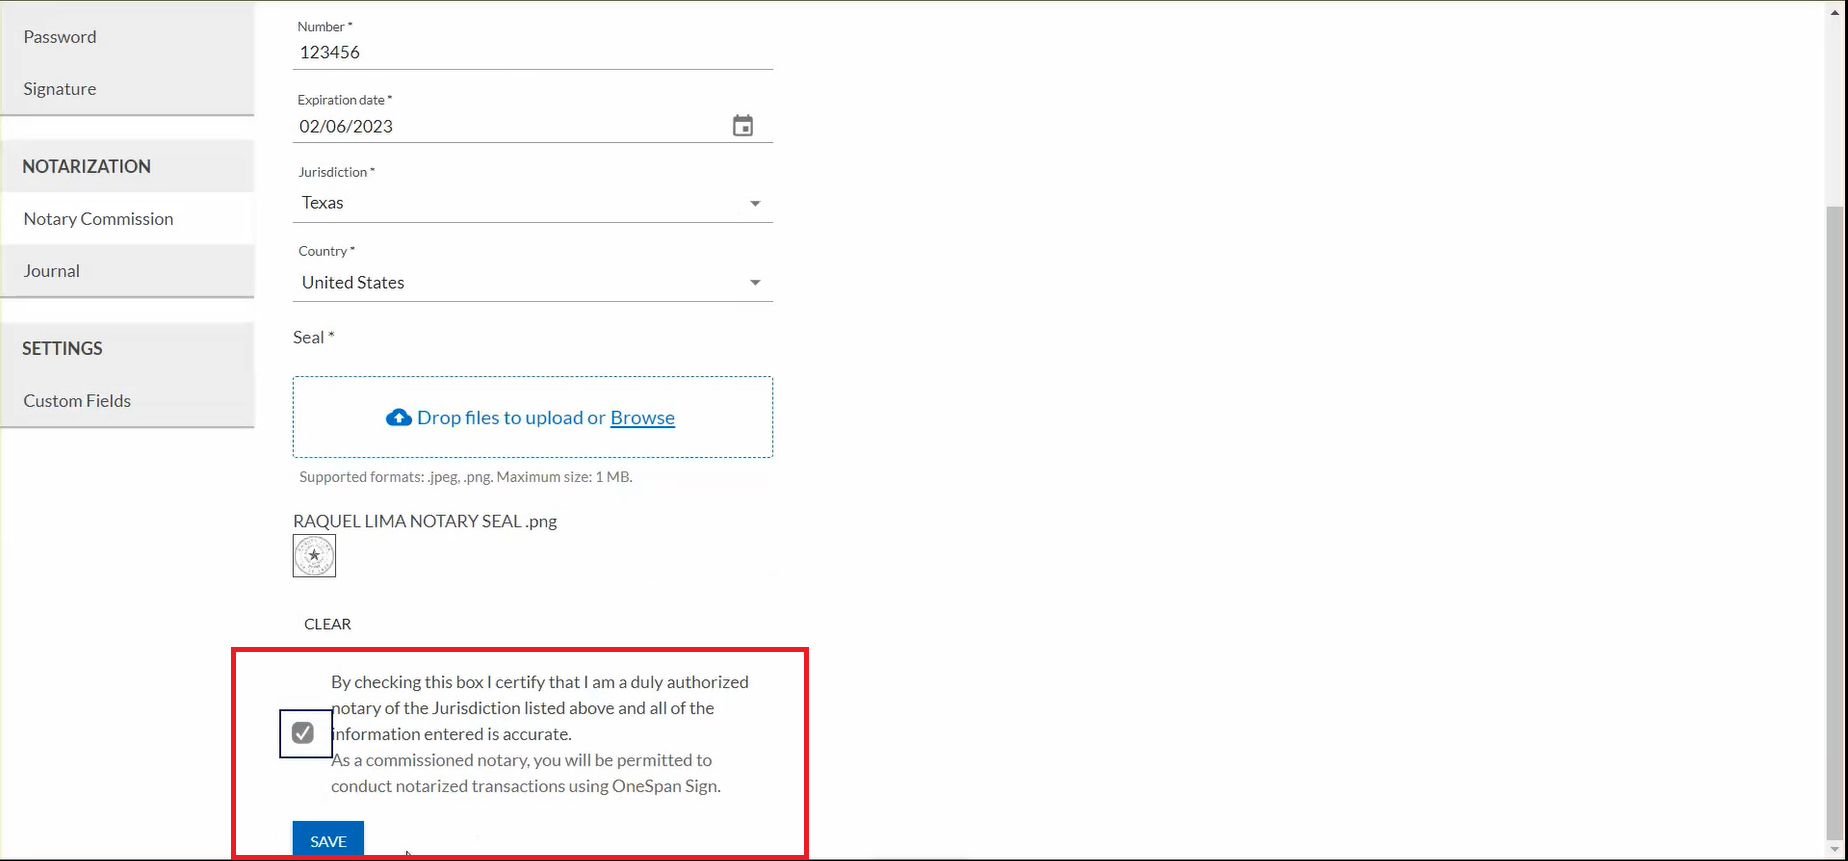
7. The notary confirms the information they have entered is accurate and then clicks ‘Save’ .
FAQs
How do I add my Notary certificate?
Many jurisdictions may require a notary to obtain a Basic Assurance Digital Certificate to authenticate their identity prior to conducting a remote online notary session.
A notary can obtain a Digital Certificate through a trusted third-party provider such as IdenTrust. It usually takes about a day for IdenTrust to issue the Digital Certificate. The notary should then install the Digital Certificate on the device which they will use for notarization by following the instructions provided by IdenTrust. Learn more about OneSpan’s partnership with IdenTrust: https://www.identrust.com/partners/onespan
How do I get my digital seal as a Notary?
You can upload your digital seal as a simple .PNG or .JPEG file. The digital seal can be purchased from the National Notary Association. https://www.nationalnotary.org/electronic-notary-seal
How do I register OneSpan as my RON tech provider?
Depending on your jurisdiction you may need to register OneSpan Notary as your remote online notarization (RON) tool with your Secretary of State (SOS). If you need to complete this step, you will need to provide a description of the OneSpan Notary software. Some states may also require details about the computer hardware you will use. See proposal below:
I would like to notify that I’ll be using the OneSpan Notary Solution.
OneSpan Notary enables organizations to accommodate both in-person electronic notarizations (IPEN) and remote online notarizations (RON), in a secure and trusted way that facilitates RON regulatory compliance. Notaries can verify the identity of signers using various authentication methods (e.g. identity verification based on government-issued ID and dynamic knowledge-based authentication based on out-of-wallet questions), collect electronic signatures, and notarize agreements all in a secure and trusted environment.
OneSpan Notary takes the notarized documents and tamper seals the e-signed PDF providing a secure and self-contained document. OneSpan Notary is a SaaS Service that provides the digital tools and the training needed to enable commissioned Notaries employed by business entities to perform remote online notarizations.
OneSpan Notary includes the following capabilities:
- Web-based e-signing process powered by OneSpan Sign (i.e. OneSpan’s electronic document signing solution) that provides options for the presentation and review of documents, methods of signature capture and user authentication, data capture and form fields.
- Workflows, reminders and notifications, attachments and e-delivery of the documents to participants.
- Electronically signed documents in standard PDF format with each esignature digitally signed for comprehensive security and detection of any document changes along with an embedded audit trail.
- Secure videoconferencing technology for live communication.
- OneSpan Notary uses co-browsing technology to ensure all participants in the notary session are viewing the same documents, and all signatures and changes to the record are made in real time.
- An Evidence Summary Report is provided for the remote online notarization and both the electronic evidence and summary are protected by digital signing.
- Identity verification capabilities that incorporate the components necessary to facilitate the automated verification of a participant’s identity.
- Notarization capabilities including, but not limited to, Notary onboarding managed by their organizations, set up notary profiles, the Notarial electronic journal, digital certificates, ability to upload notarial seal, and participant authentication.
The personal hardware I will use consists of a <<Add your Hardware details here>>
How do I get my RON commission?
Before you can perform remote online notarization with OneSpan Notary, you must be commissioned as a remote online notary in your state. The National Notary Administration (NNA) explains how to earn a commission.
When you apply for your RON commission, you may need to describe the technology you will use.
After the state certifies you to perform notarizations, you will need to enter your commission information on the SenderUI Commission page in OneSpan Notary.
What are the steps I must follow to be a RON notary?
- Become a notary registered and seated in a state that has active remote online notarization legislation.
- Be invited to join an organization as a notary to carry out notarizations for that organization.
- Activate your notary profile via the activation email sent to their email address.
- Depending on your jurisdiction, you may be required to obtain a Basic Assurance Digital Certificate from a trusted vendor, such as IdenTrust, and install it on the device you will use to carry out RON.
Can I just use videoconferencing software to perform online notarization?
No, RON regulations across the United States require strong electronic evidence that captures the end-to-end notarization process. RON requirements cannot be satisfied by using only videoconferencing software or patching together different technology components to build an in-house notary solution. You can read more about RON requirements in this blog.
How to Configure a RON Transaction
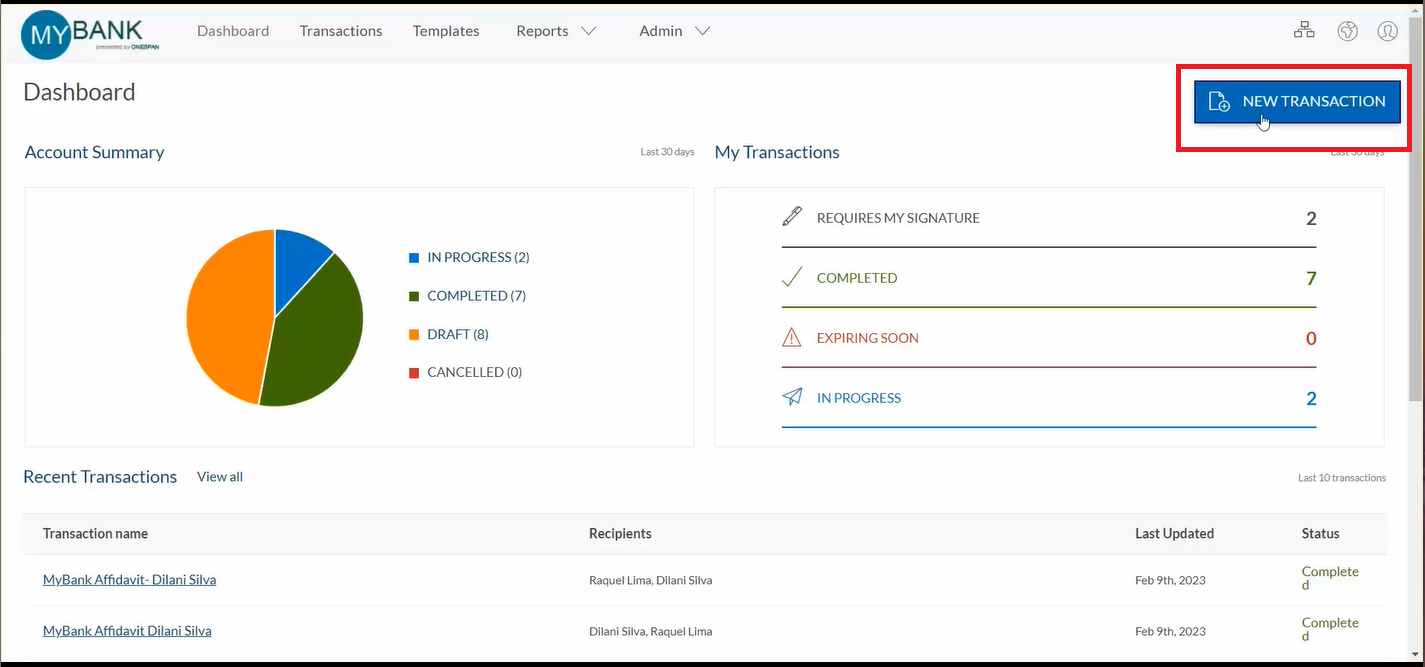
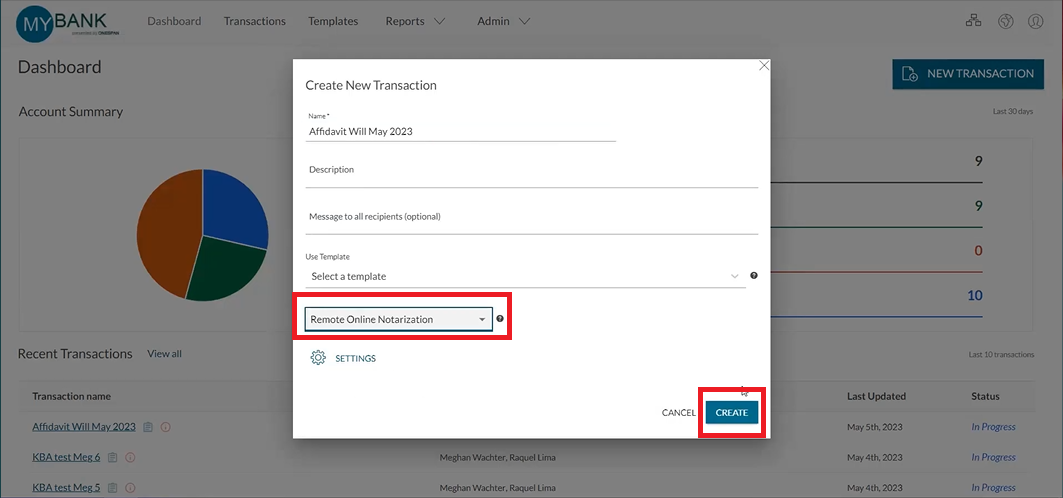
1. To begin, the notary selects ‘New Transaction’ and enters a name for the transaction.
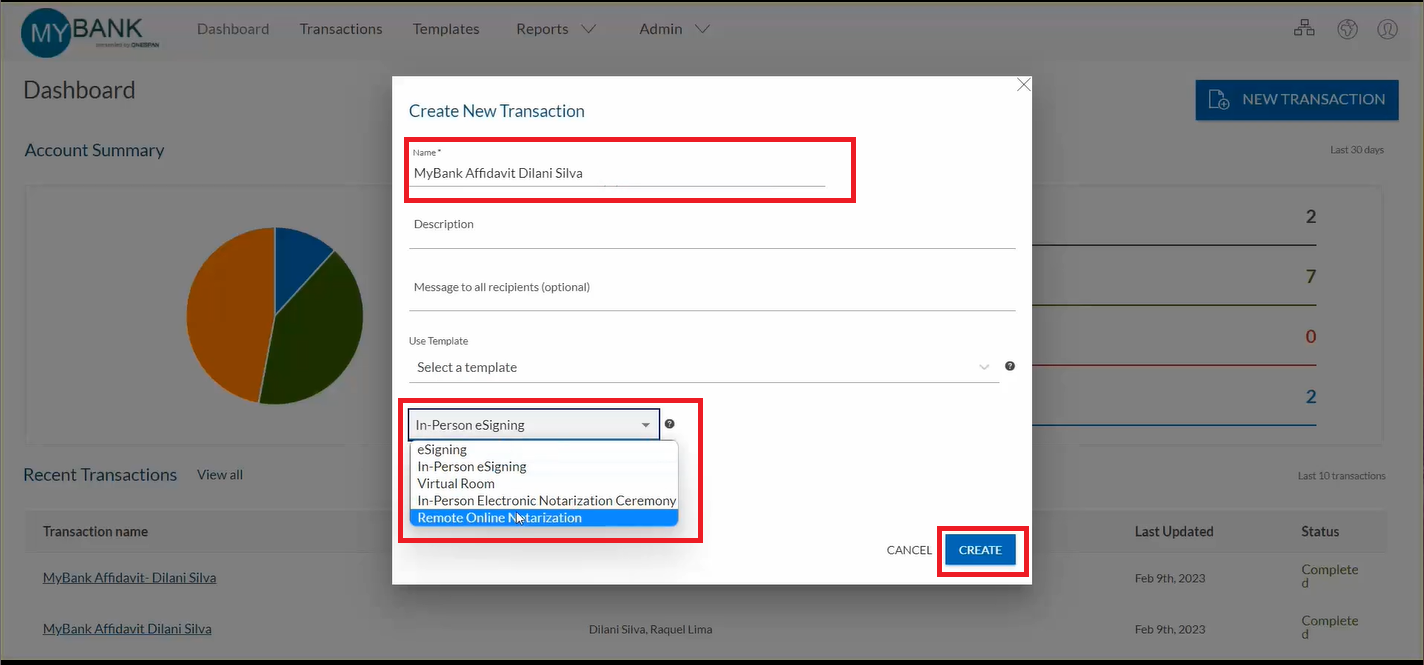
2. The notary selects ‘Remote Online Notarization’ then clicks the ‘Create’ button to proceed.
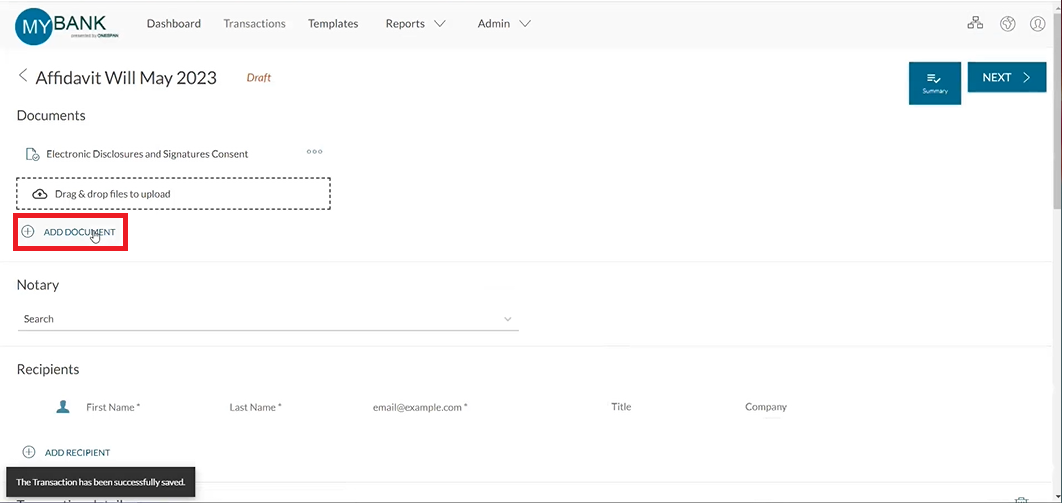
3. The notary then adds the document. In this example, an affidavit requires e-signing and notarizing.
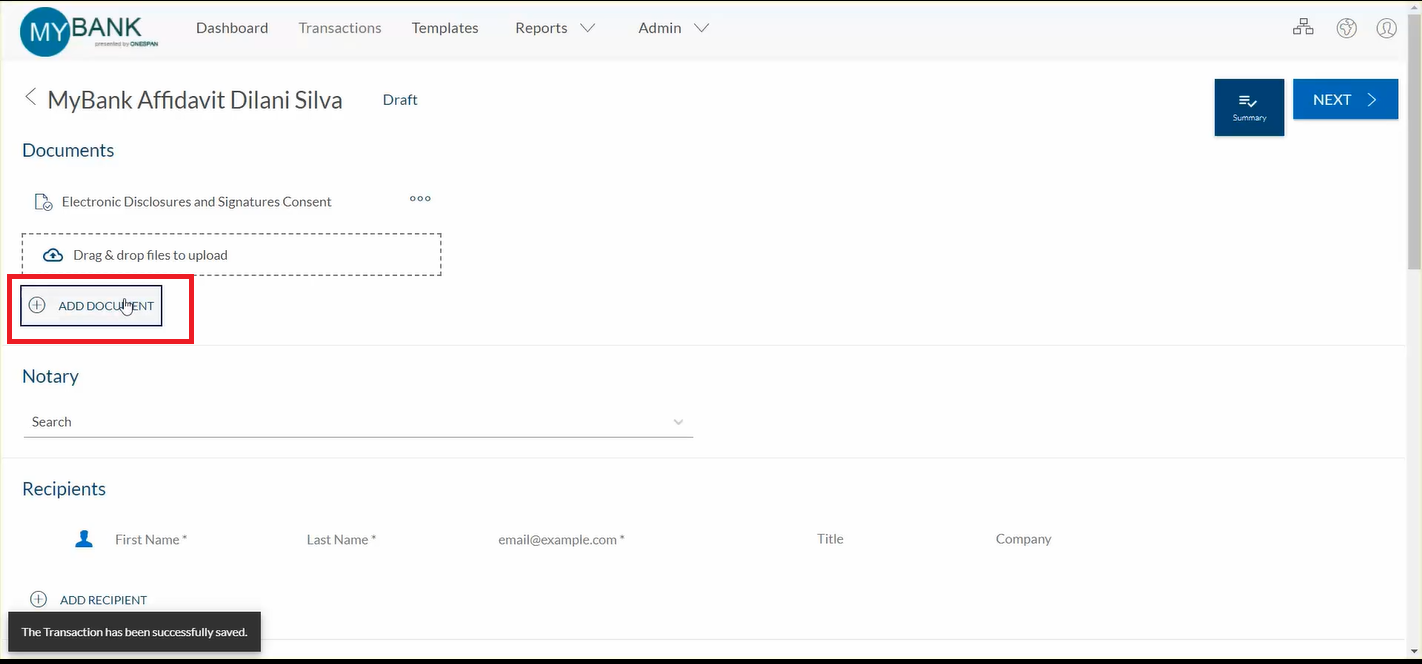
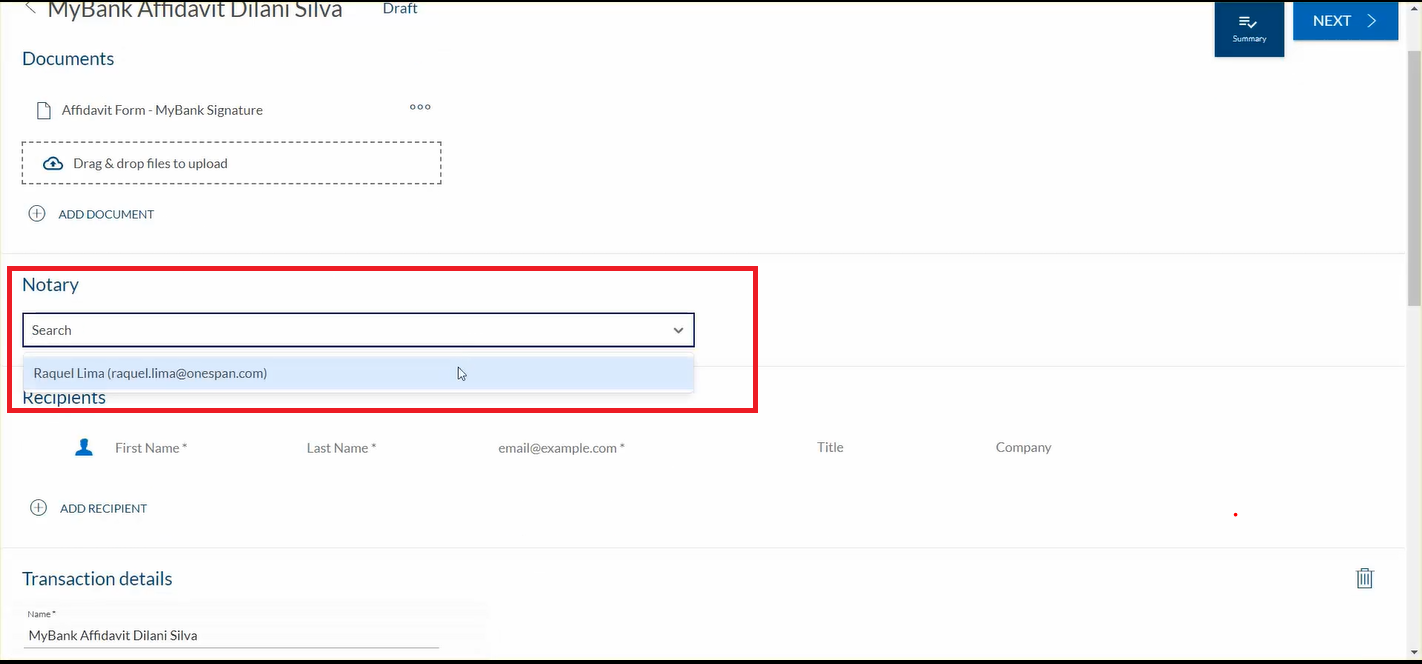
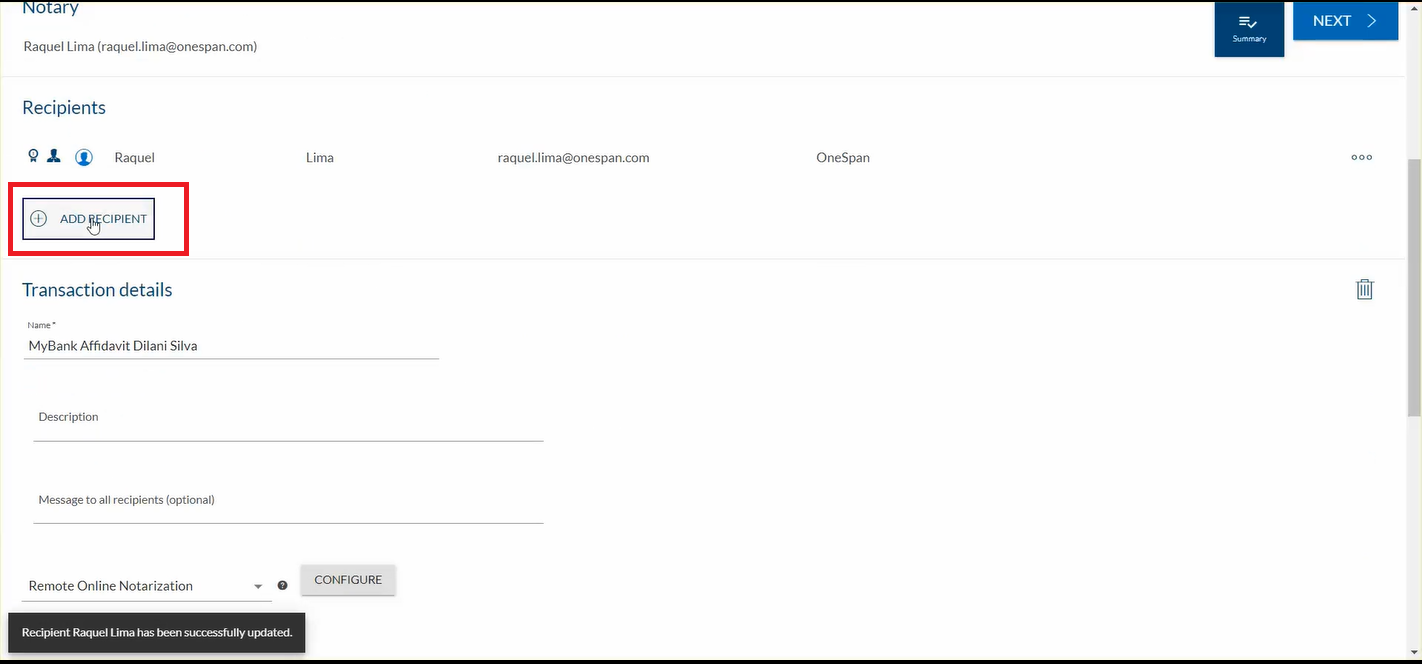
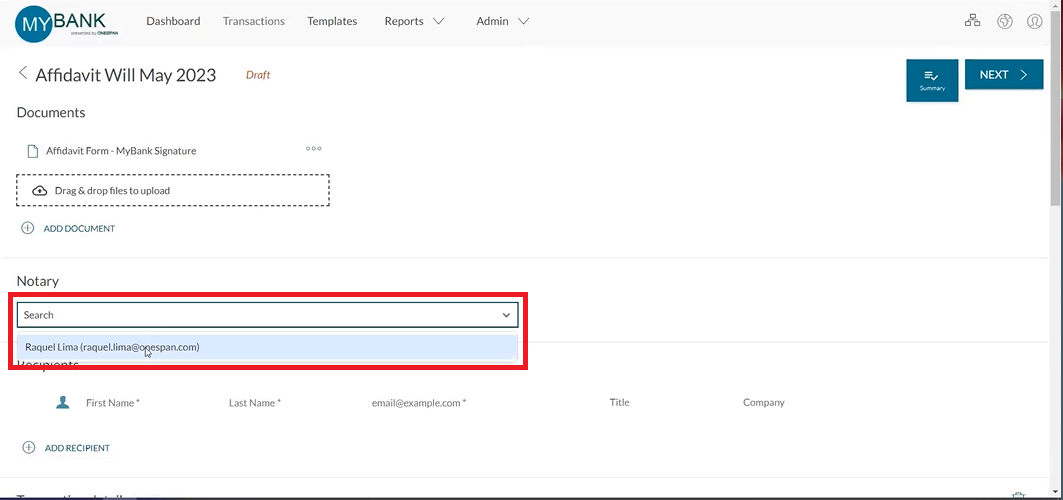
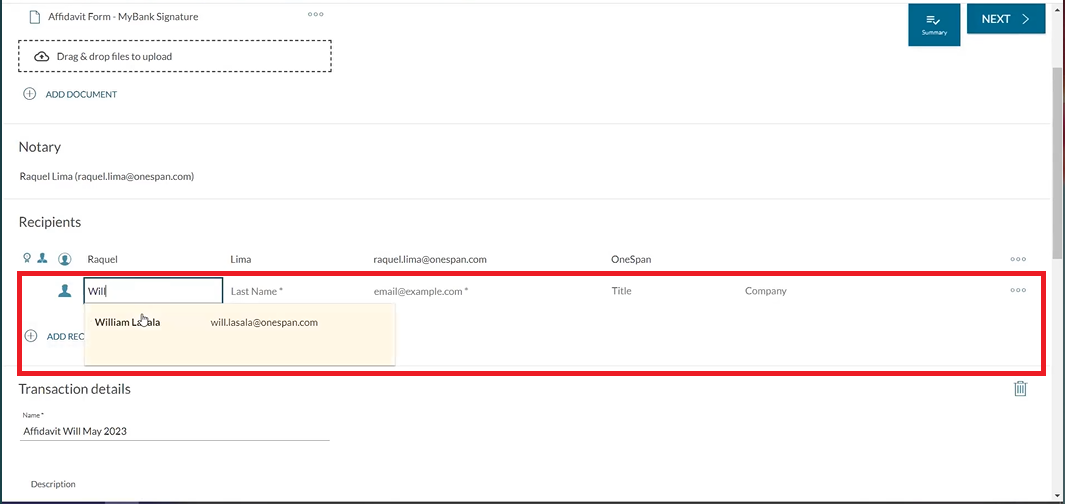
4. The notary selects their name in the ‘Notary’ section and then adds the signer to the transaction by adding the signer’s first name, last name and email address. The notary can also include additional signers and reviewers to the transaction.
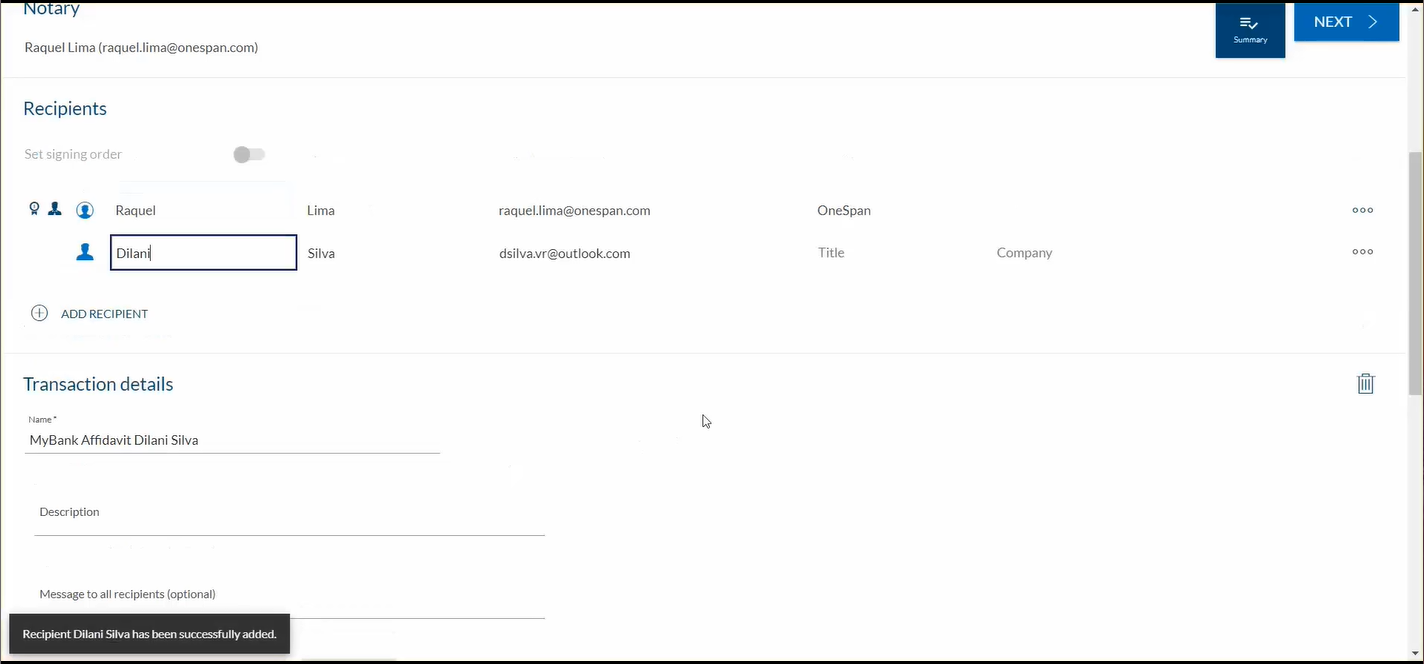
5. Since the notary already knows the signer, the notary does not require additional authentication such as ID Verification or Knowledge-based Authentication (KBA) to validate the signer’s identity.
6. The notary scrolls down and clicks ‘Configure’.
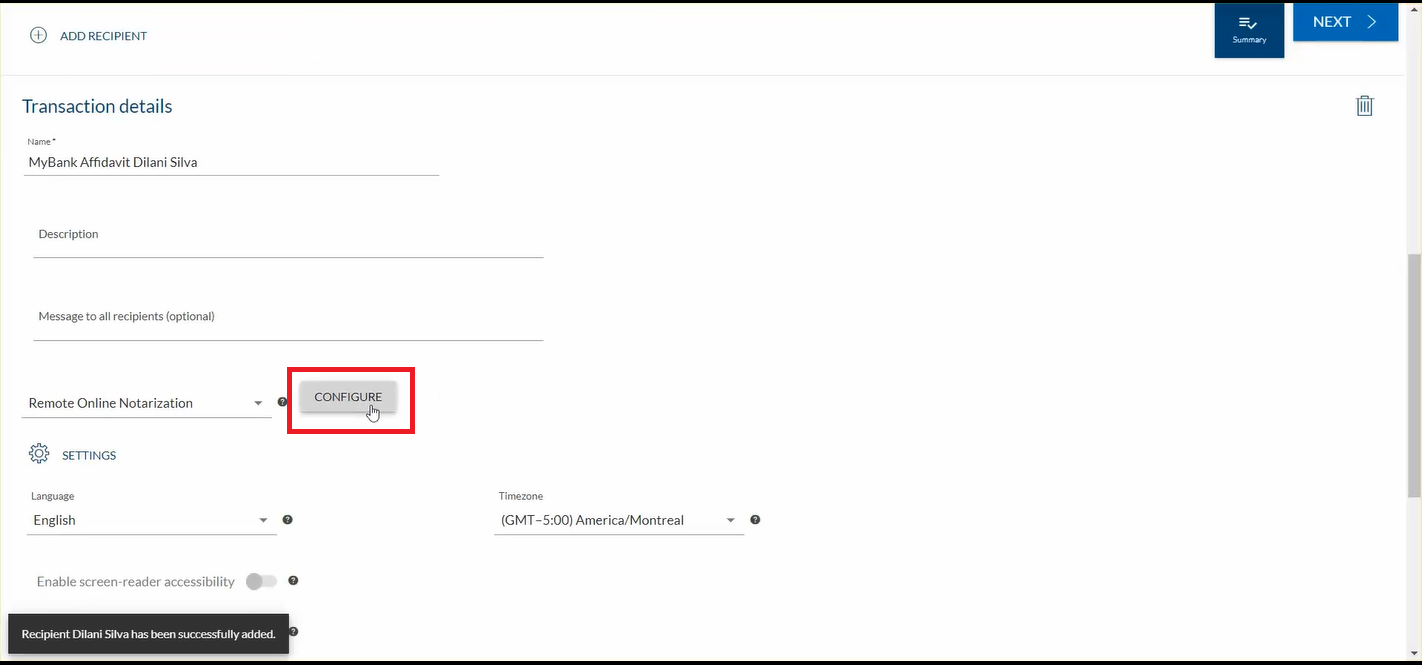
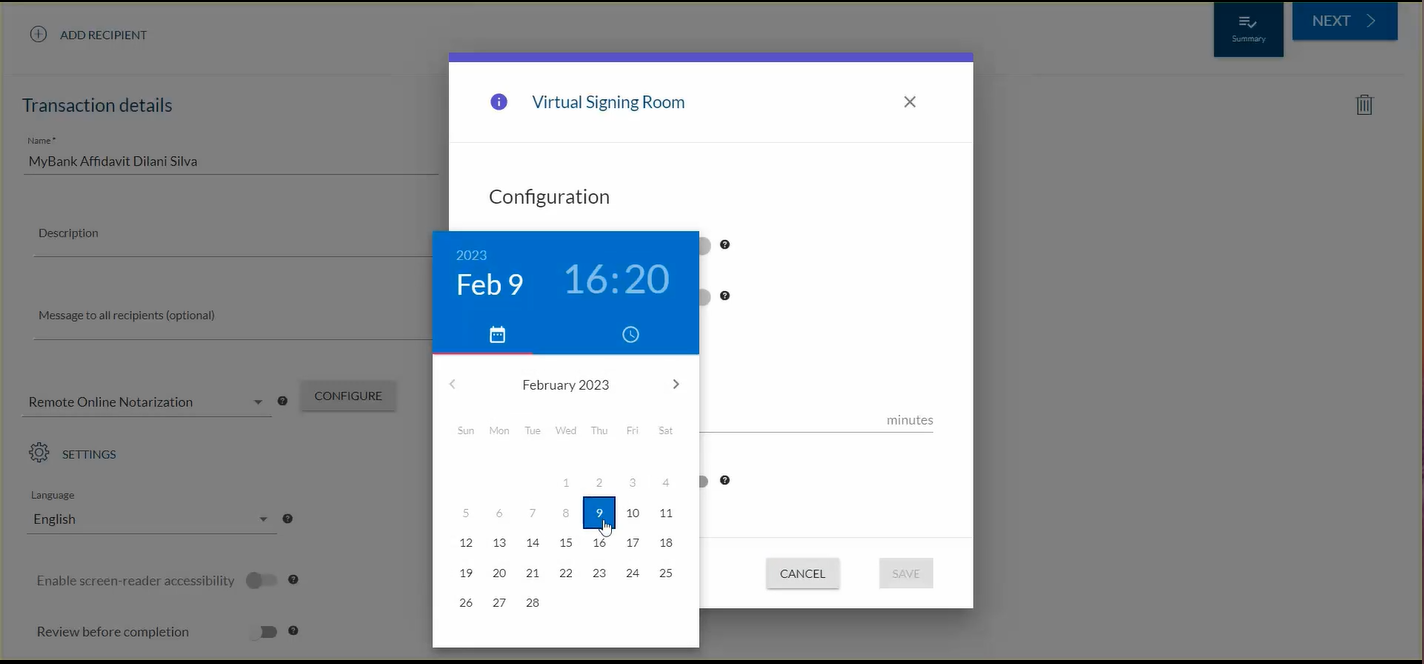
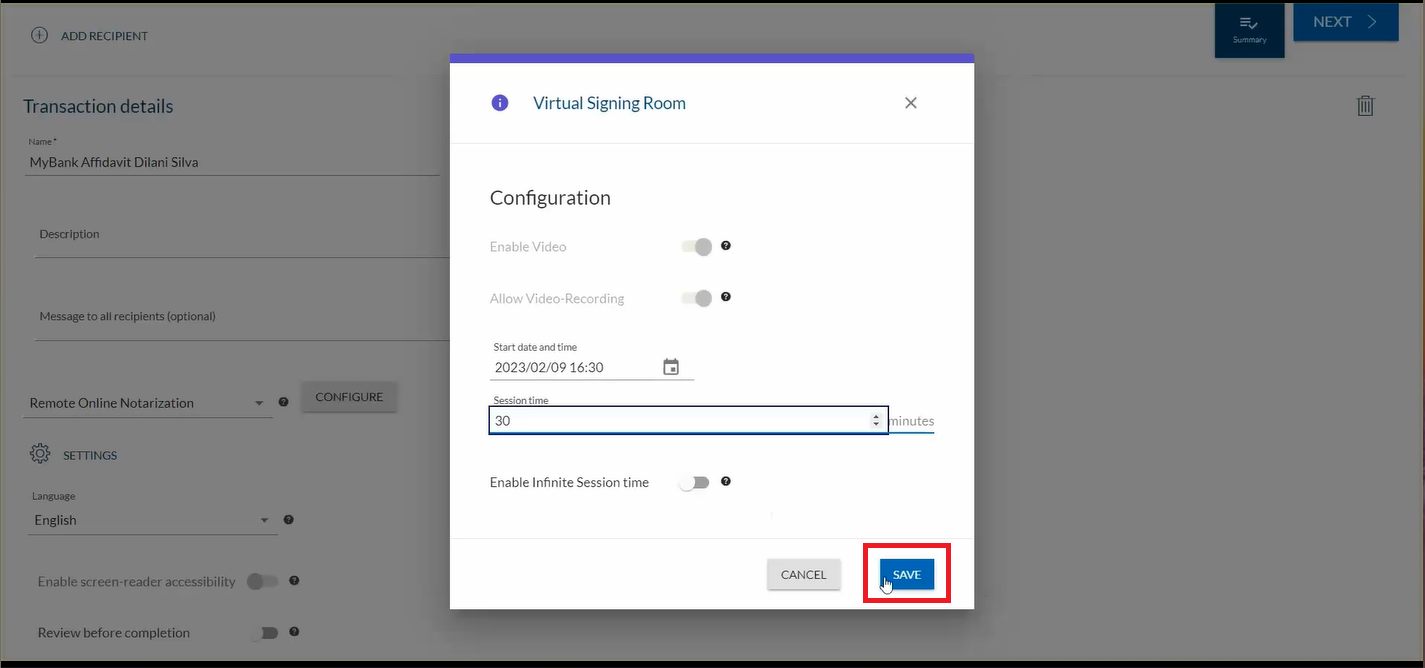
7. The video and recording capabilities are automatically enabled due to RON compliance requirements. The notary schedules a date and time for the Remote Online Notarization session and clicks ‘Save’.
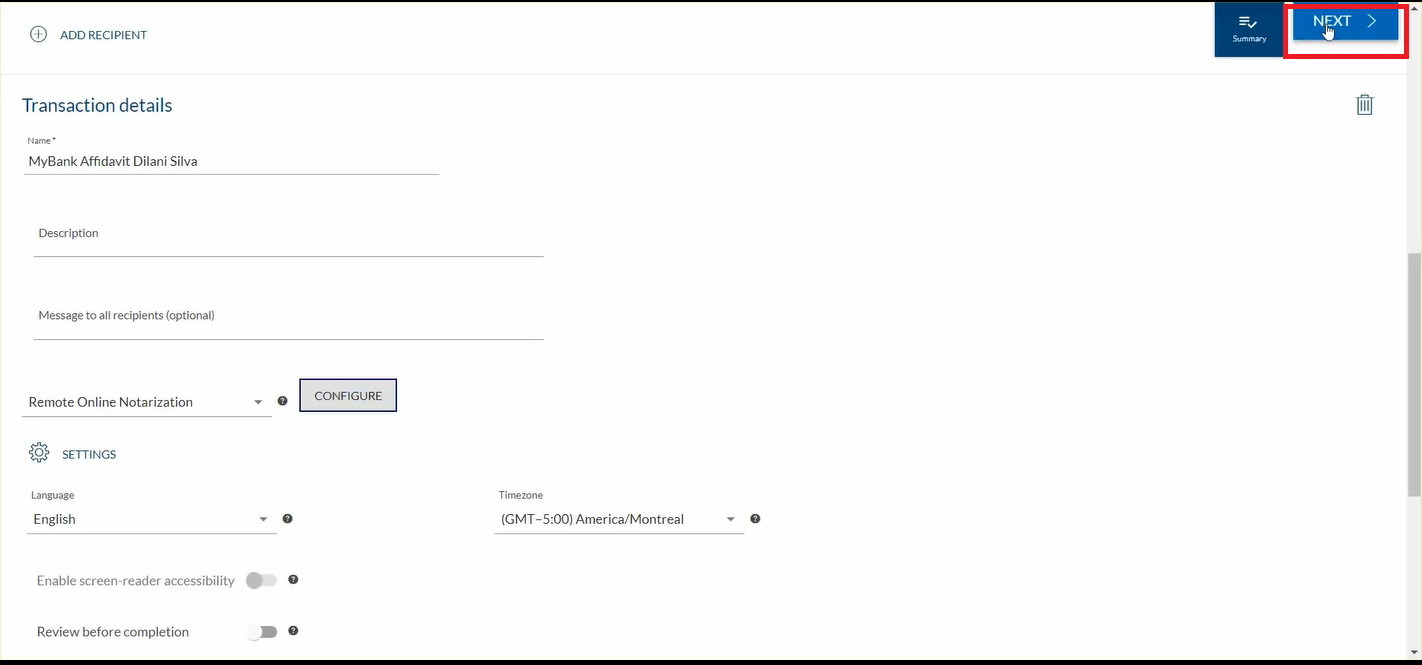
8. The notary clicks ‘Next’
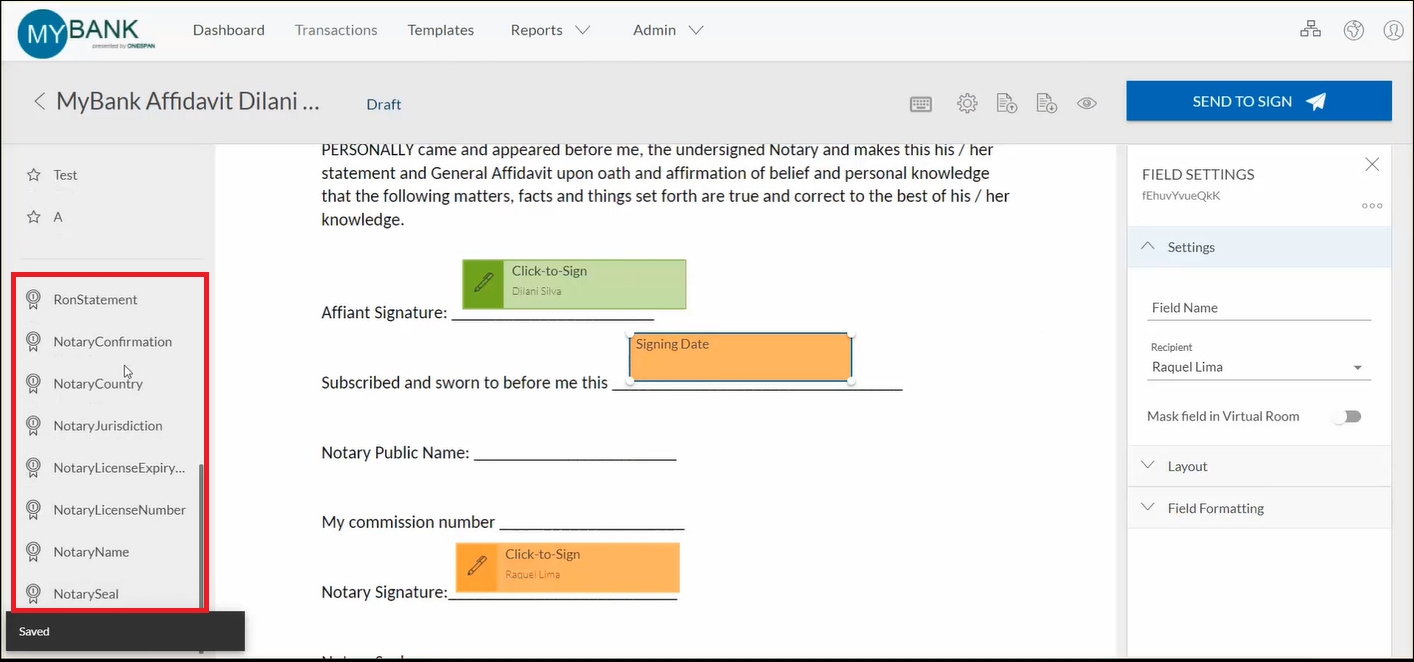
9. Now it’s time for the notary to prepare the affidavit by dragging and dropping the signature blocks into the desired areas of the document.
The notary has access to signature fields specifically configured for Remote Online Notarization such as:
- Remote Online Notarization Statement
- Notary Confirmation
- Notary Country
- Notary Jurisdiction
- Notary License Expiration
- Notary License Number
- Notary Name
- Notary Seal
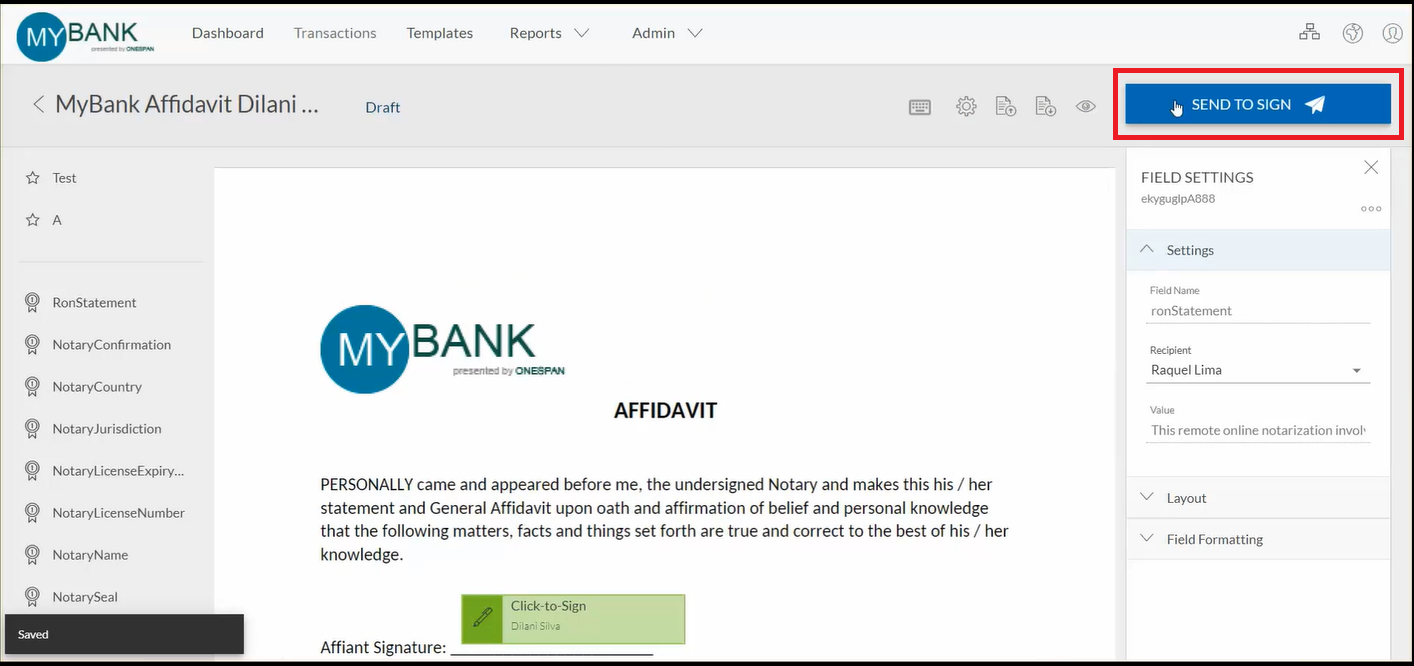
10. The affidavit is now ready to send. The notary clicks ‘Send to Sign’ to schedule the Remote Online Notarization session.
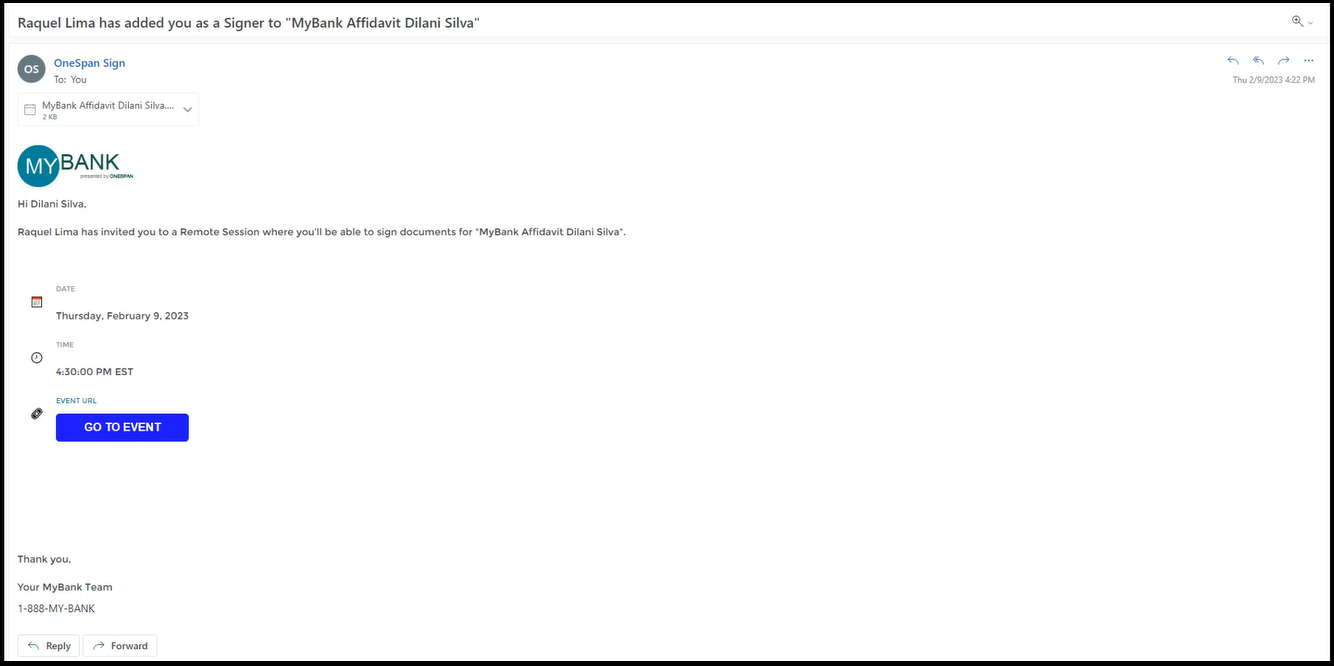
11. The signer receives an email notification inviting them to attend the remote online notary session at the scheduled time. The signer can add the session to their calendar and set a reminder for the remote online notary session.
How to Validate a Signer’s Identity for Remote Online Notarization
Step-by-step Instructions
Configuring a Transaction for KBA and IDV (Notary)
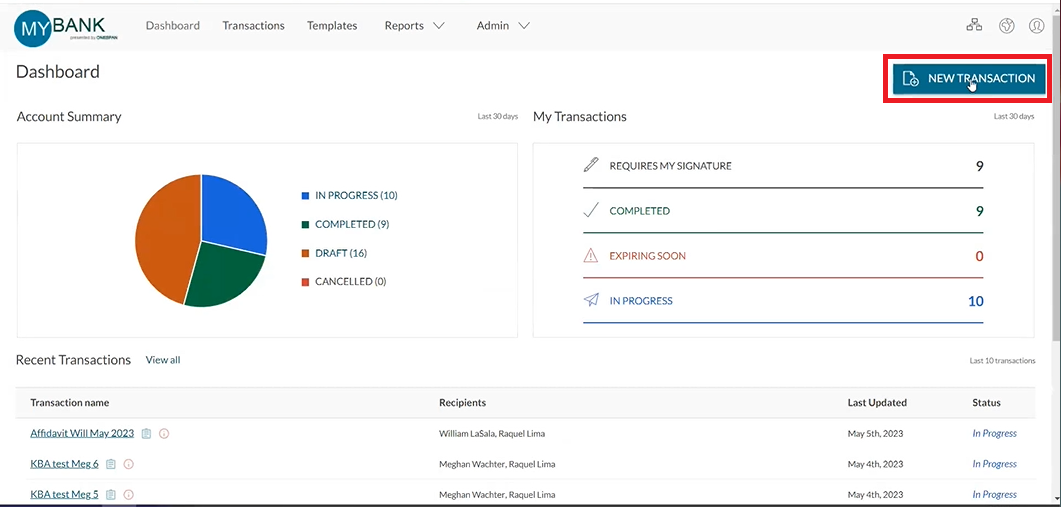
- To begin, the notary selects ‘New Transaction’ and enters a name for the transaction.
- The notary selects ‘Remote Online Notarization’ then clicks the ‘Create’ button to proceed.
- The notary then adds the document. In this example, an affidavit requires e-signing and notarizing.
- The notary selects their name in the ‘Notary’ section and then adds the signer to the transaction.
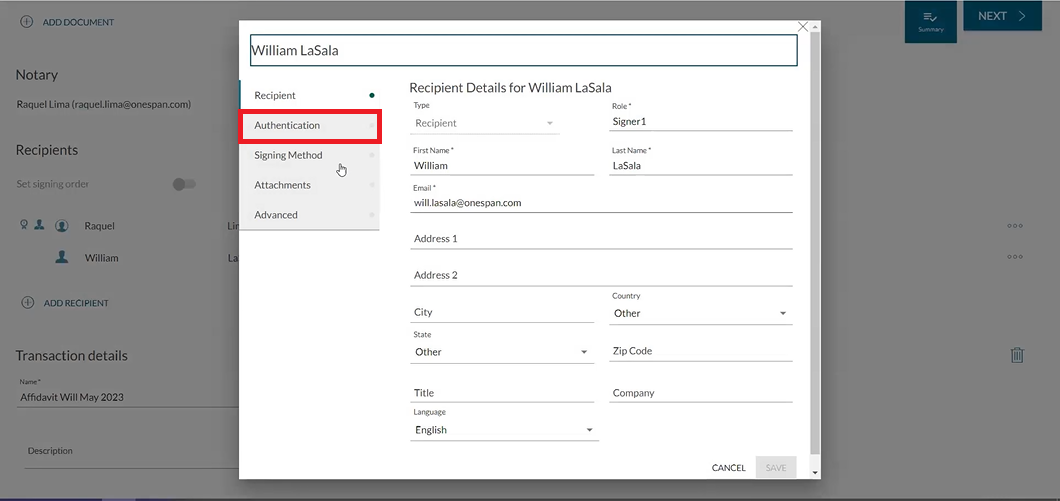
- In the Recipient Settings section, the notary selects ‘Authentication’ to bring up the signer authentication options.
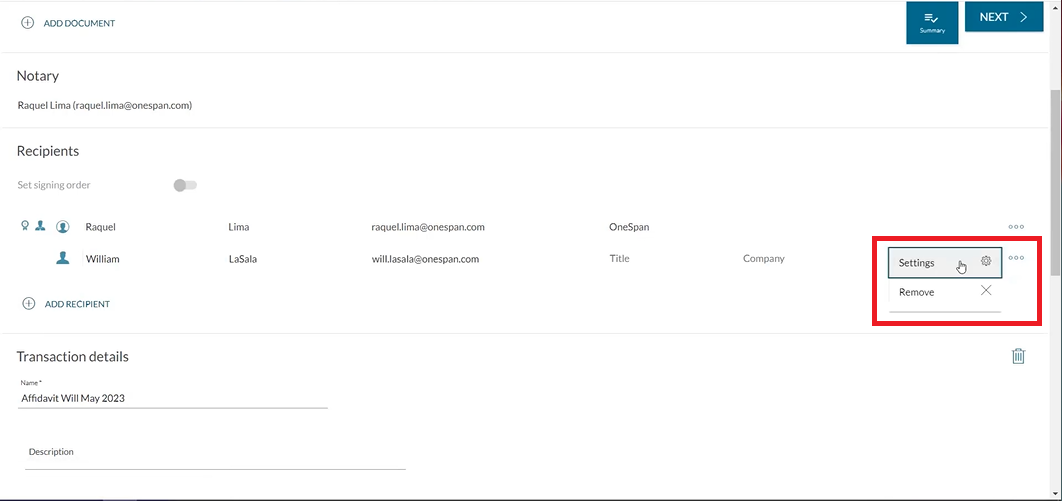
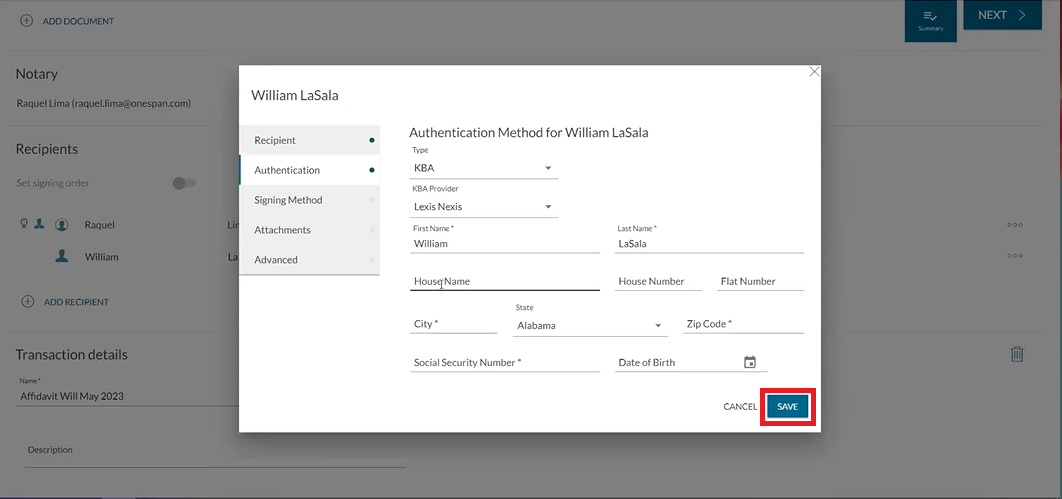
- First, we’ll see how the notary can configure the signer authentication using Knowledge-based Authentication (KBA). In the ‘Signer Type’ dropdown, the notary selects ‘KBA’ then selects the KBA Provider. The notary fills in additional information about the signer such as their home address, social security number and date of birth. The notary clicks ‘Save’.
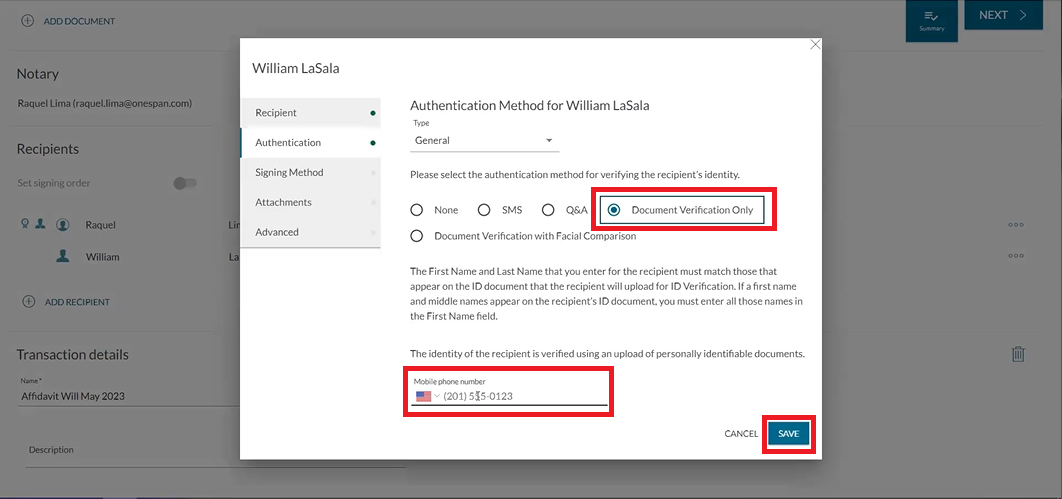
- Next, we’ll see how the notary can configure the signer authentication using ID Verification. The notary accesses the Recipient Settings, selects ‘Authentication’, and then selects ‘Document Verification Only’. They then enter the signer’s phone number and click ‘Save’.
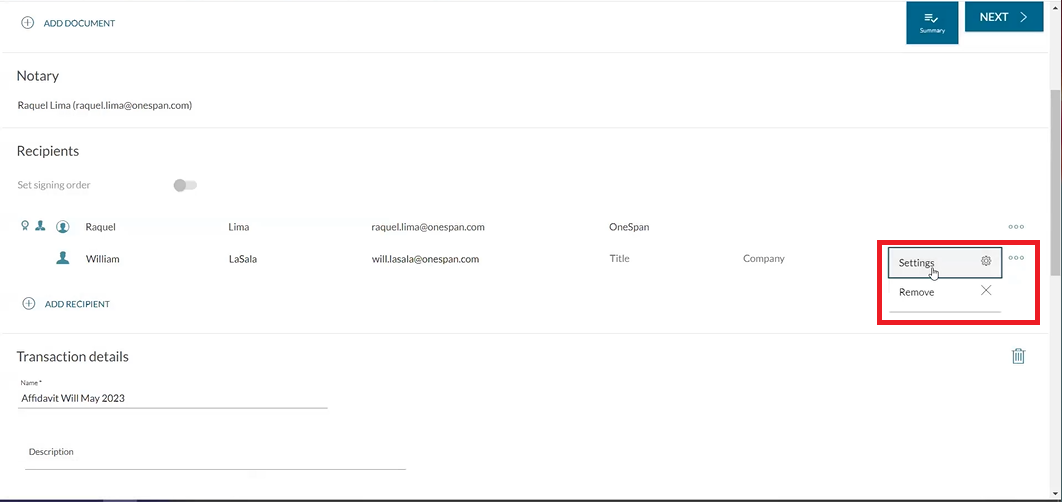

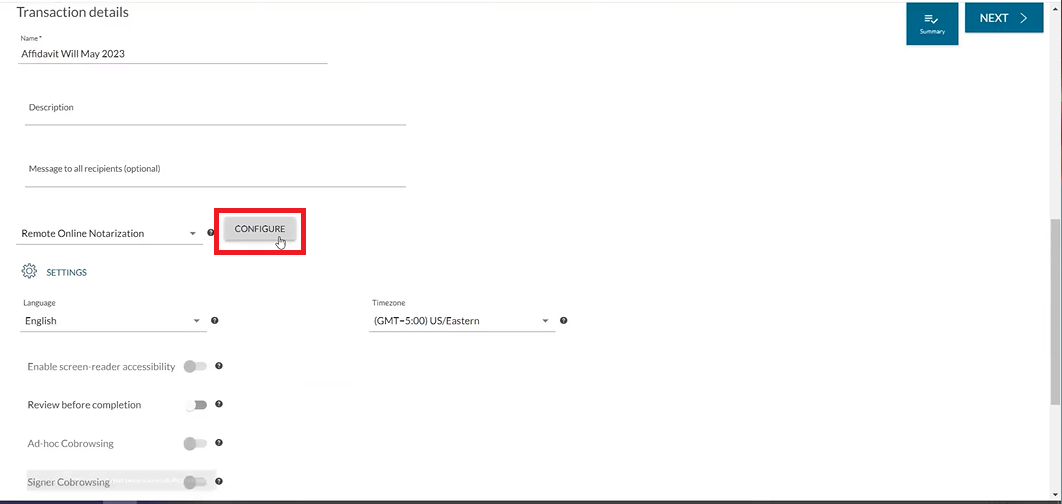
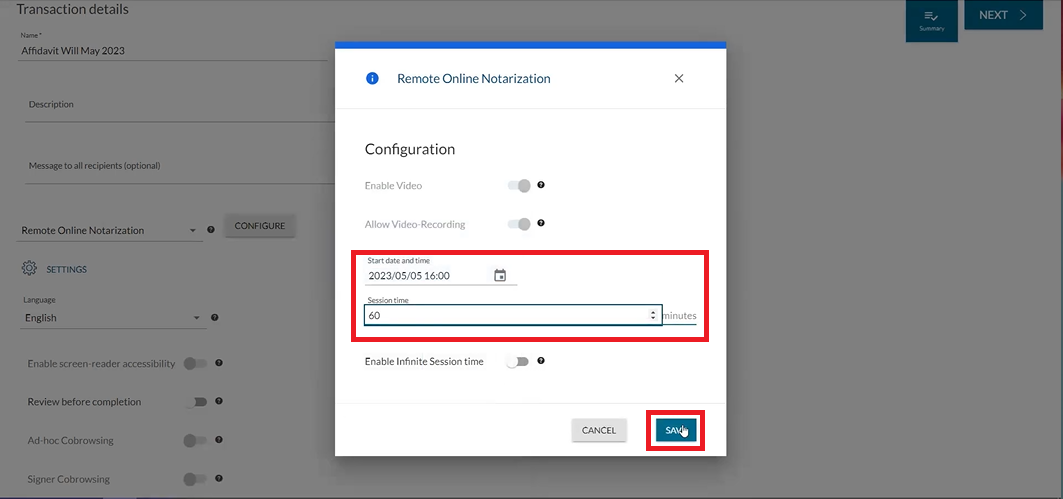
- The notary scrolls down and clicks ‘Configure’ to schedule a date and time for the Remote Online Notarization session and clicks ‘Save’.
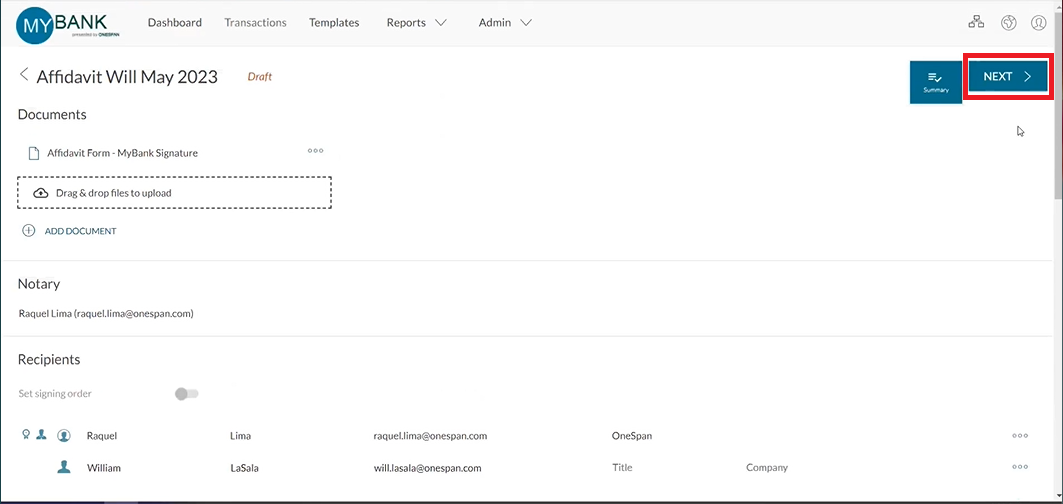
- The notary clicks ‘Next’.
- Now it’s time for the notary to prepare the affidavit by dragging and dropping the signature blocks into the desired areas of the document.
The transaction is now ready and the notary clicks ‘Send to Sign’ to send the Affidavit to the signer.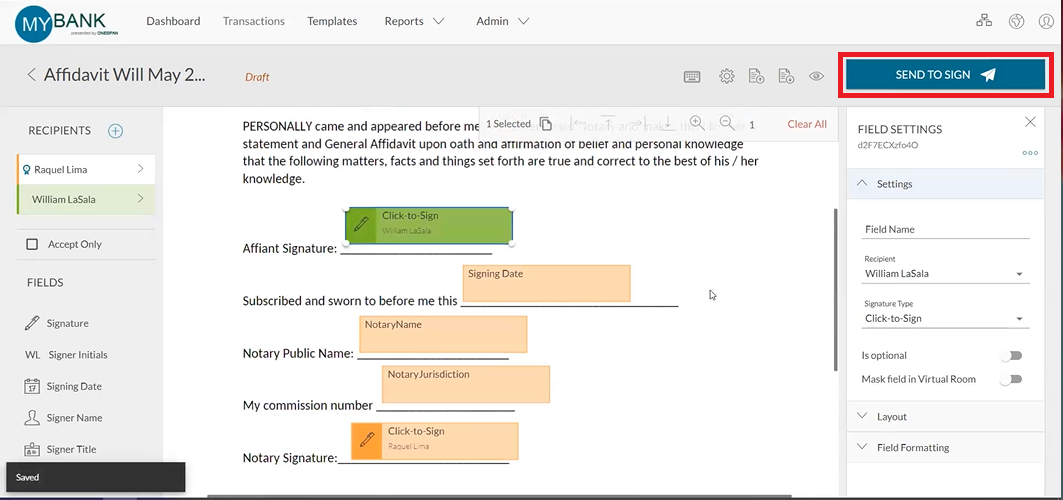
Validating Identity (Signer)
- Before the signer can sign the Affidavit, they need to validate their identity.
The signer accesses the transaction from their email and clicks ‘Go to Event’.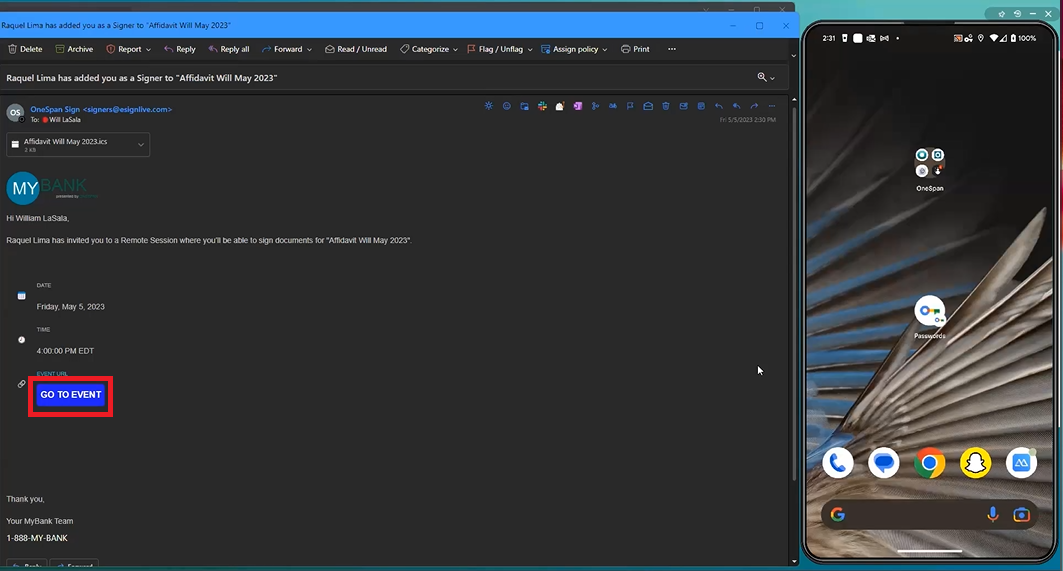
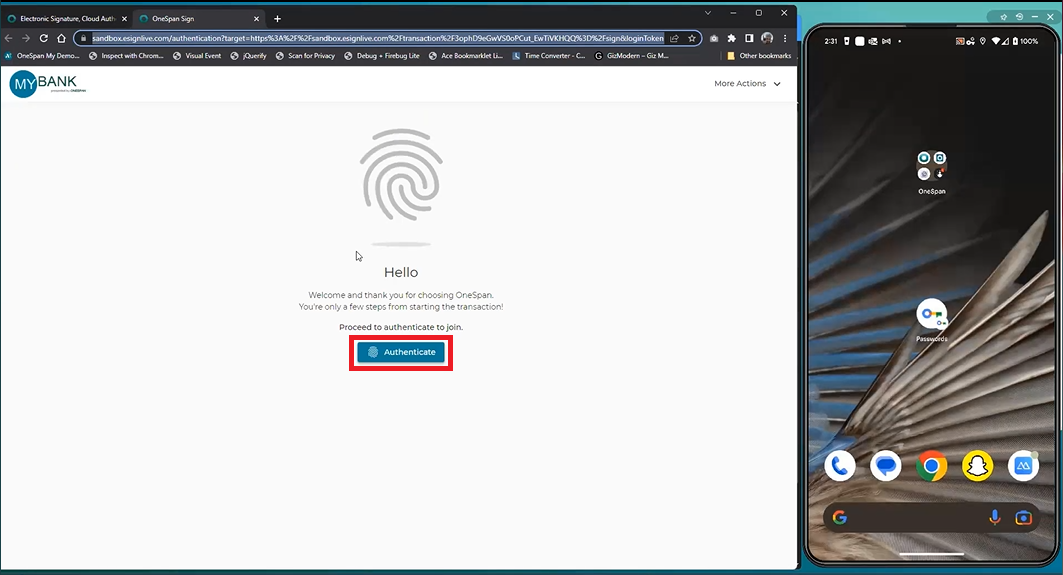
- The signer is asked to verify their identity using Knowledge-based Authentication (KBA). The signer clicks ‘Authenticate’.
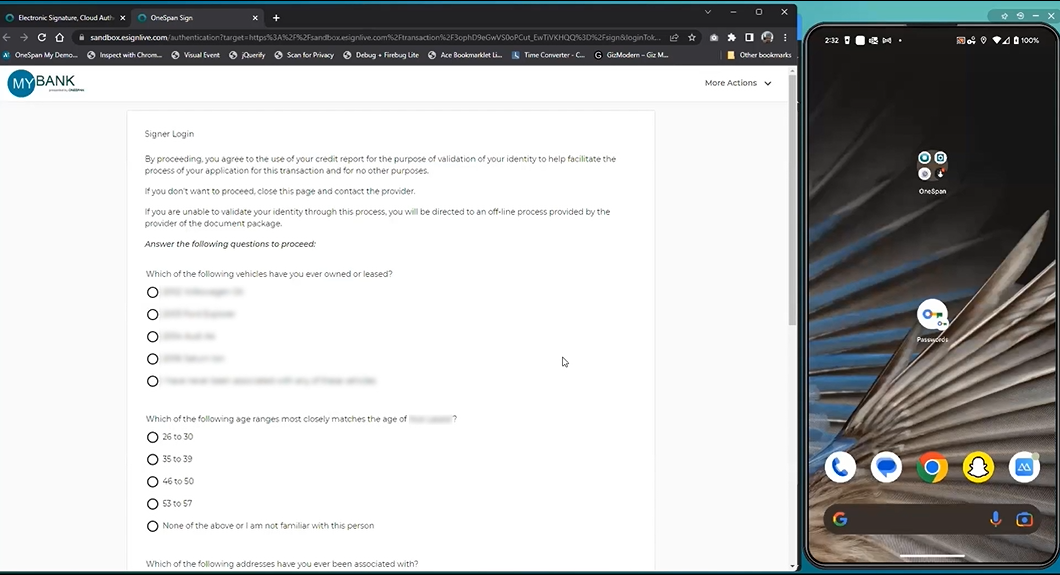
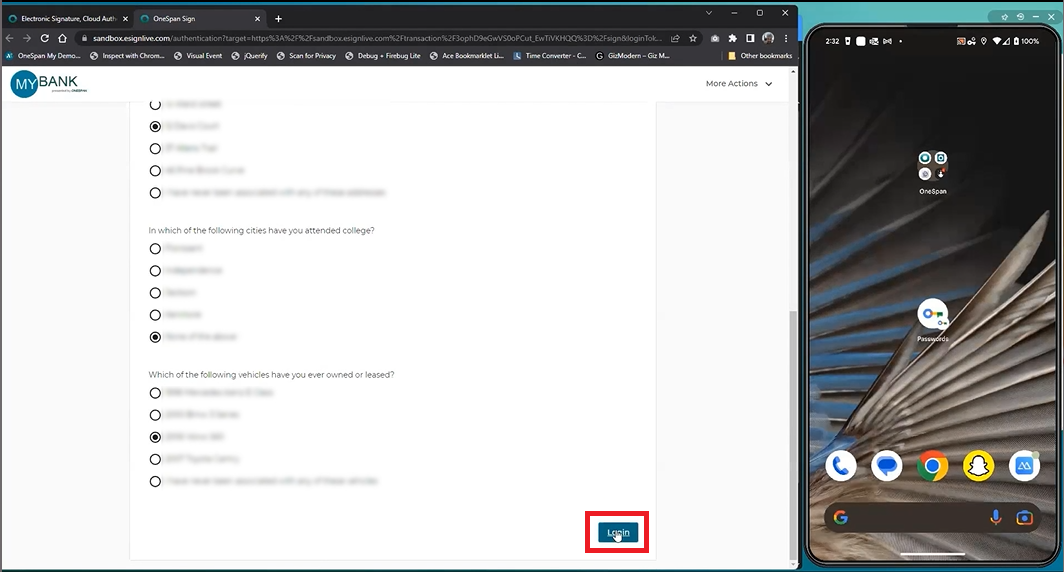
- The signer is presented with 5 knowledge questions to verify their identity. The questions are compiled from public and private data such as marketing data, credit reports, or transaction history. The signer clicks ‘Login’ after answering the questions.
- Now it’s time for the signer to verify their identity using ID Verification.
A welcome screen appears explaining the ID Verification steps. The signer provides their consent to the processing of their personal data and clicks ‘Next’.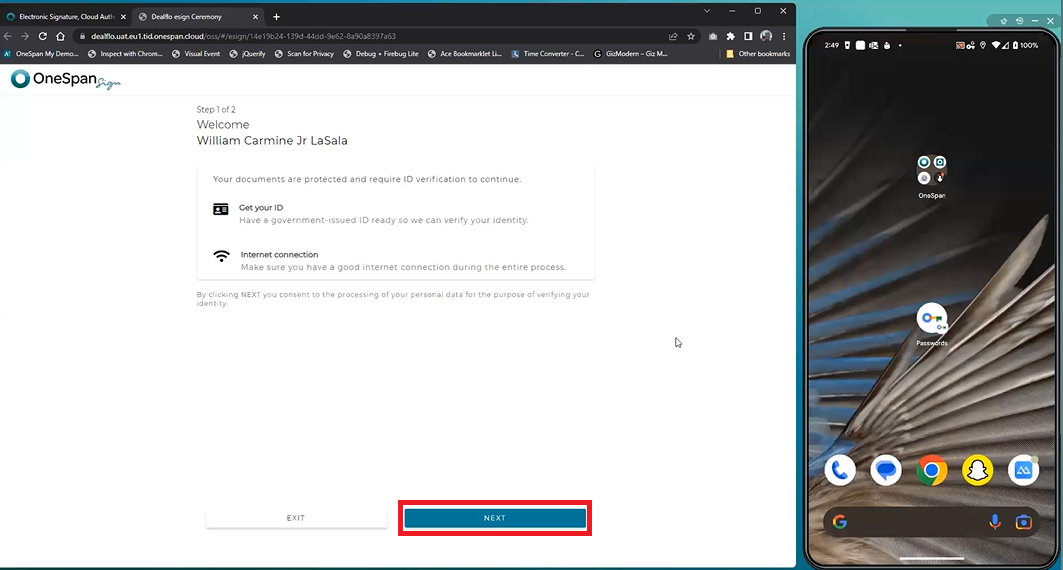
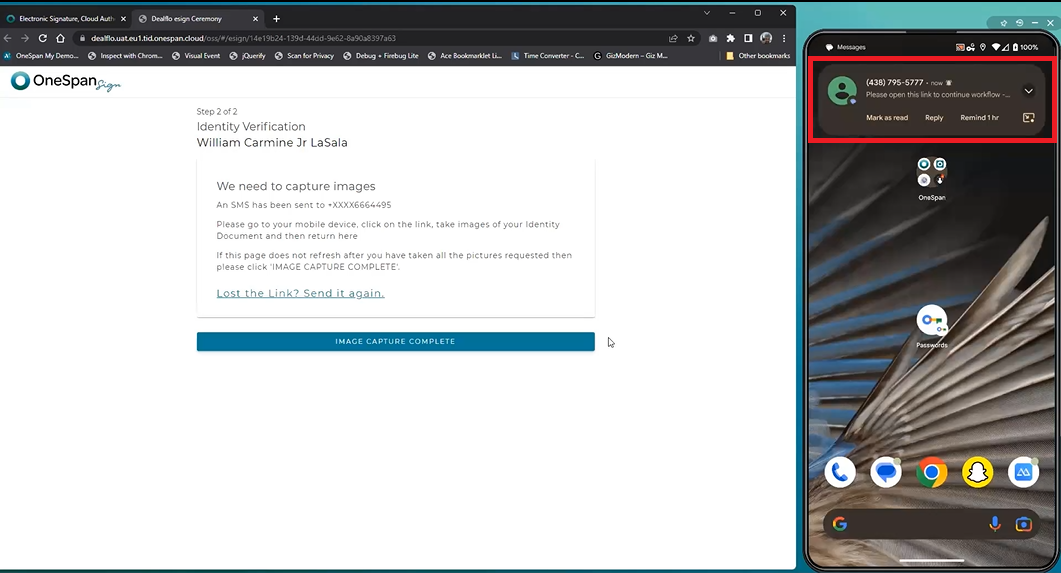
- The signer receives a link on their mobile phone. The signer clicks the link and selects the government-issued ID they’d like to authenticate. They can select their driver’s license or passport.
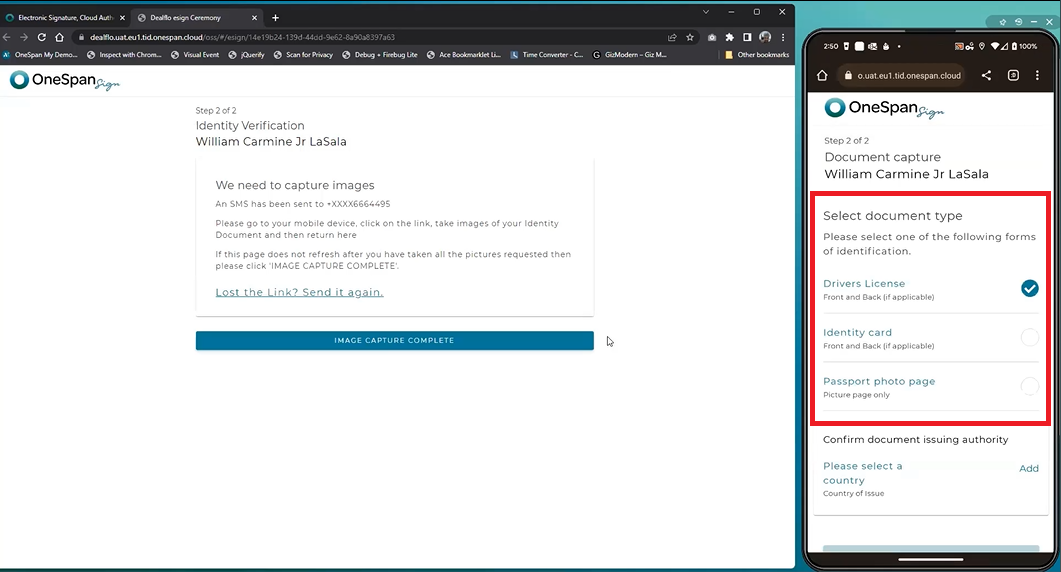
- The signer selects country and state of issuance of their driver’s license.
The signer clicks ‘Next.’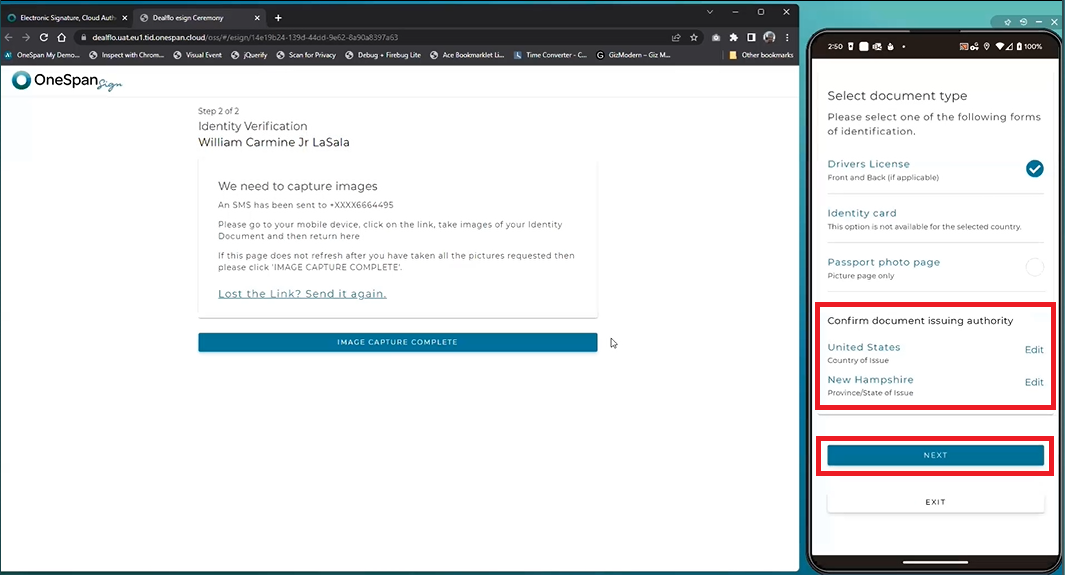
- The signer takes a photo of the front and back of their driver’s license and then clicks ‘Next’ to submit the images.
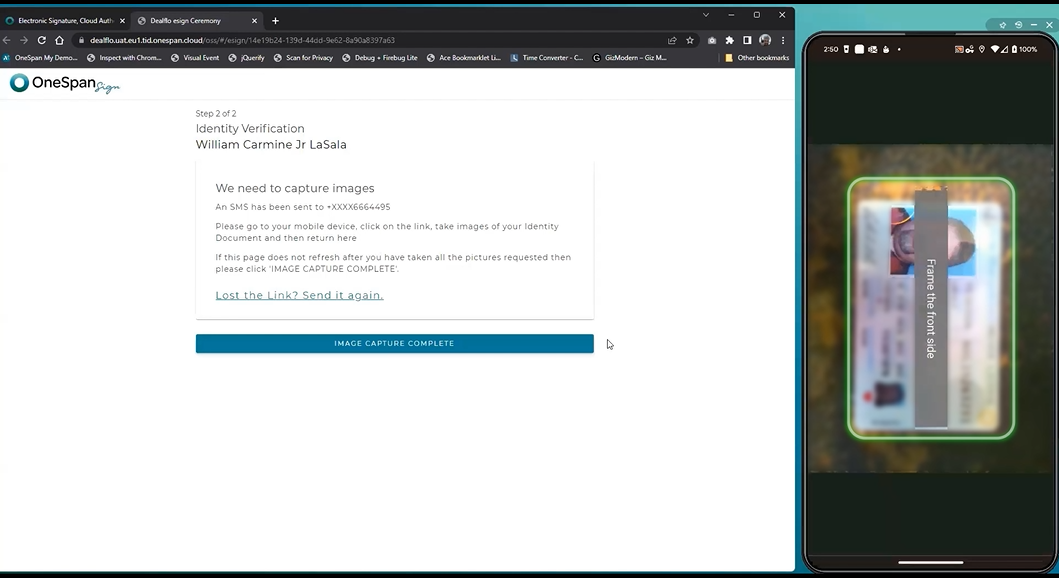
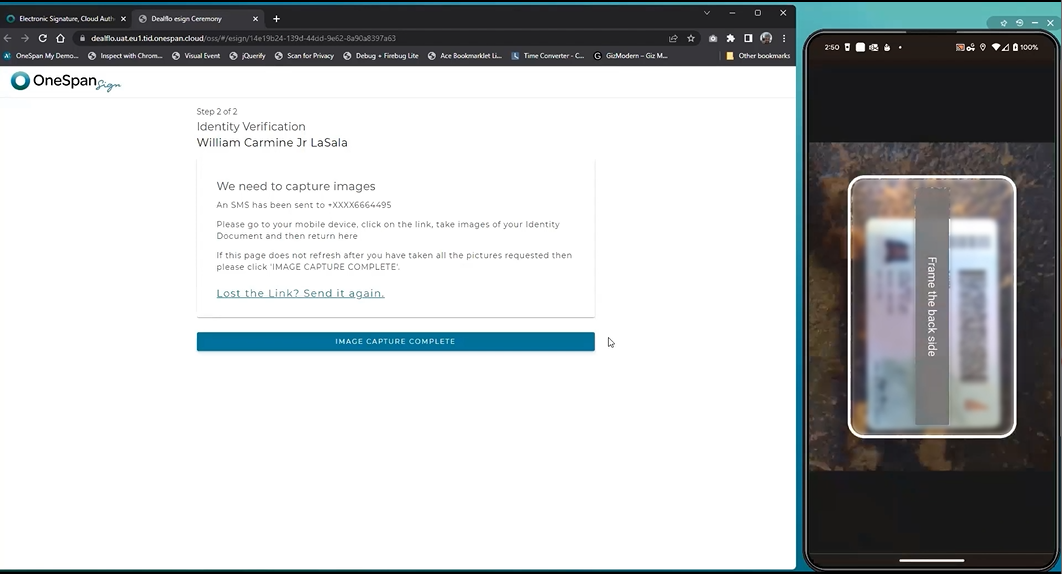
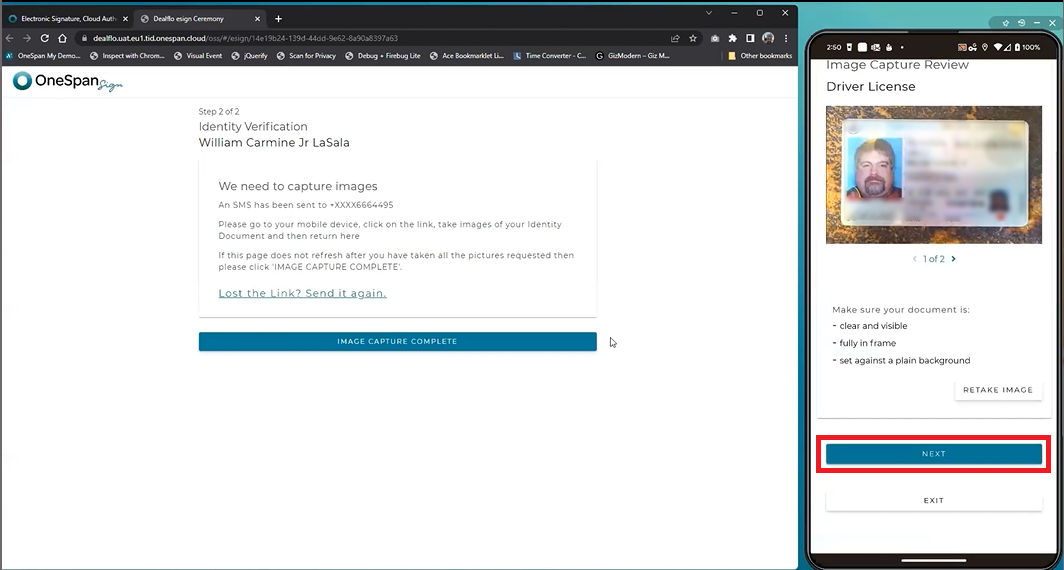
- The signer returns to their desktop computer and clicks ‘Image capture complete’.
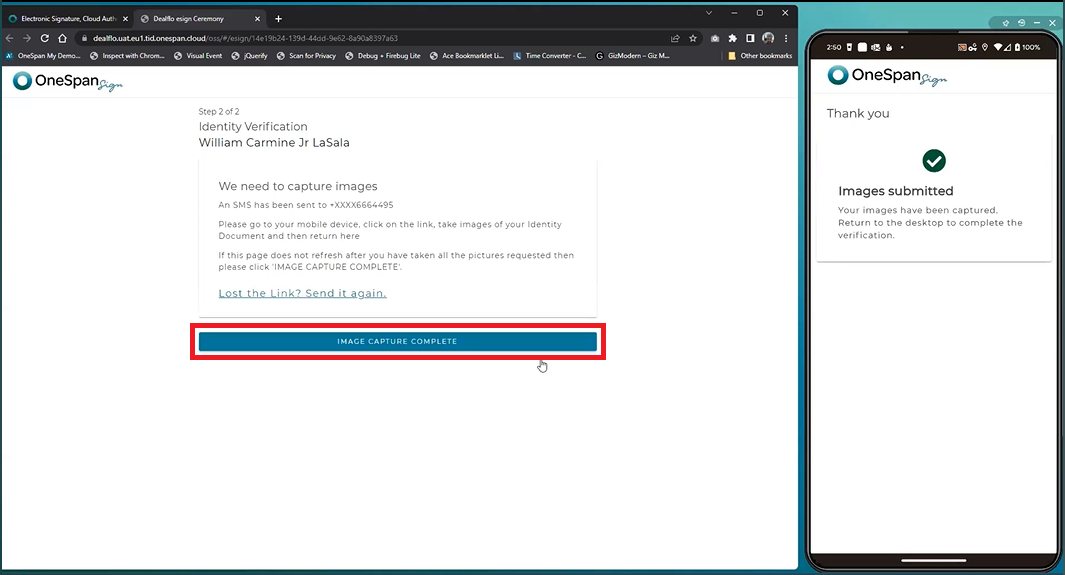
- After the signer has successfully verified their identity, they can gain access to the remote online notarization session.
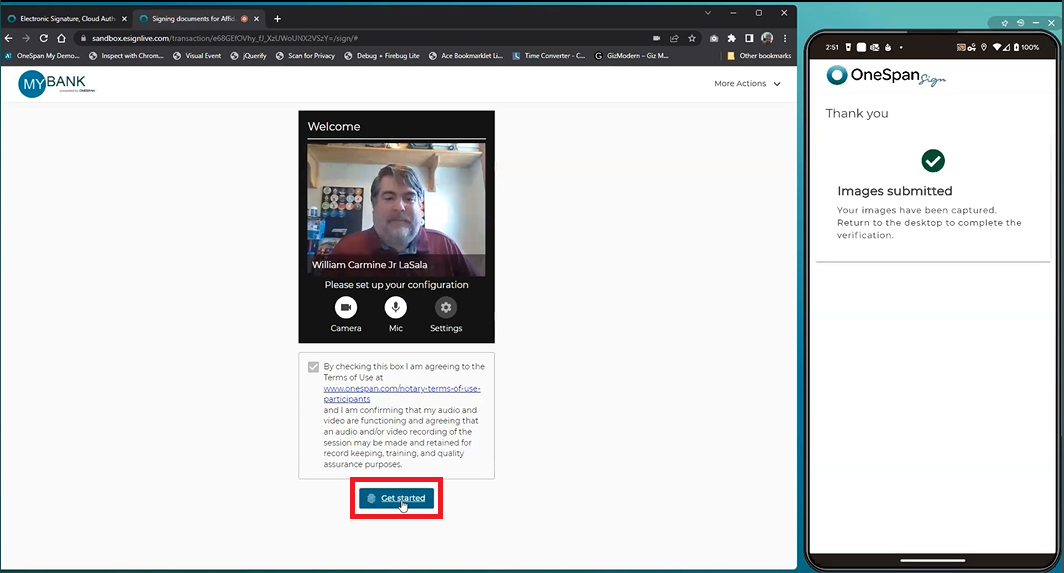
Signing and Notarizing a Document (Notary and Signer)
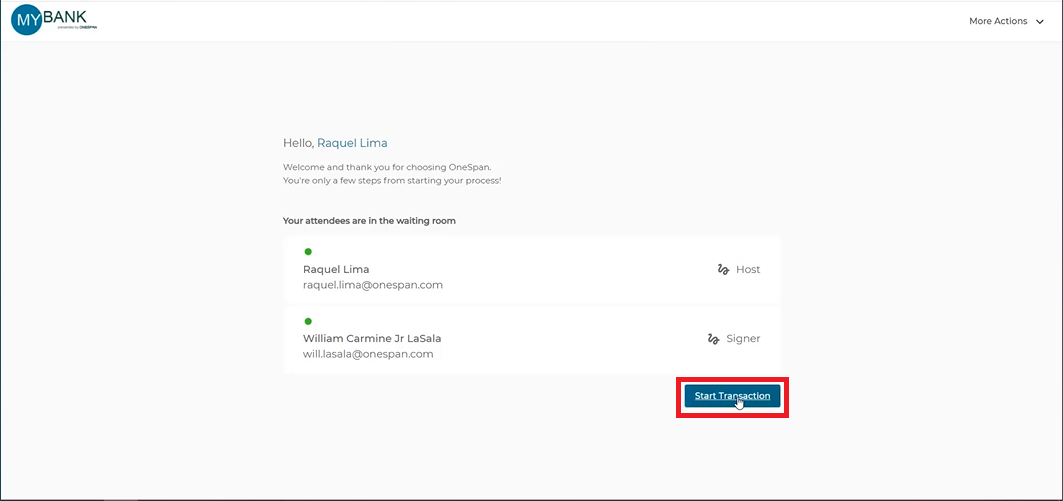
- The notary enters the remote online notary session and then clicks ‘Start Transaction’.
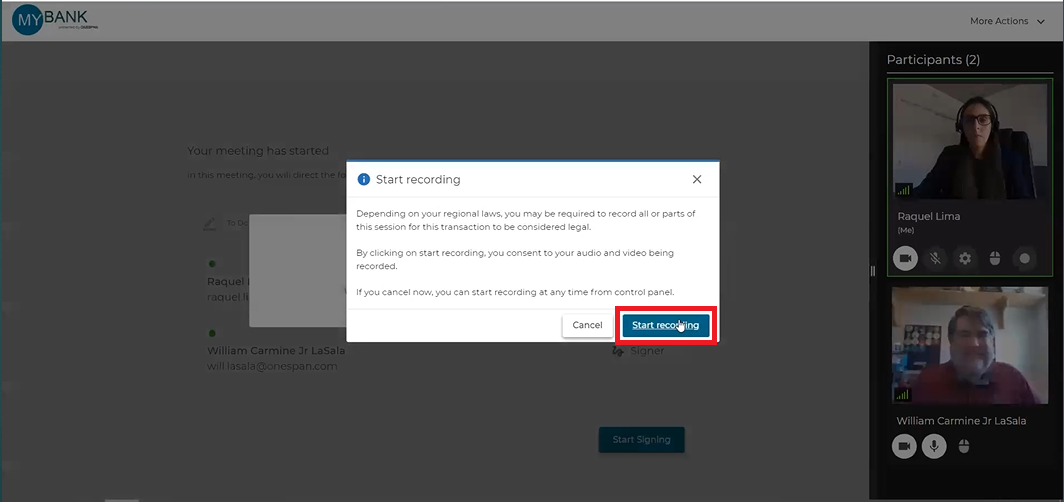
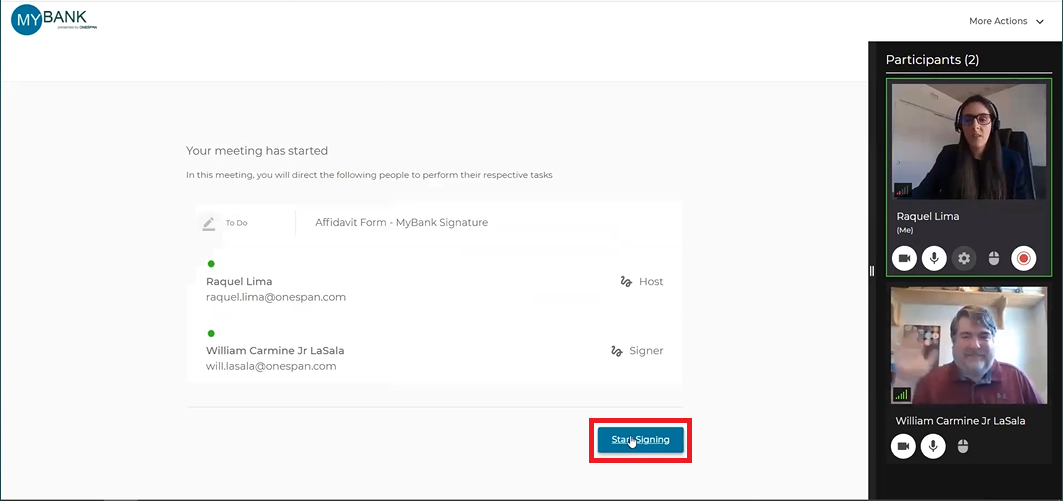
- The notary can start recording the session and then clicks the ‘Start Signing’ button to initiate the e-signing and notarization process.
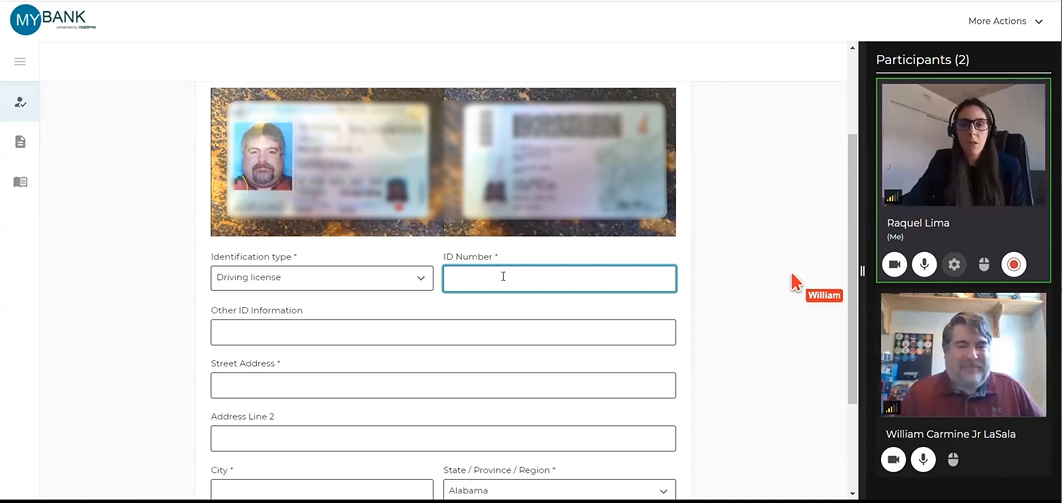
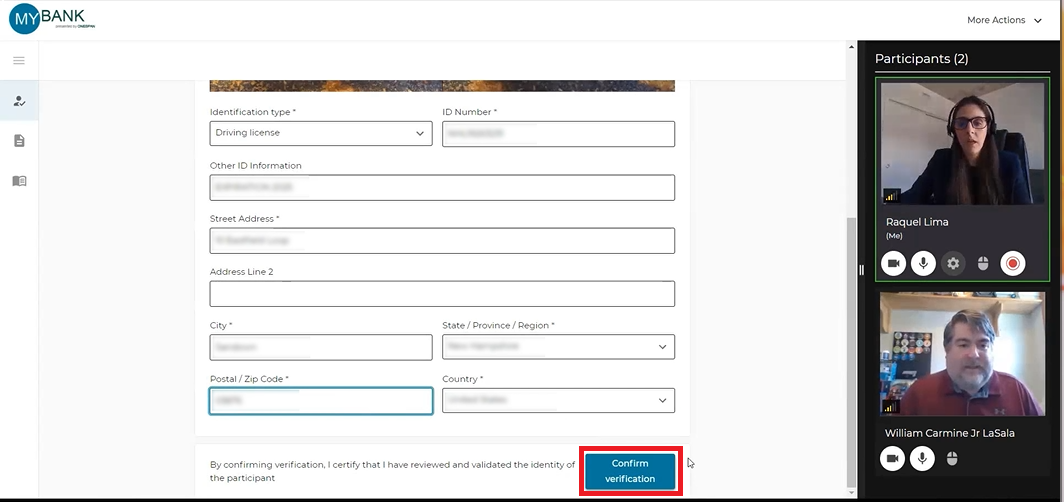
- The notary compares the image of the government-issued ID provided by the signer in the ID verification steps with the on-screen video of the signer in the session. The notary enters additional information such as Identification Type, ID Number, and the signer’s address, and clicks ‘Confirm verification’.
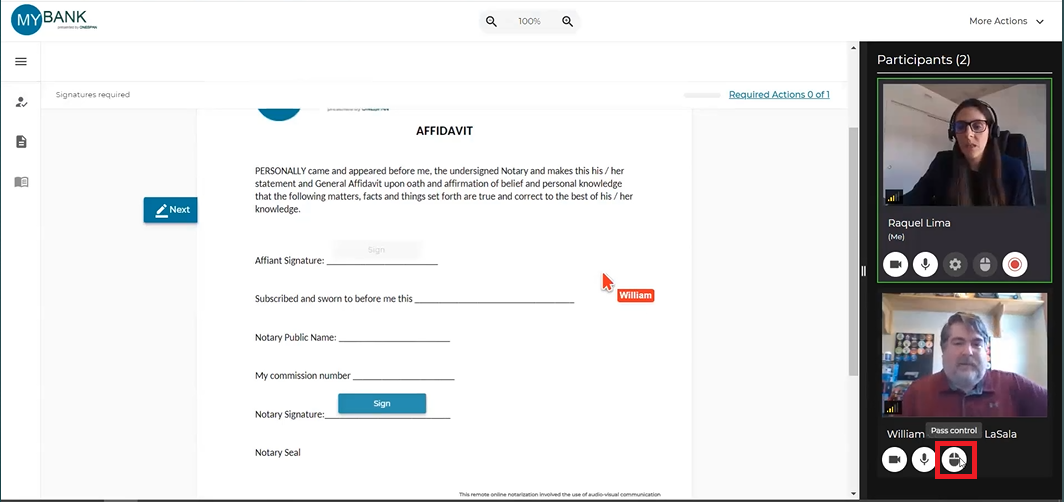
- The notary then passes control to the signer. The signer reads and signs the required areas of the document then clicks ‘Confirm’.
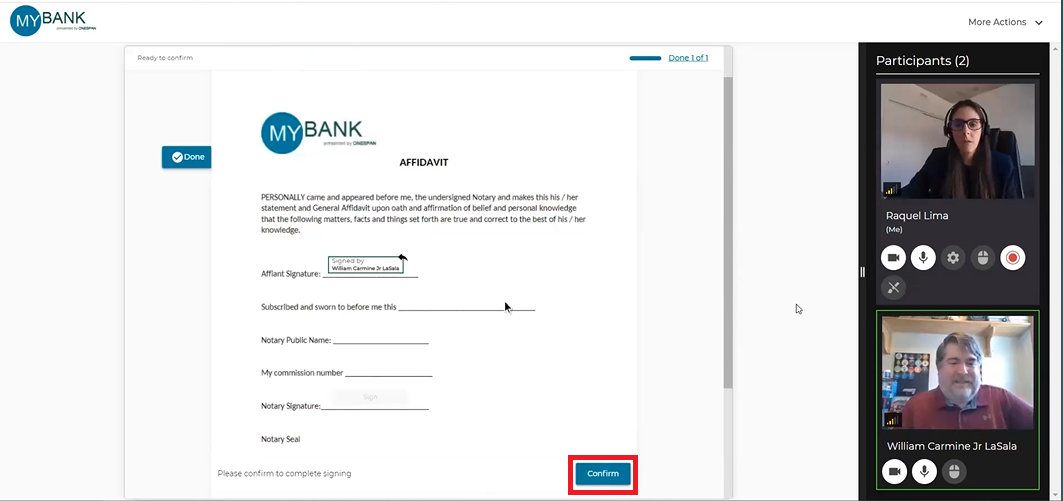
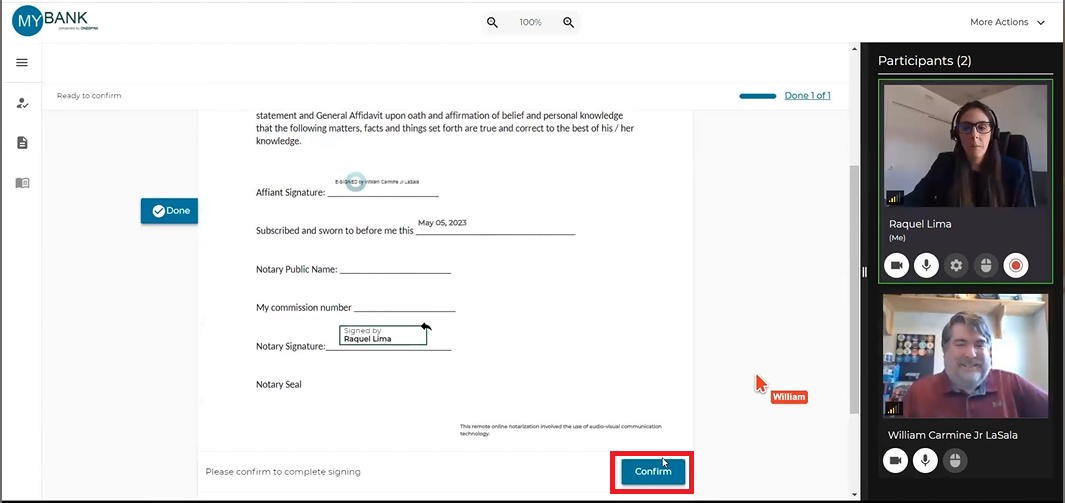
- After the signer completes the document, the notary signs and then applies their eNotary seal to the document. The notary clicks ‘Confirm’.
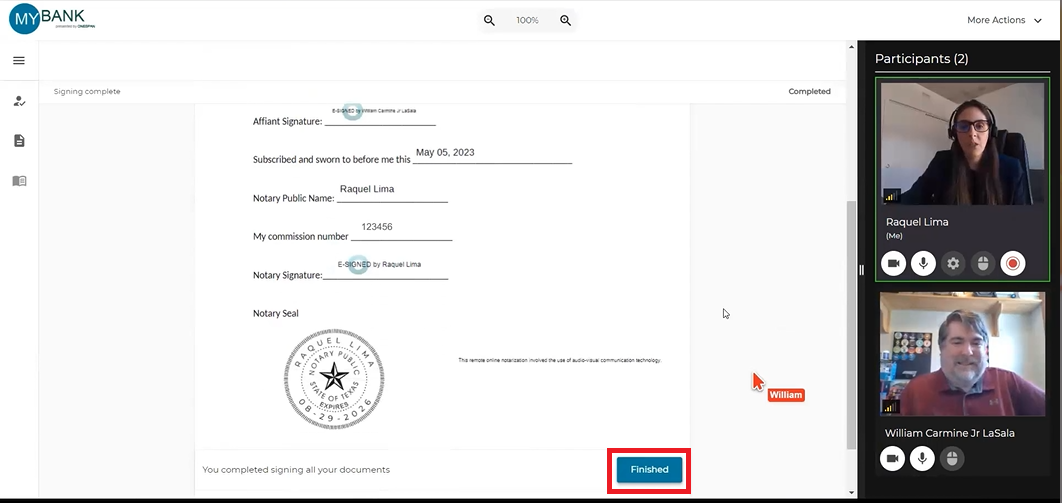
- The notary reviews the notarized document with the signer then clicks ‘Finished’.
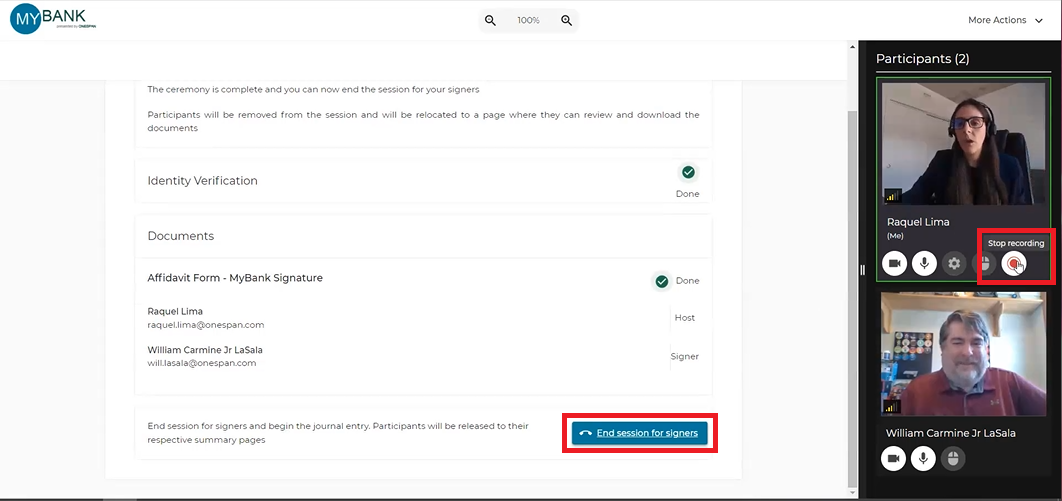
- The notary ends the session with the signer by stopping the recording then clicks ‘End session for signers’.
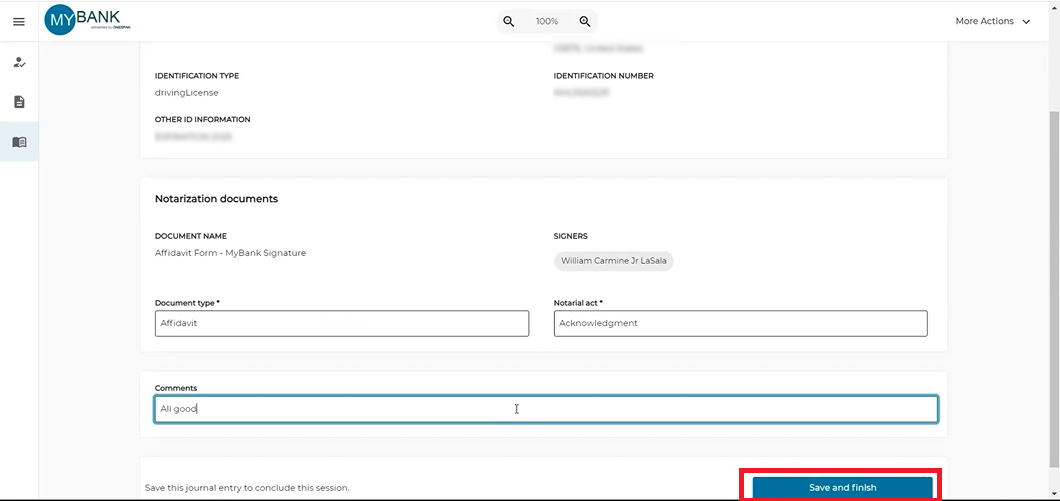
- The notary fills in additional information about the remote online notary session in the eJournal and then clicks ‘Save and Finish’.
- After the signing process is complete, a single, unified audit trail is produced, capturing details of the Knowledge-based Authentication (KBA) and ID Verification steps.
How to E-Sign and Notarize a Document
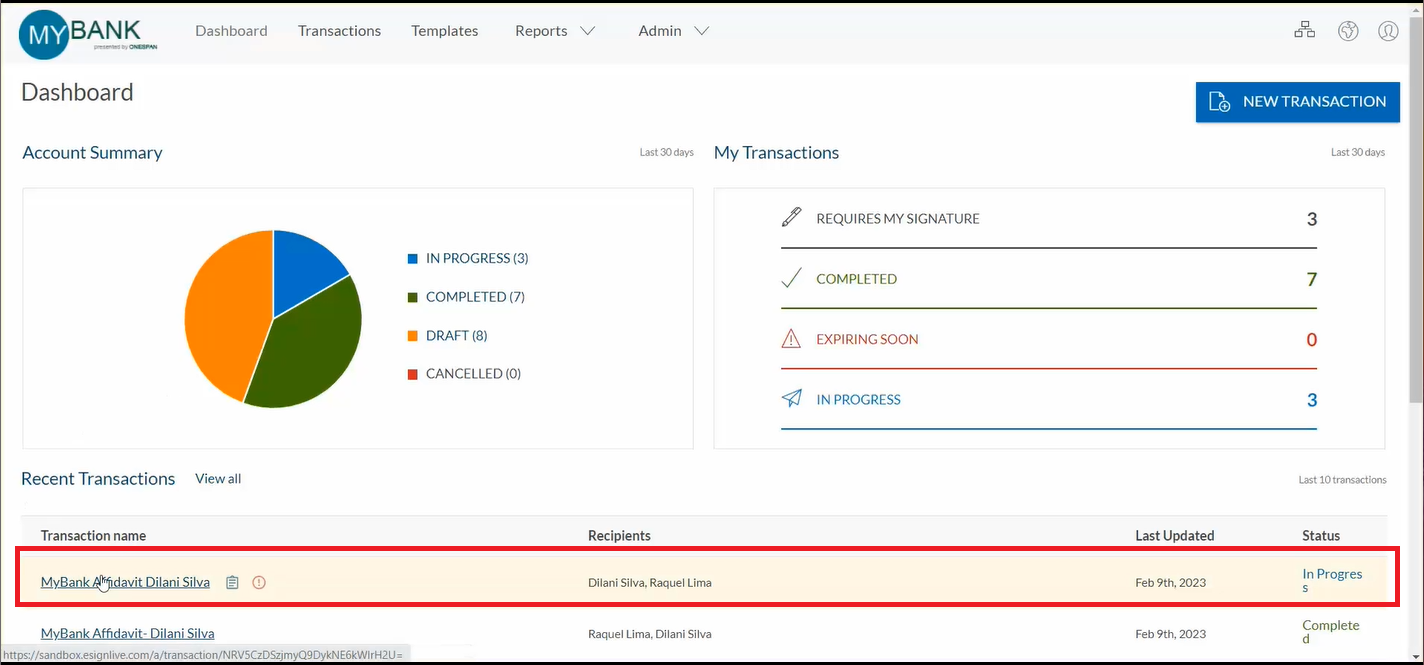
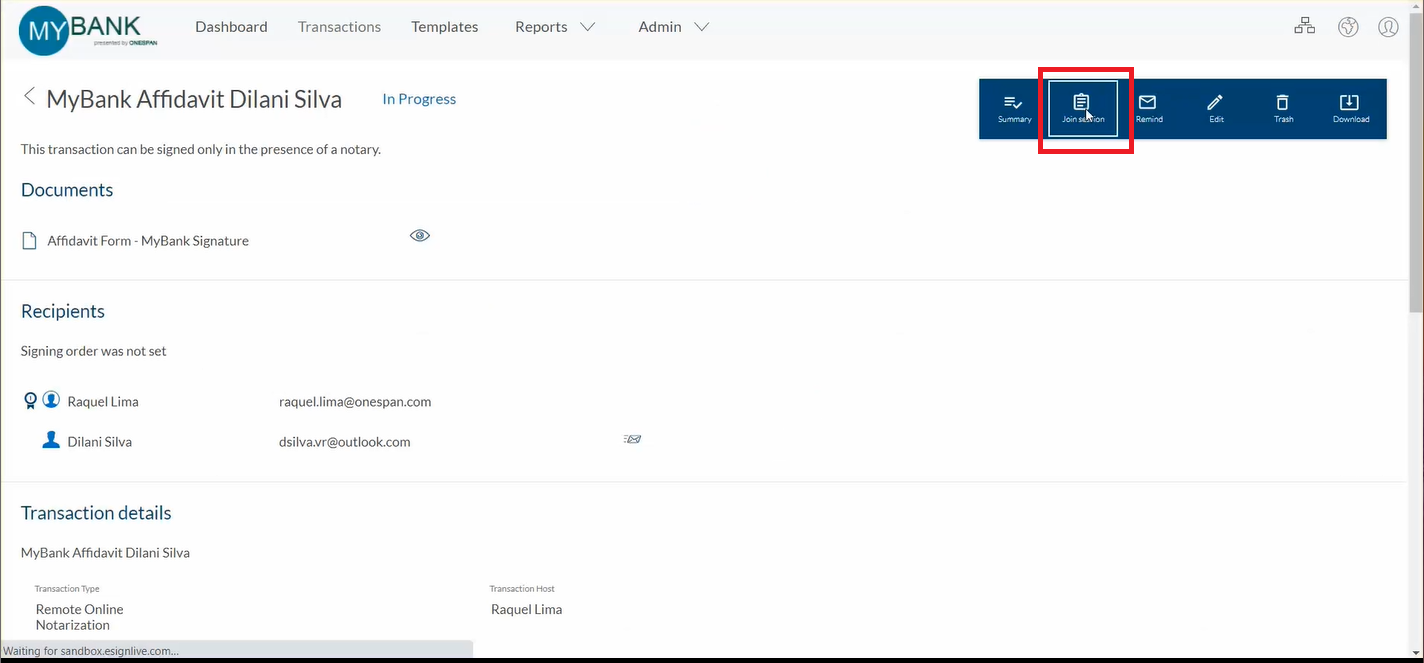
1. When it’s time to launch the remote online notary session, the notary pulls up the transaction and clicks ‘Join Session’.
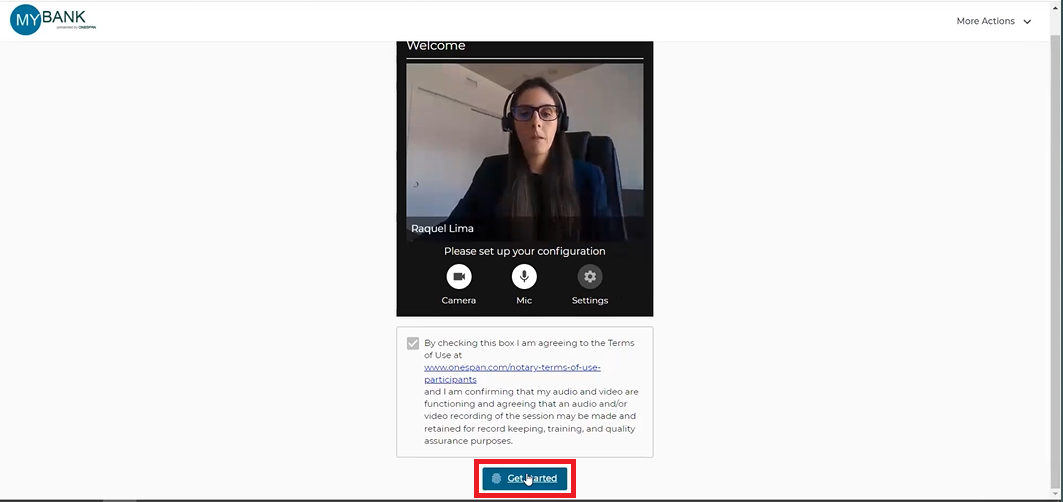
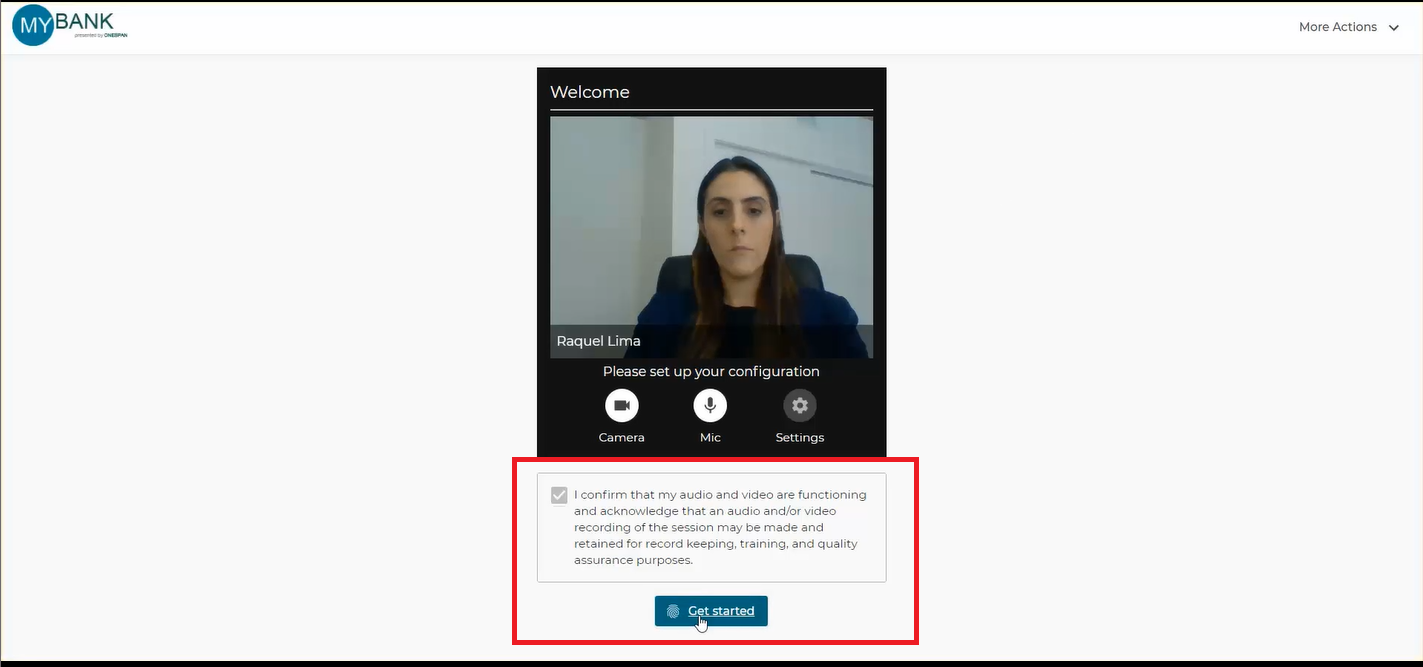
2. The notary confirms their audio and video settings then clicks ‘Get Started’ to enter the session.
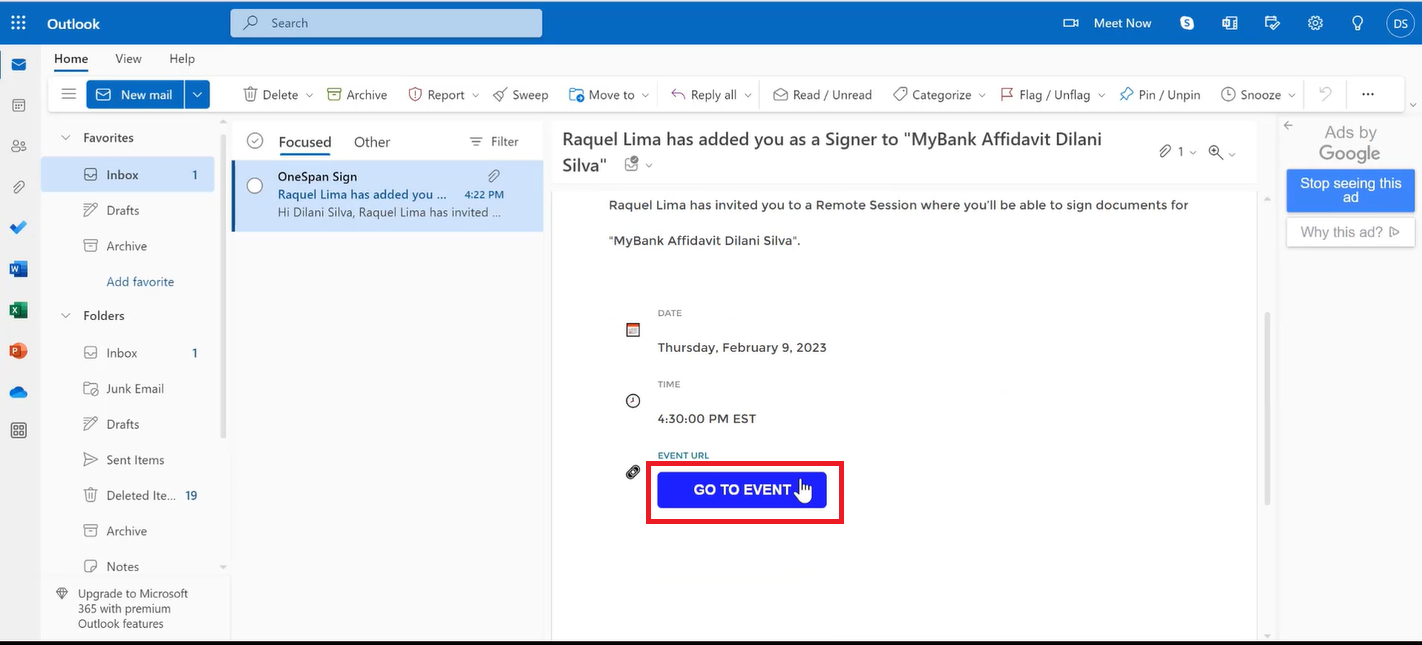
3. The signer joins the remote online notary session from the email invite.
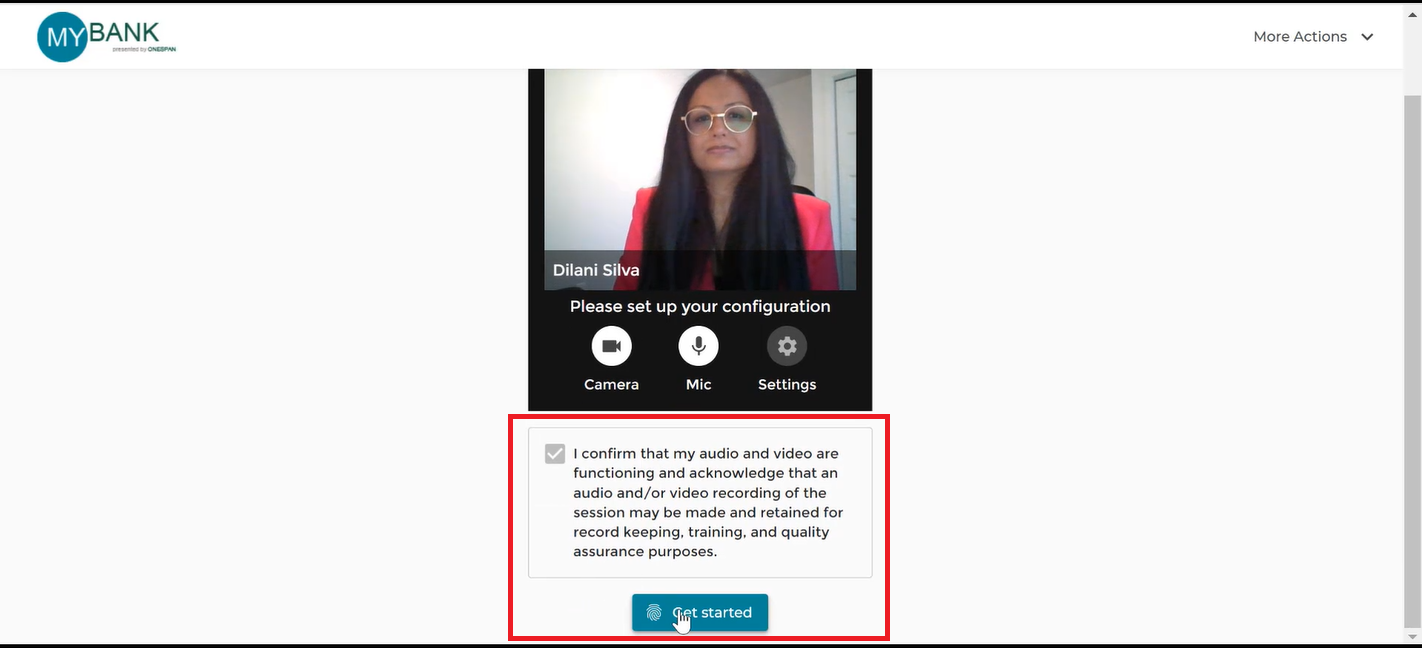
4. The signer confirms their audio and video settings, consents to the audio / video recording of the remote online notary session, and clicks ‘Get Started’. The signer is then sent to a waiting room.
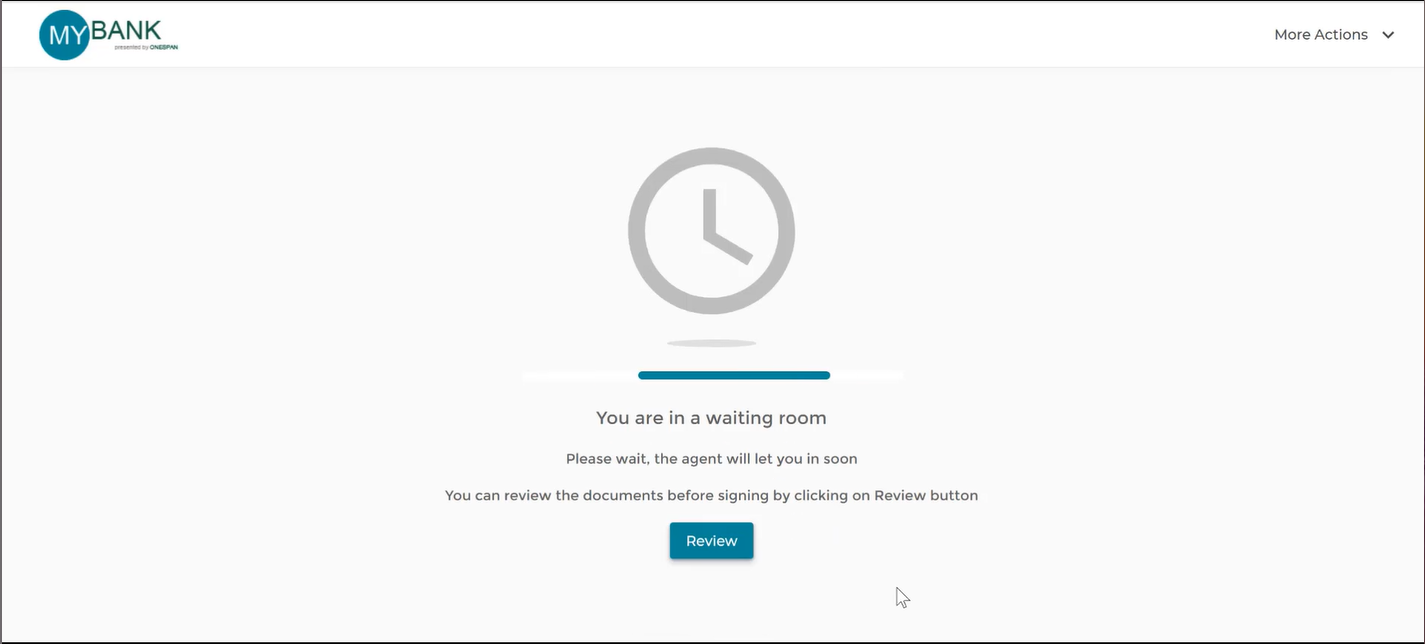
5. The notary joins, verifies that the signer is in the waiting room, then starts the remote online notary session by clicking ‘Start Transaction’.
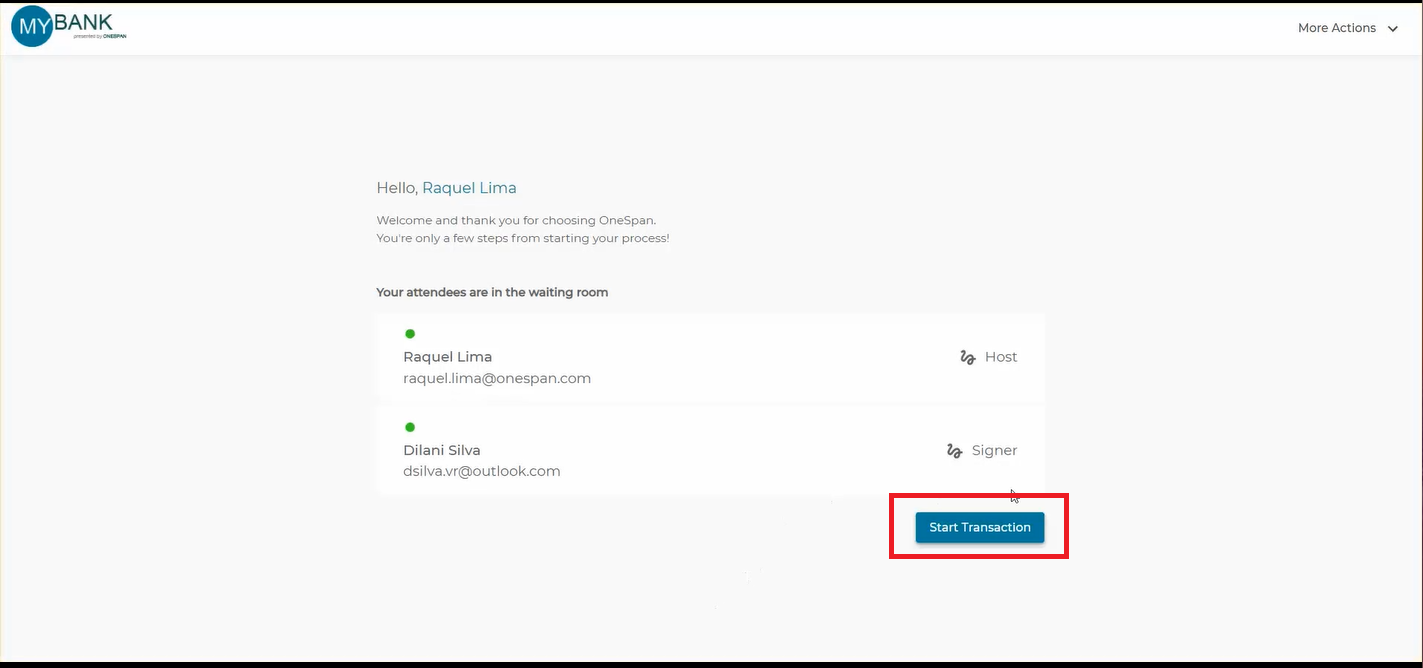
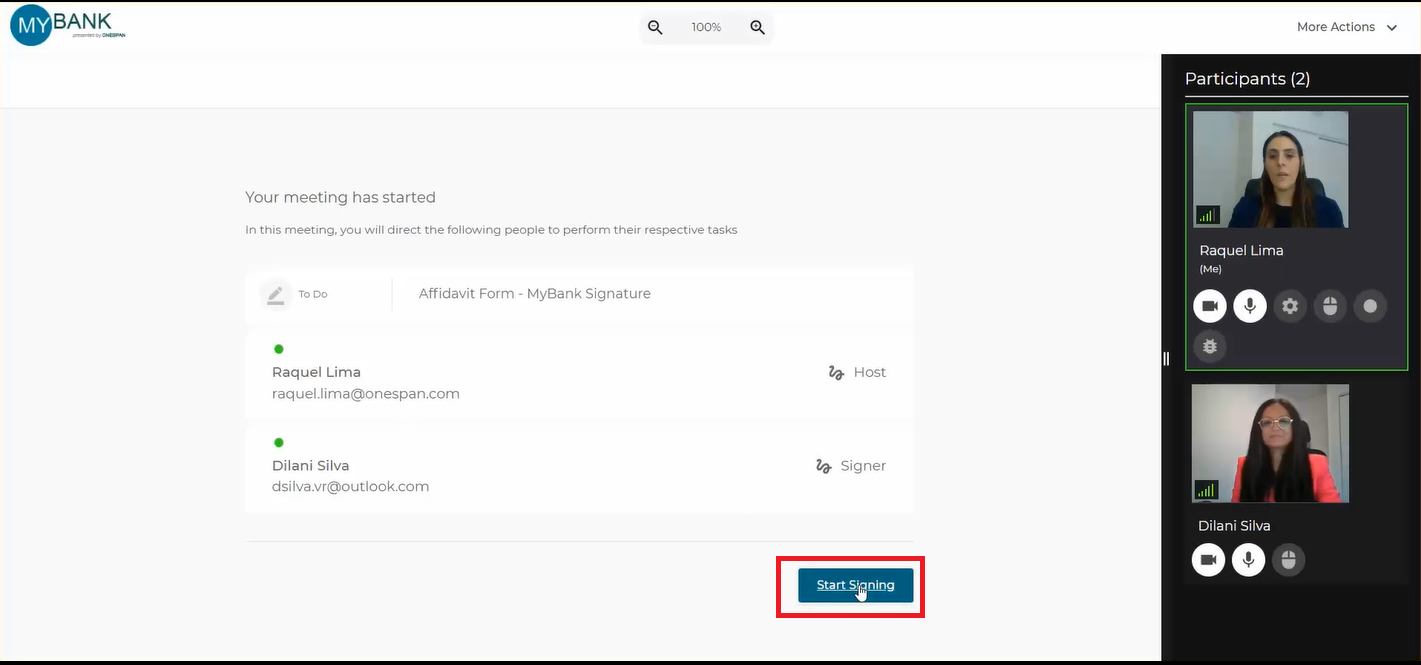
6. The notary and signer are now in the session. The Welcome screen appears, showing the tasks that need to be completed.
The notary clicks the ‘Start Signing’ button to initiate the e-signing and notarization process.
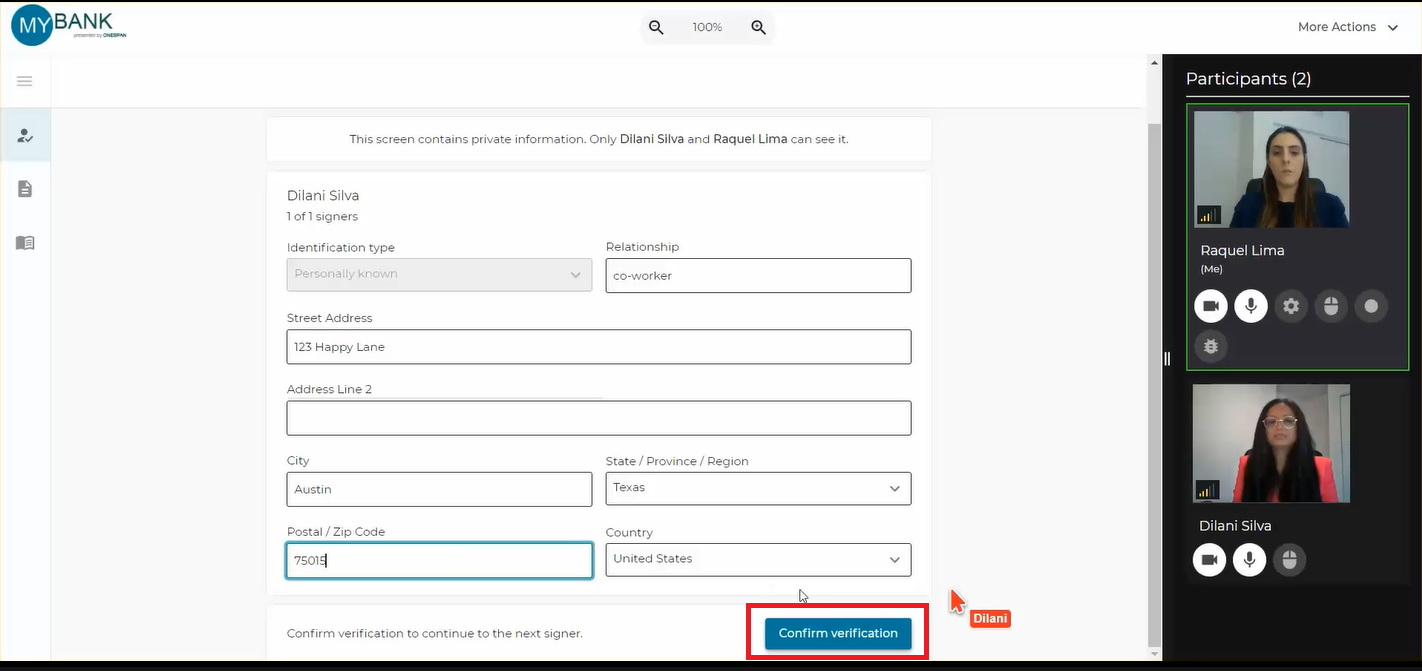
7. To begin, the notary captures information to identify the signer in the eJournal.
- If the signer is known to the notary, the notary includes information in the eJournal explaining their relationship with the signer.
- If the signer is unknown to the notary, the notary includes details regarding the government-issued identification document used to identify the signer in the eJournal. The notary performs a credential analysis by validating the signer’s identity. This is done by comparing the identification document provided during ID verification (IDV) with the signer’s on-screen image.
In this scenario, the notary already knows the signer.
The notary adds the signer’s address information to the eJournal and clicks ‘Confirm Verification’.
8. The notary can start recording at any point of the session as per state requirements. The notary clicks the ‘Start recording’ button from their control panel.
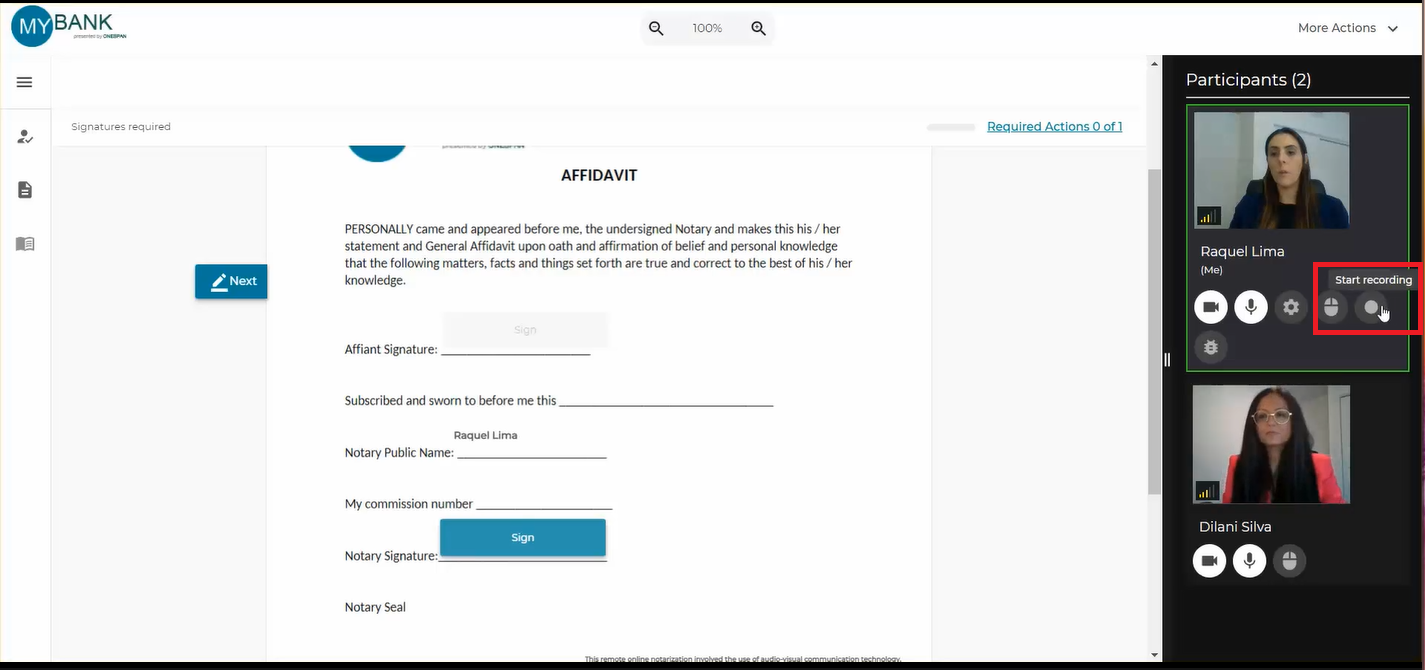
9. The notary should take a moment to explain the details of the document that needs to be reviewed and completed by the signer.
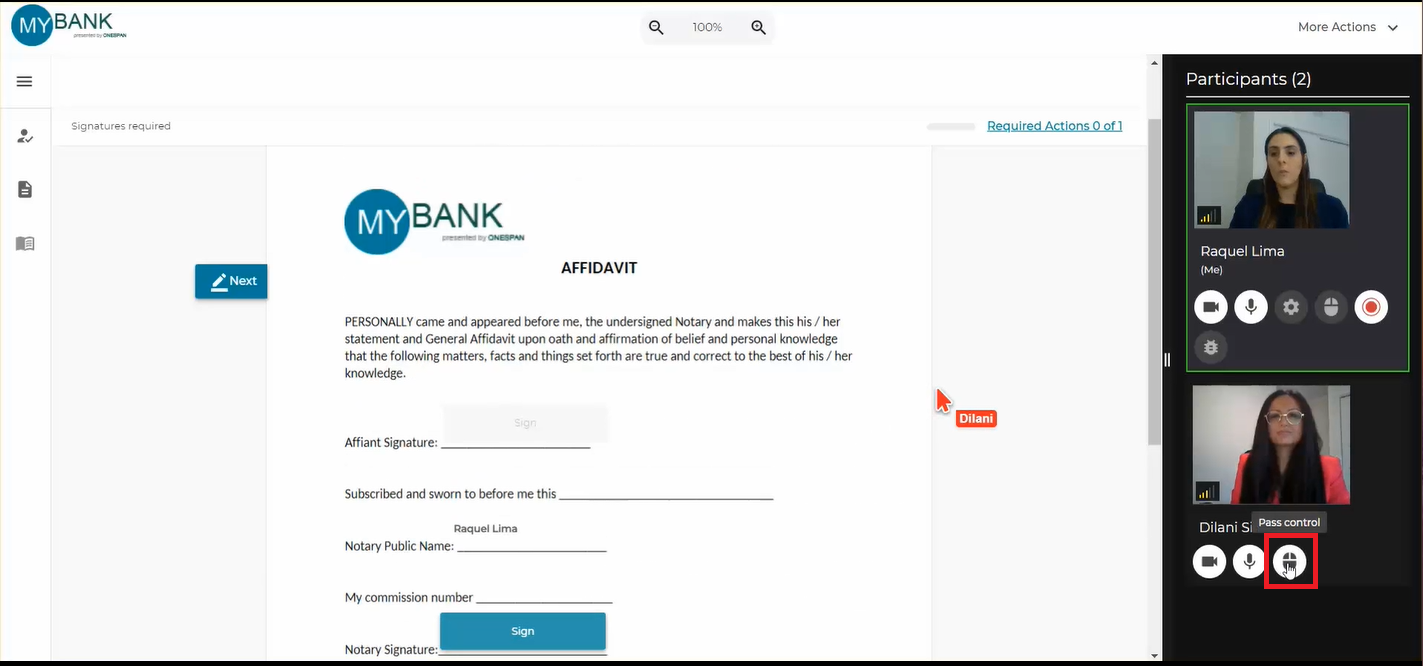
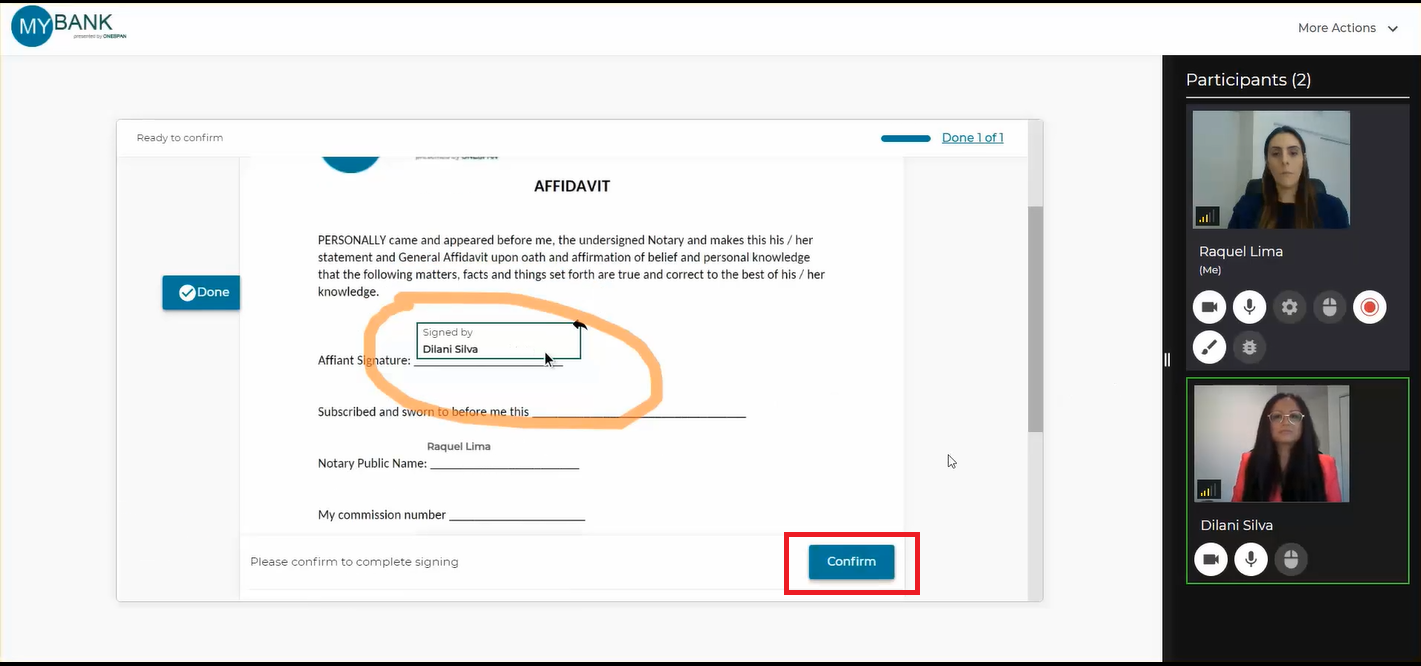
10. The notary then passes control to the signer. The signer reads and signs the required areas of the document then clicks ‘Confirm’. Guided workflows and cues with co-browsing help the signer complete the necessary steps.
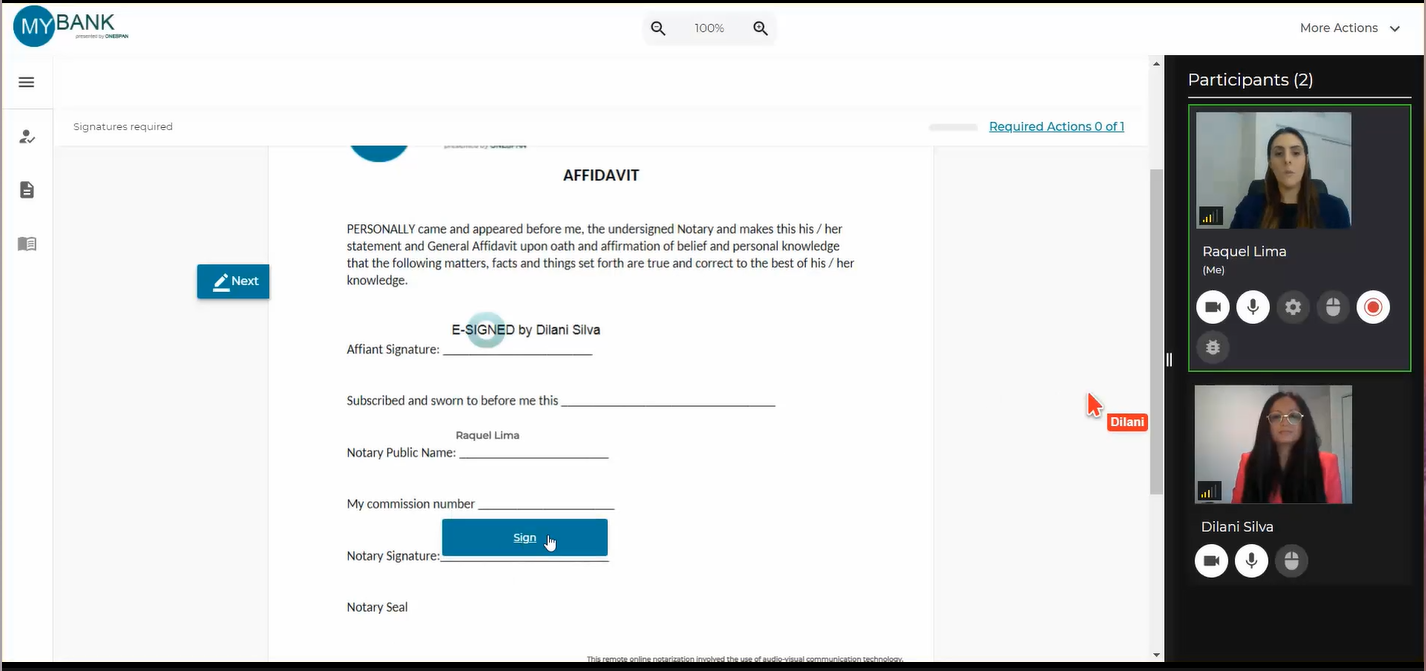
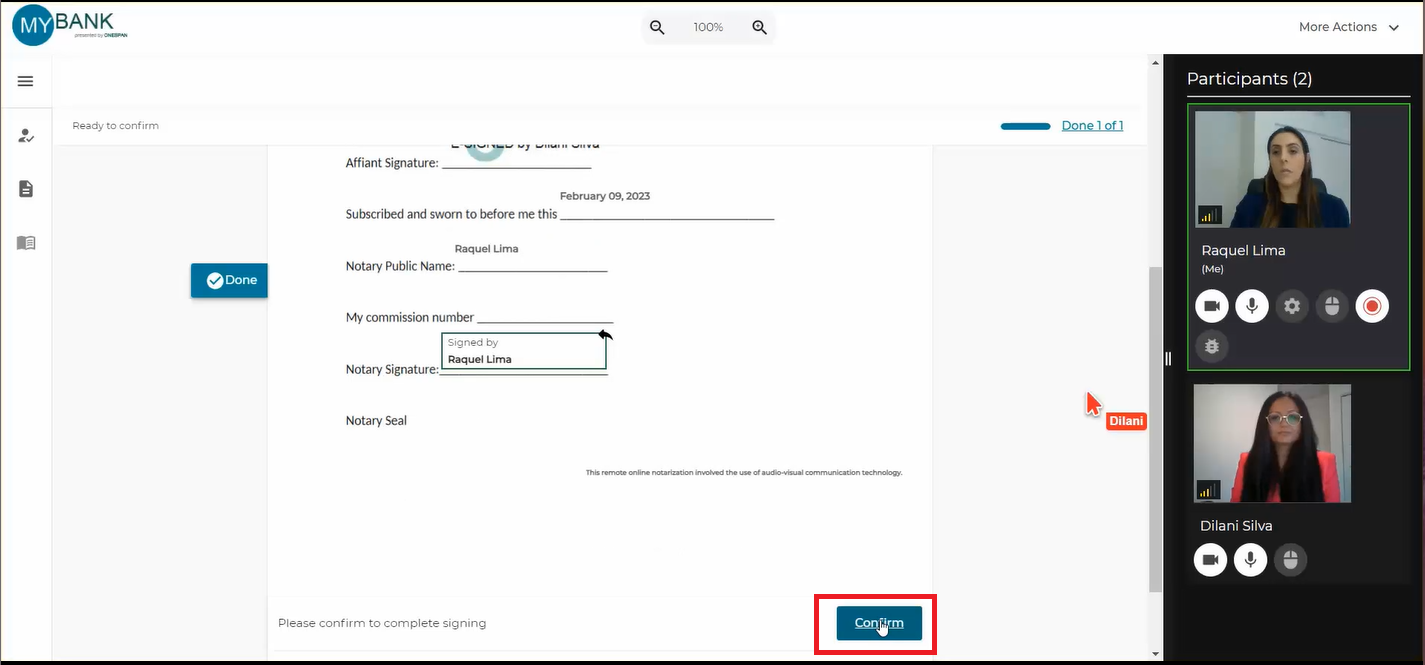
11. After the signer completes the document, the notary signs and then applies their eNotary seal to the document. The notary then clicks ‘Confirm’. Information such as notarization date, notary’s name, notary’s commission, jurisdiction and remote online notarization wording are included after the notarization is completed.
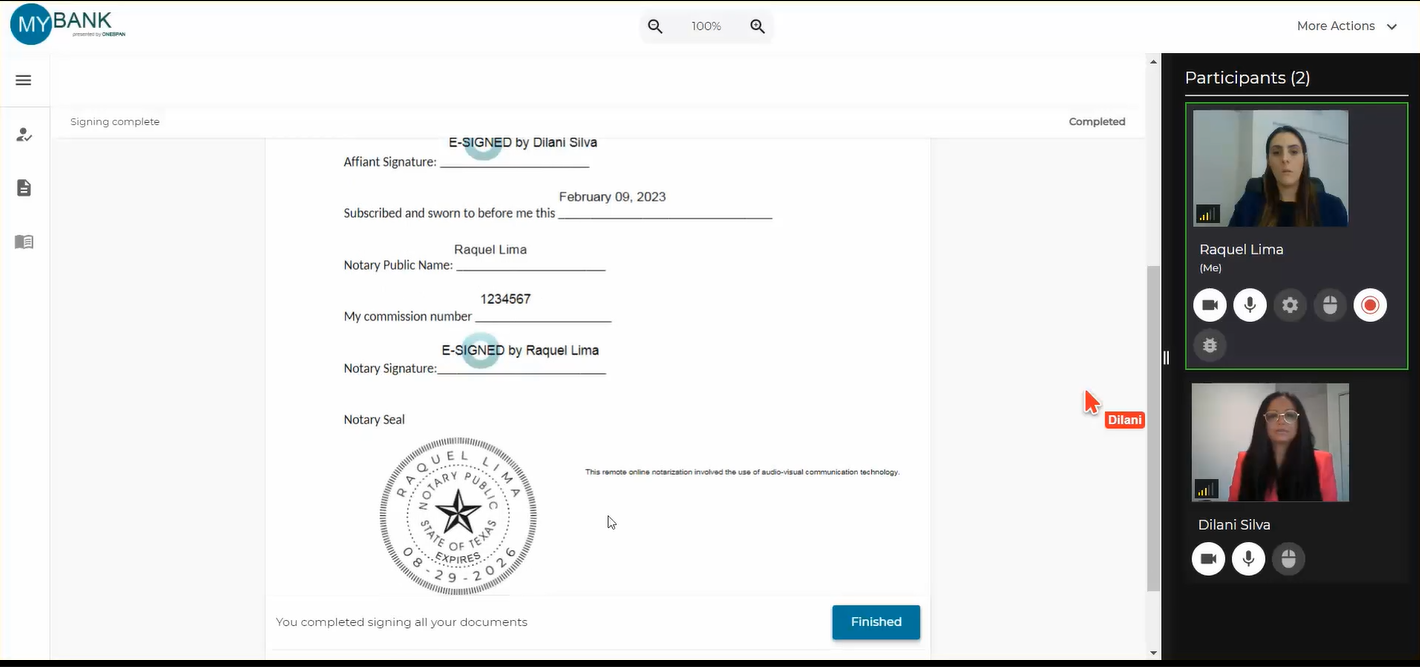
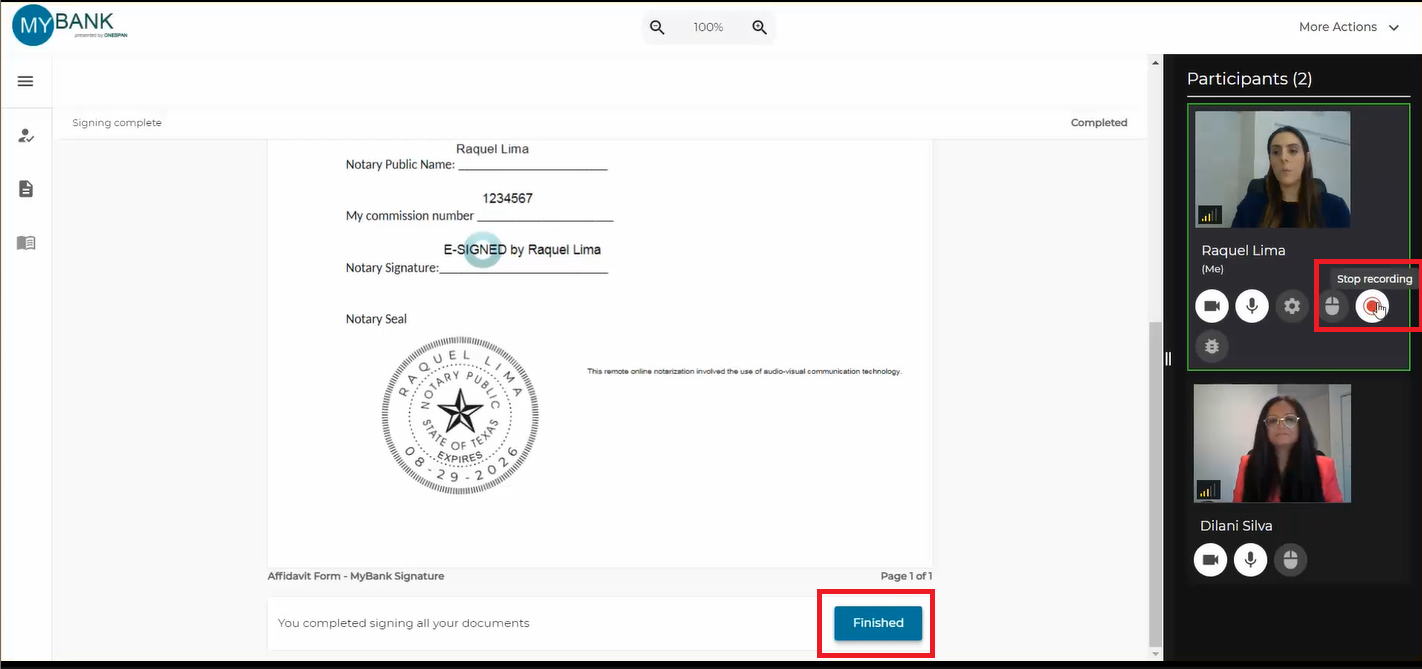
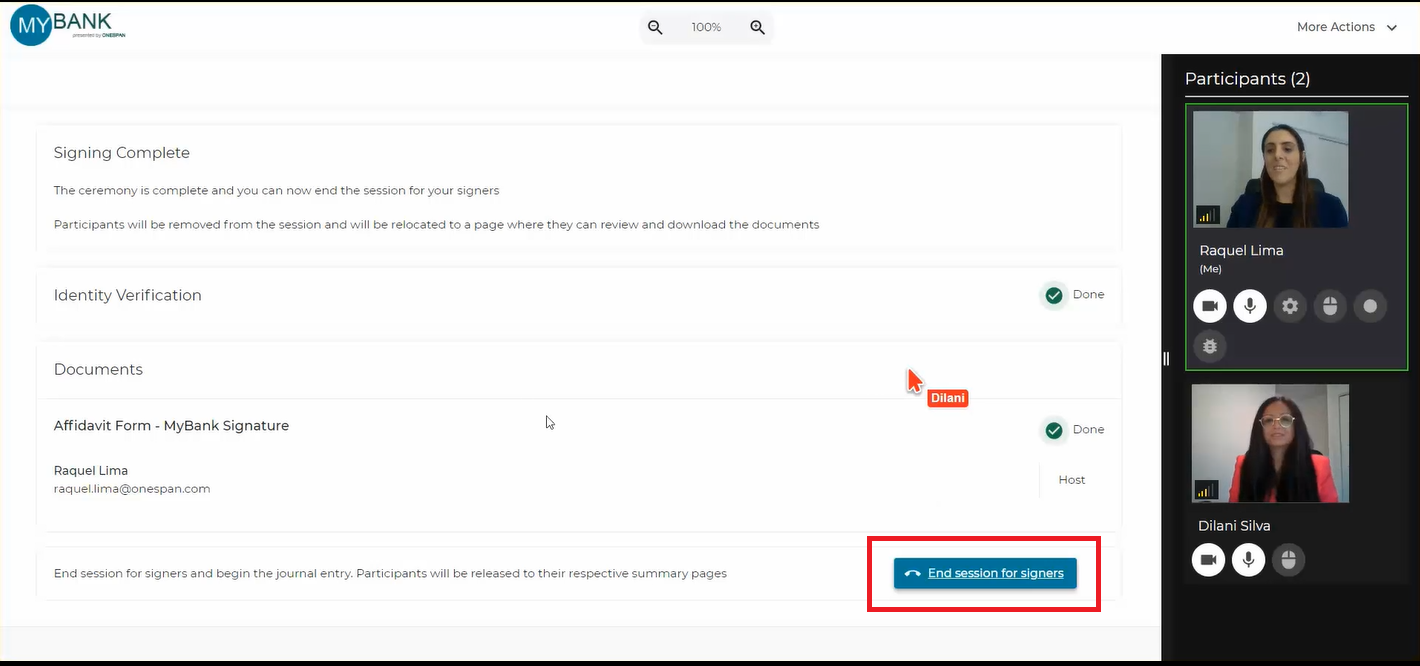
12. The notary ends the session with the signer by stopping the recording and clicking ‘Finished’. The notary clicks ‘End session for signers’.
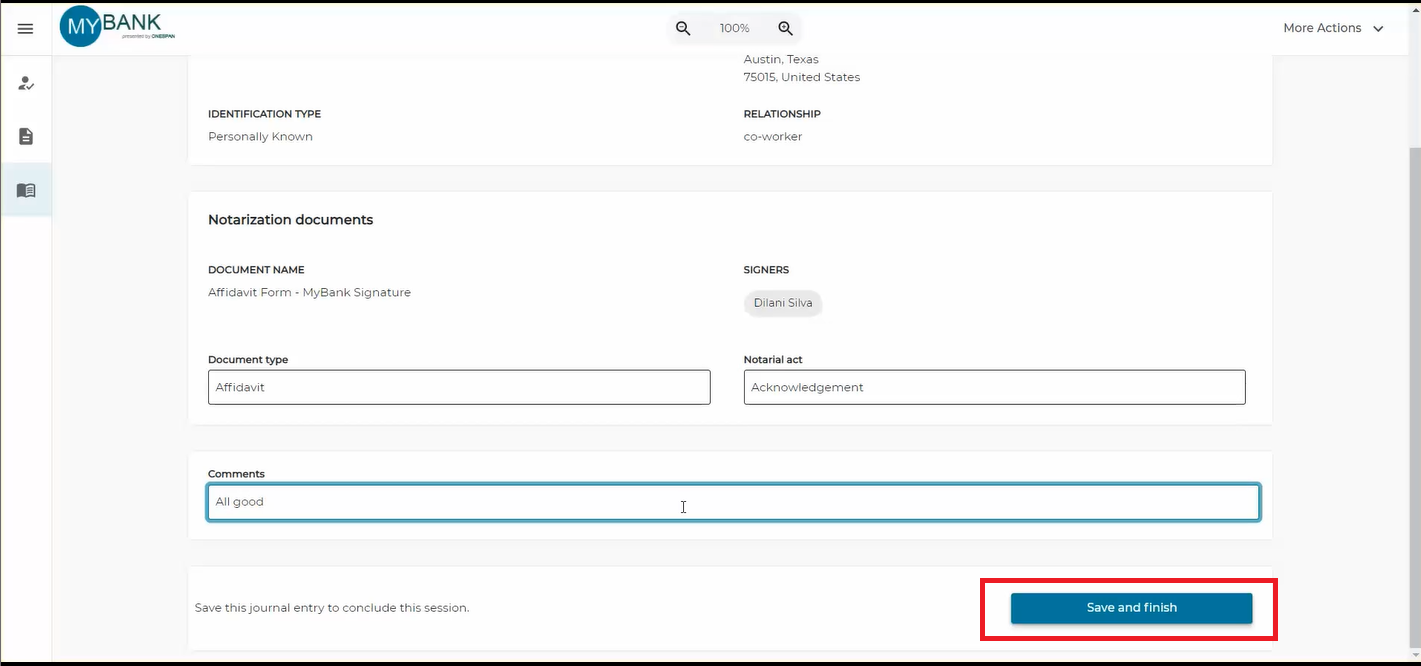
13. The notary can then fill in additional information about the remote online notary session in the eJournal. This could include information such as the type of document, type of notarial act, and any other relevant comments. The notary clicks ‘Save and Finish’.
How to Access Electronic Evidence
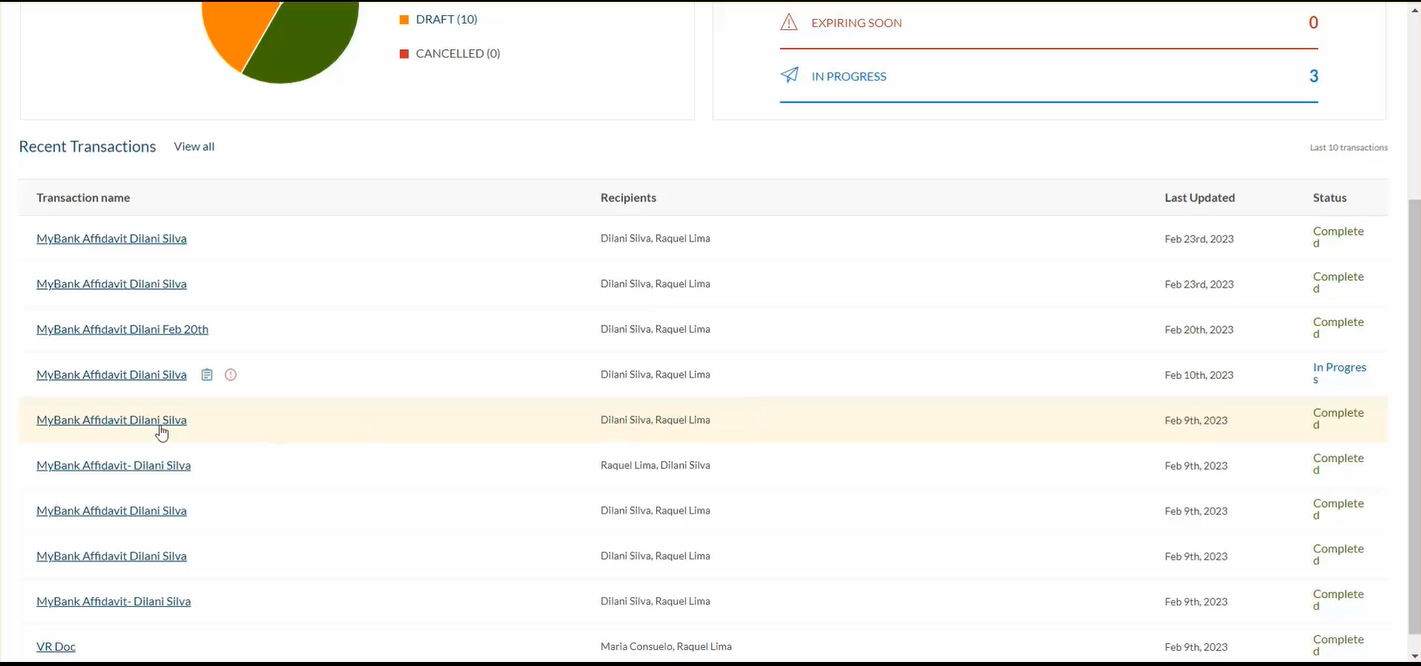
1. To access the electronic evidence, the notary selects the desired transaction from the transaction list.
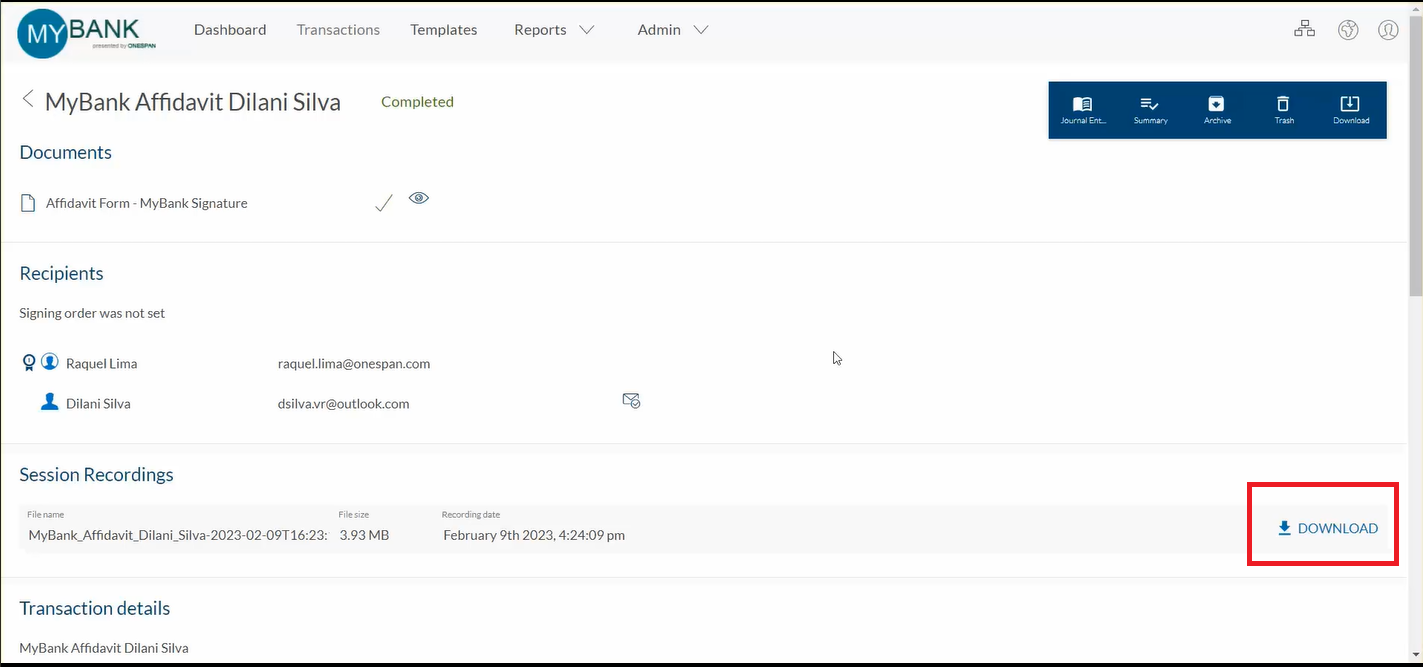
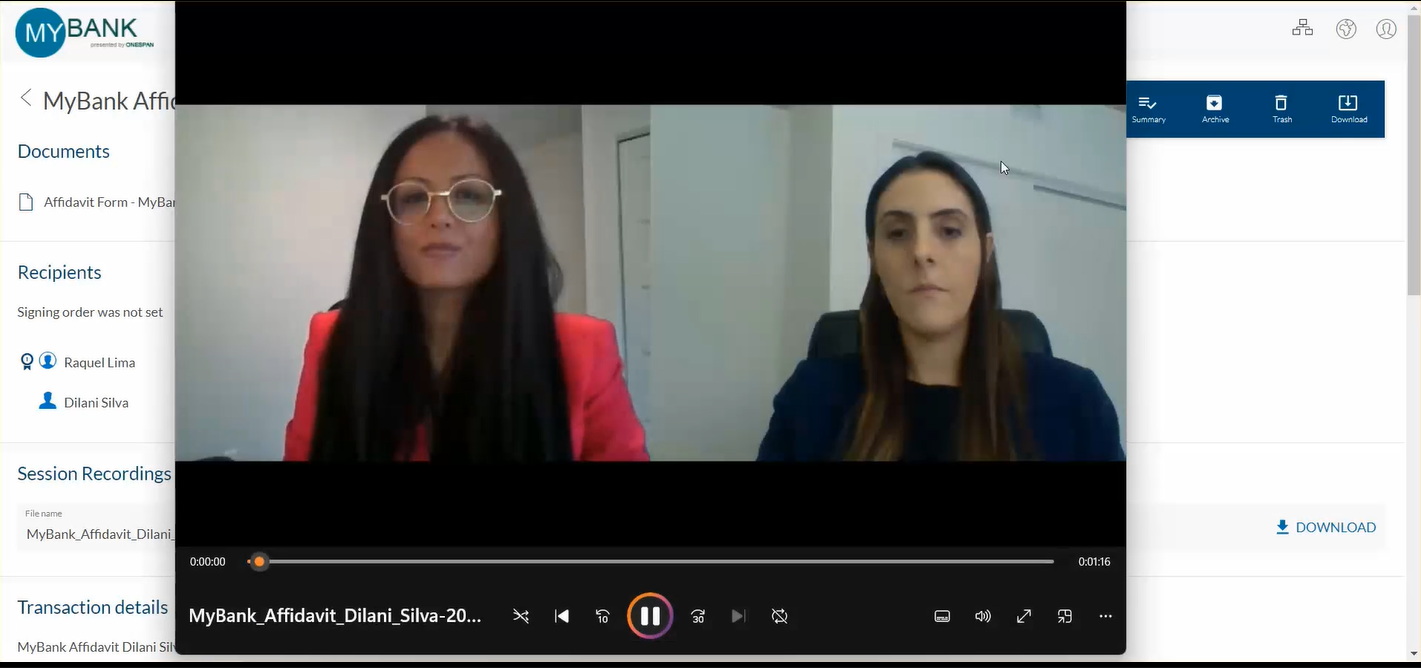
2. To view the audiovisual recording of the session, the notary goes to ‘Session Recordings’ and clicks ‘Download’. The video recording captures the notary and signer interacting throughout the remote online notary session. Per Remote Online Notarization (RON) compliance requirements, the audiovisual recording does not show the document that is being e-signed and notarized.
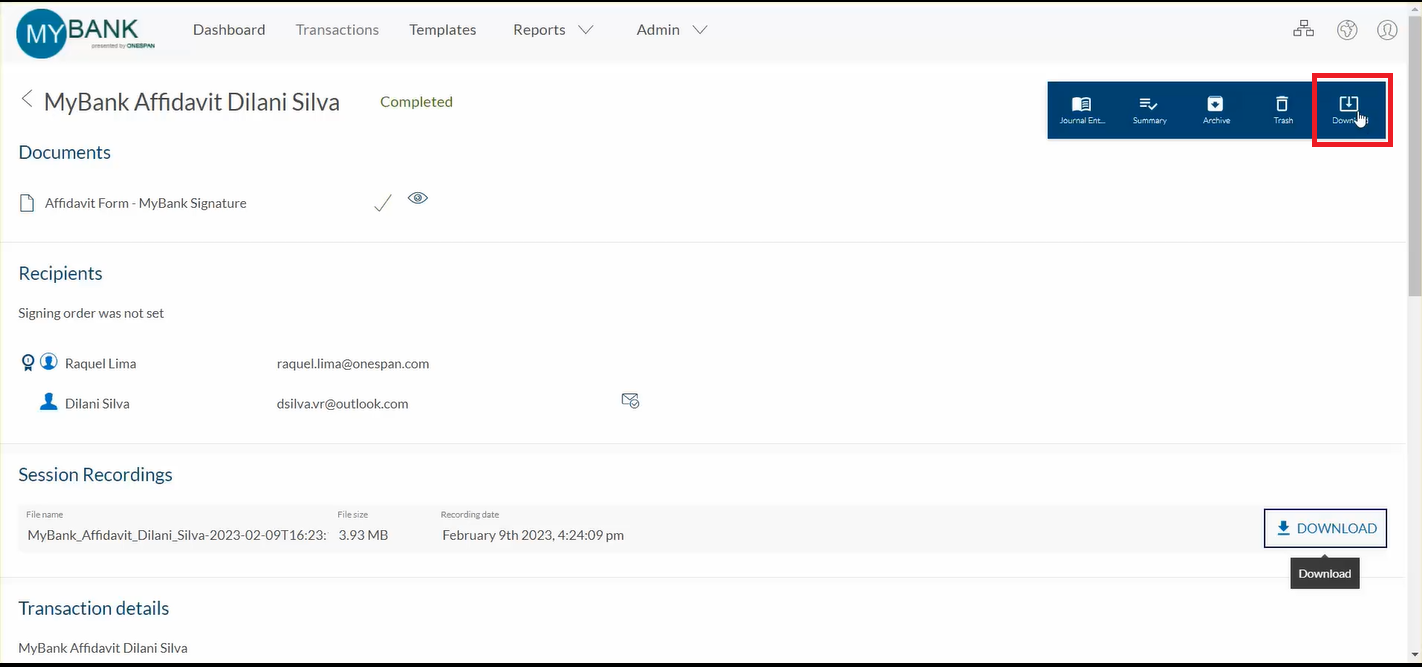
3. To access the notarized document and comprehensive audit trail, the notary goes to the toolbar and clicks ‘Download’. The notarized document and audit trail will be contained in a zip file.
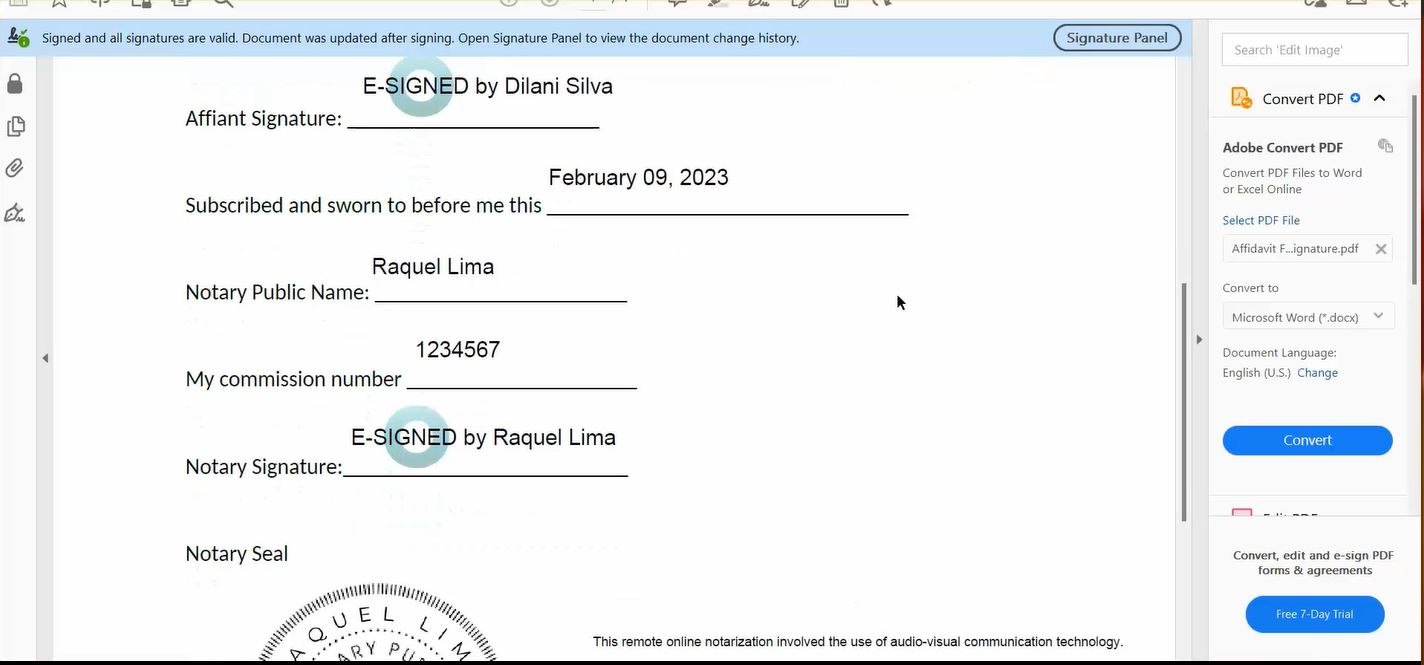
4. The notarized document shows the signer’s e-signature, the date the document was notarized, the notary’s name and commission number, the notary’s e-signature, the eNotary electronic seal, and the remote online notarization wording.
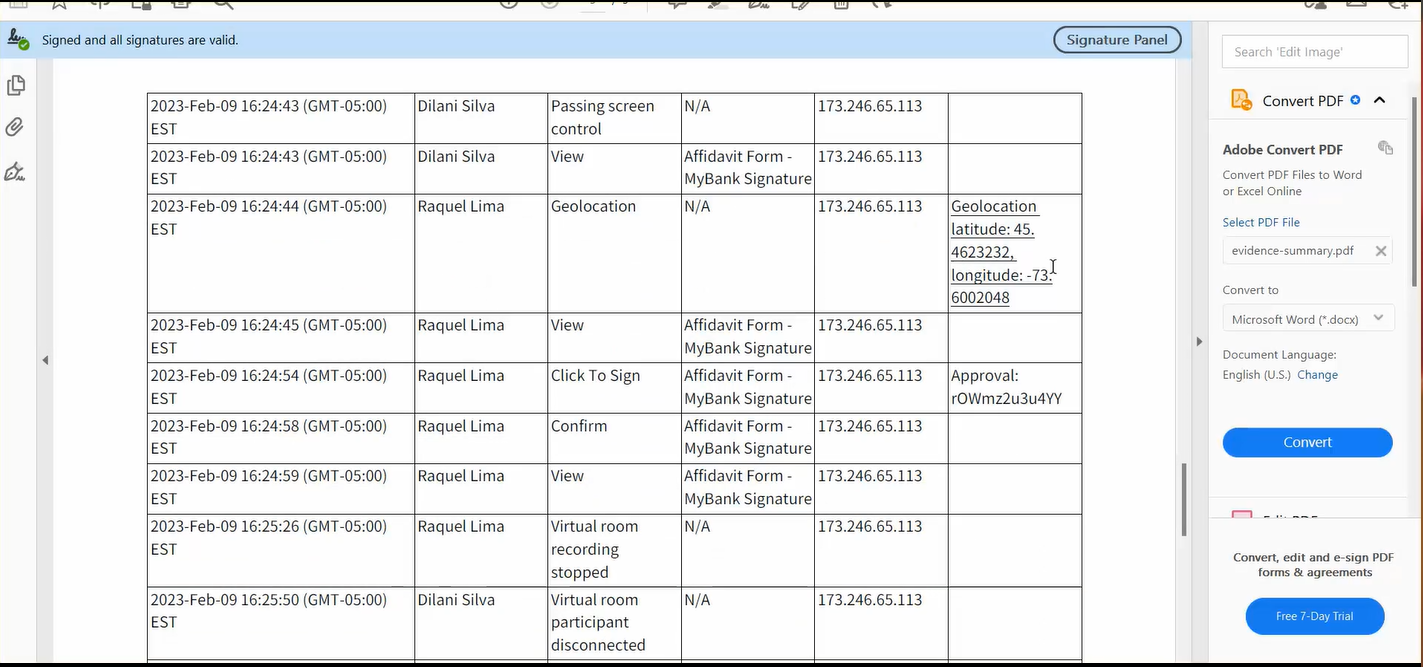
5. The evidence summary contains the audit trail. This captures detailed actions taken throughout the e-signing and notarization process, including:
- Signing privileges passed between notary and signers
- IP address and geolocation details of participants
- Pass / fail identity proofing details
- E-Signing events and timestamps
- Remote online notaries applying their eNotary electronic seal
- And other actions
6. The eJournal can only be accessed by the notary. At the end of each remote online notary session the eJournal will be available to the notary in the ‘Account Settings’ section.
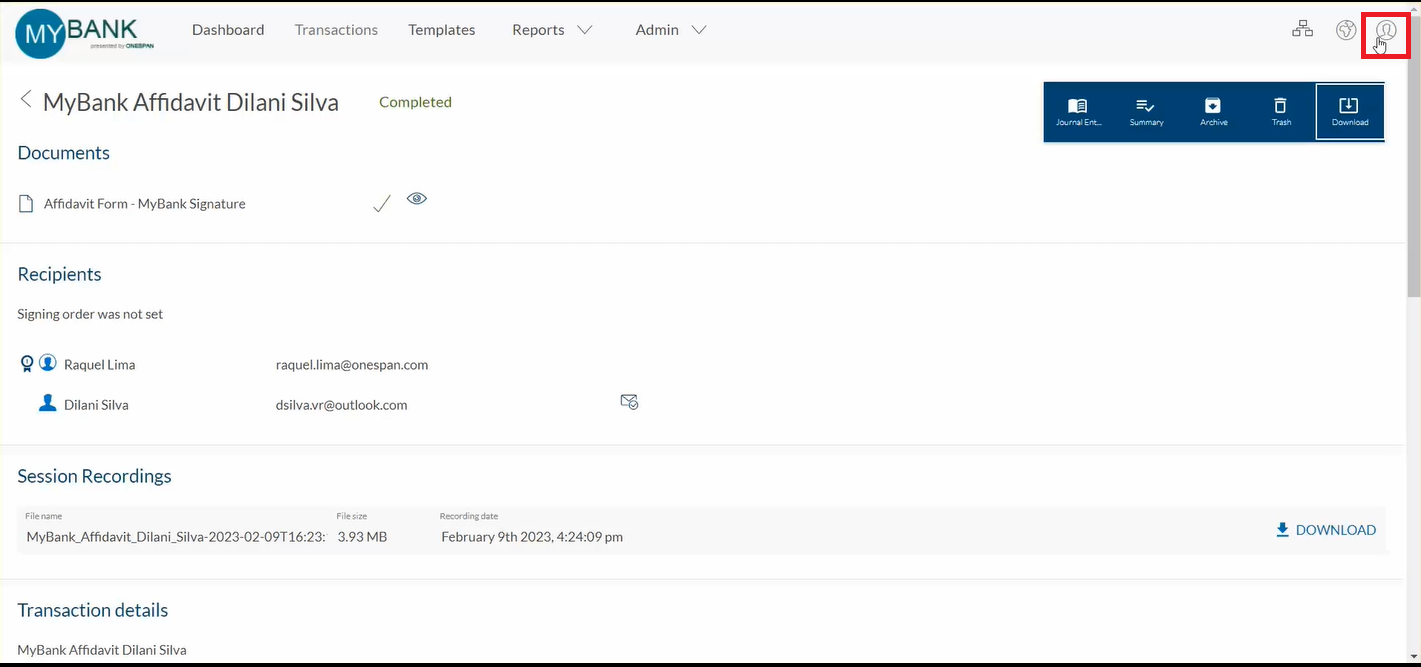
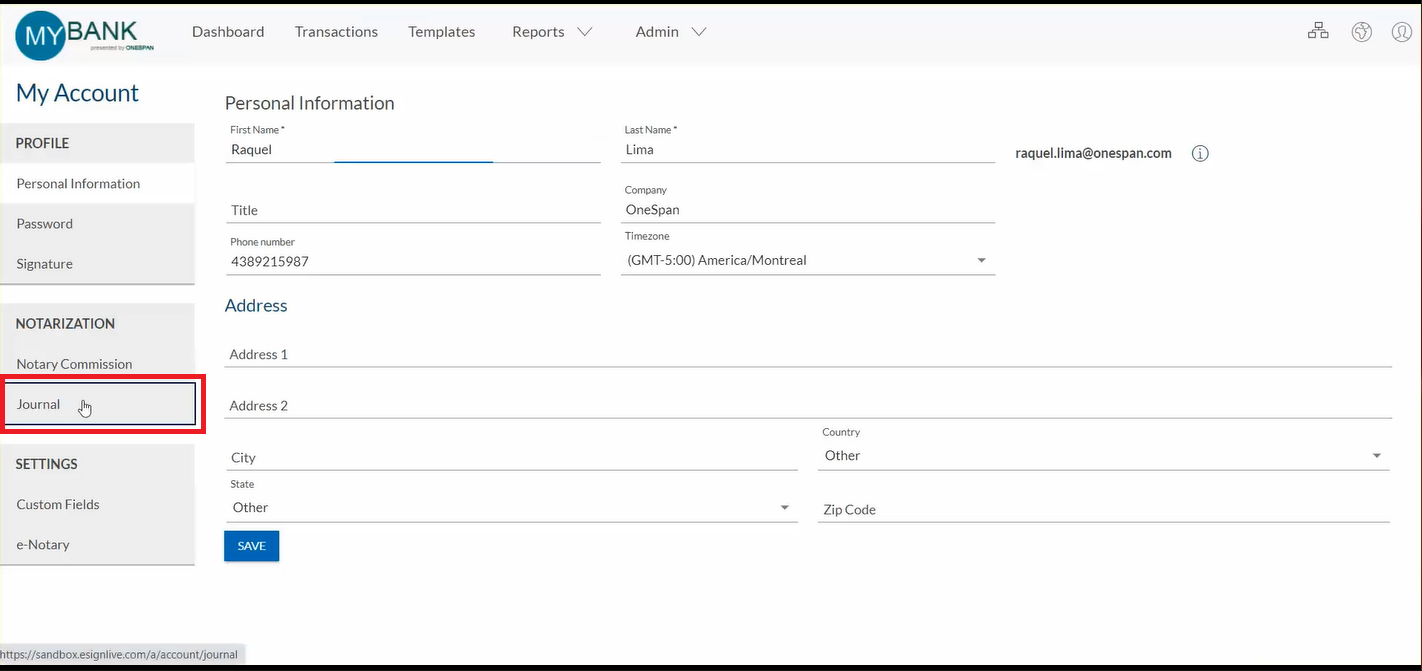
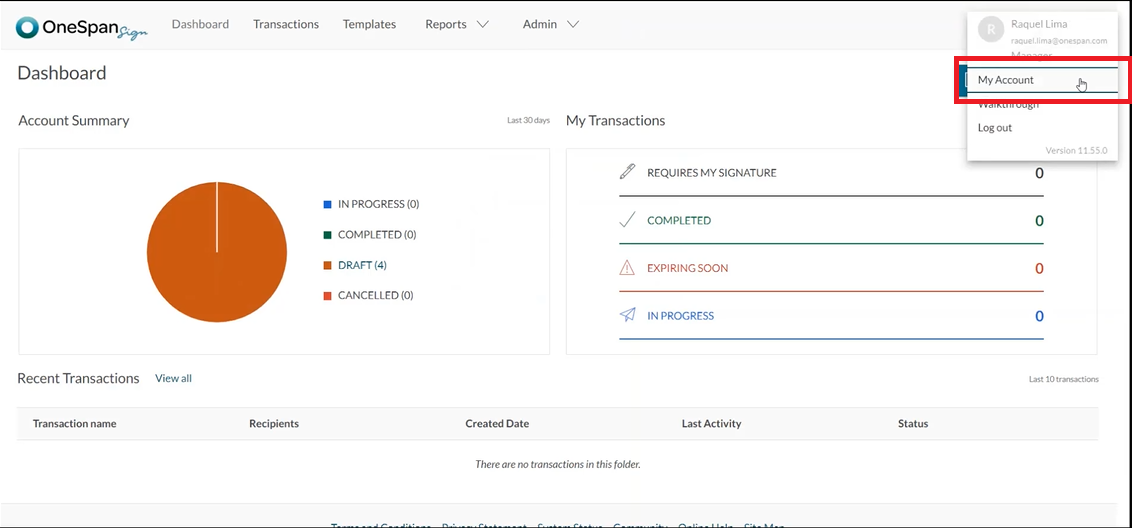
7. To access the eJournal the notary clicks ‘My Account’, then ‘Journal’, and then selects the remote online notary session they would like to access the eJournal for.
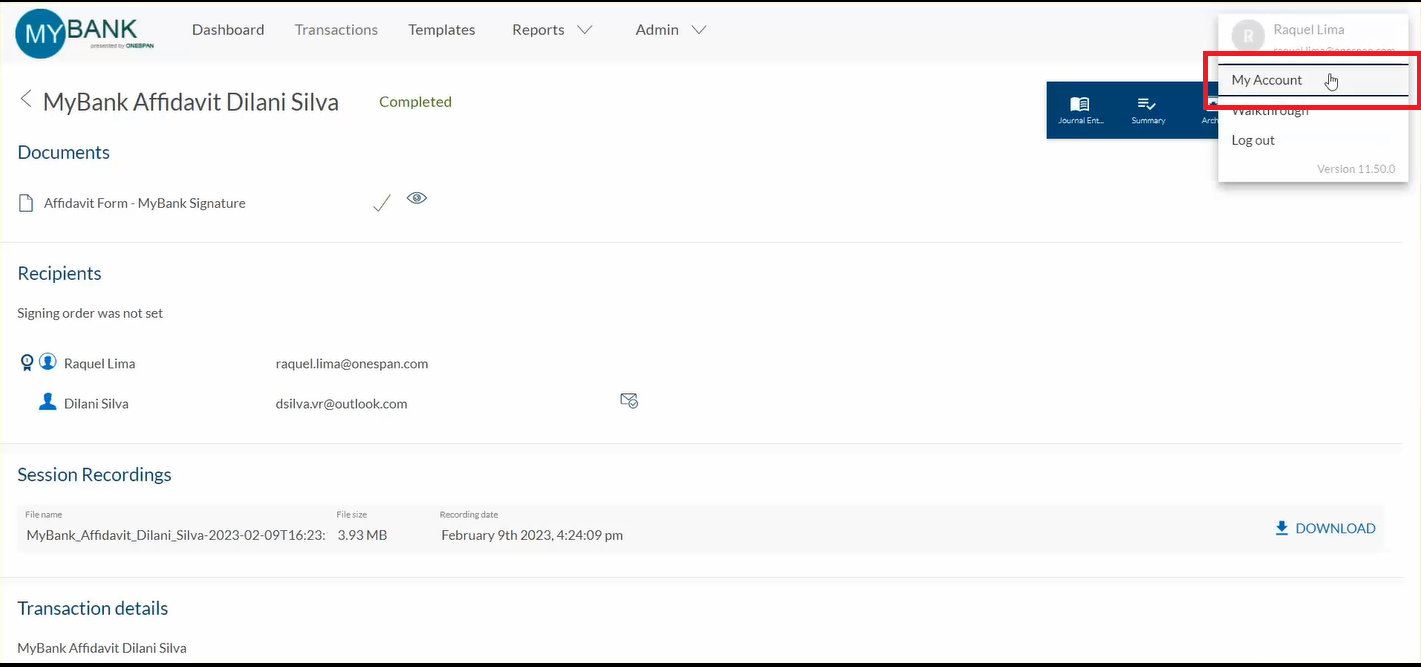
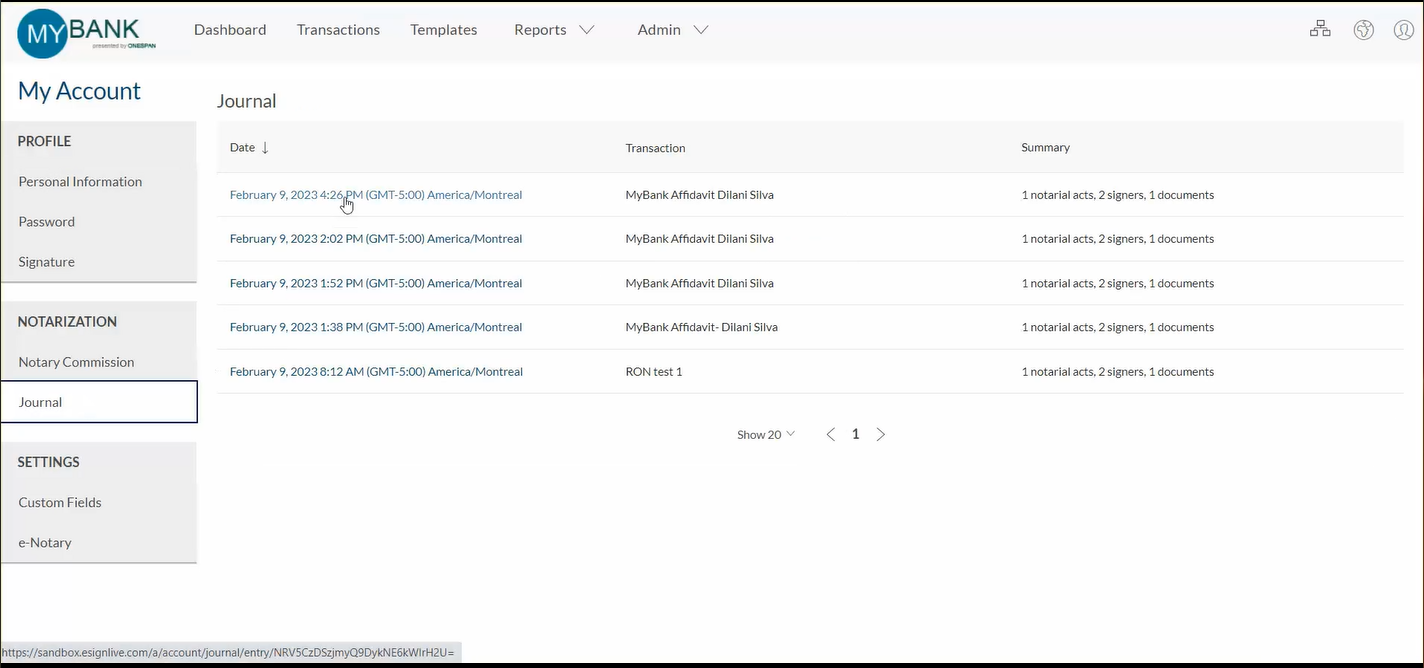
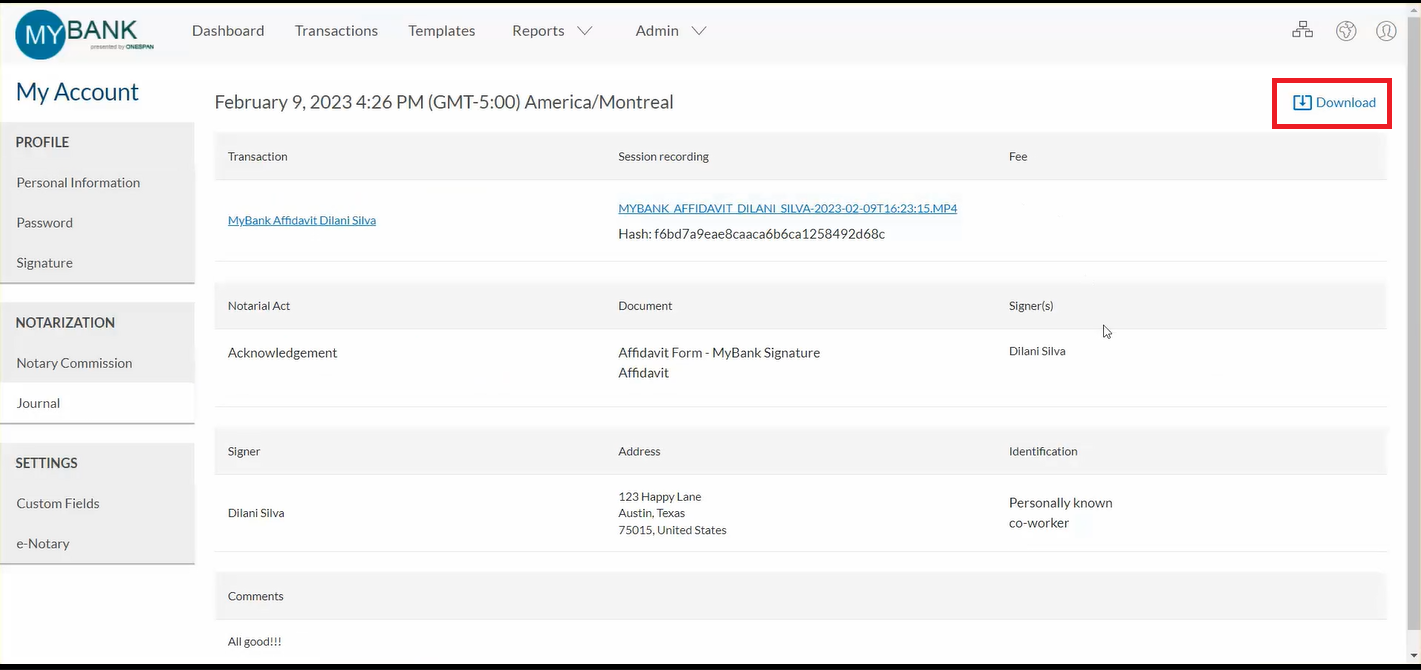
8. All of the required information captured during the remote online notary session is included in the eJournal such as transaction name, session recording, notarial act, document type, signer information, identification type, as well as the notary’s comments.
9. The notary can download and save the electronic evidence to their records.
How to Use In-Person Electronic Notarization (IPEN)
Step-by-step instructions
Updating the Notary Commission Page for IPEN
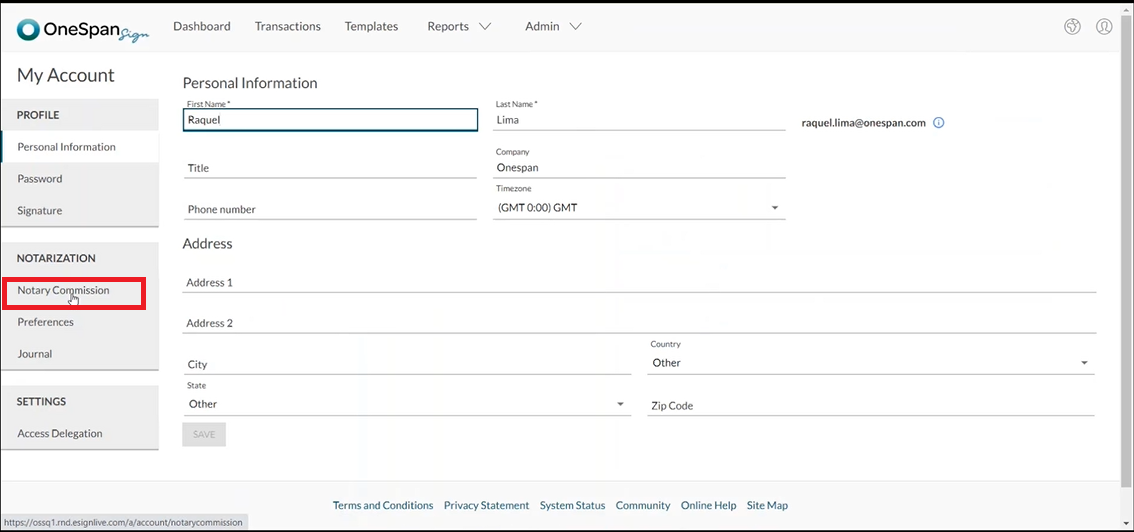
1. After logging in to OneSpan Sign, the Notary accesses their ‘My Account’ section and clicks ‘Notary Commission’.
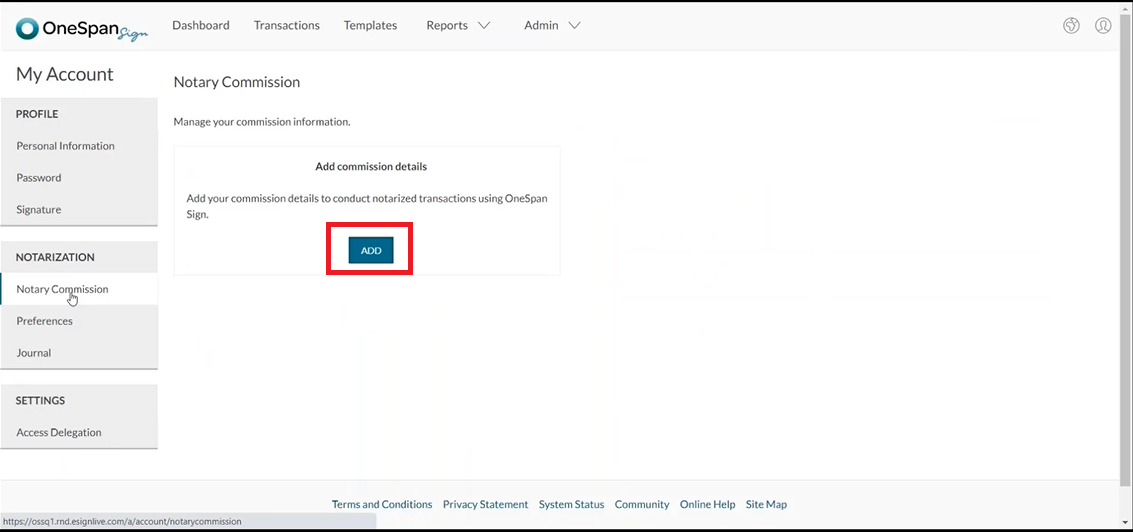
2. The Notary clicks ‘Add’ to include their commission detail.
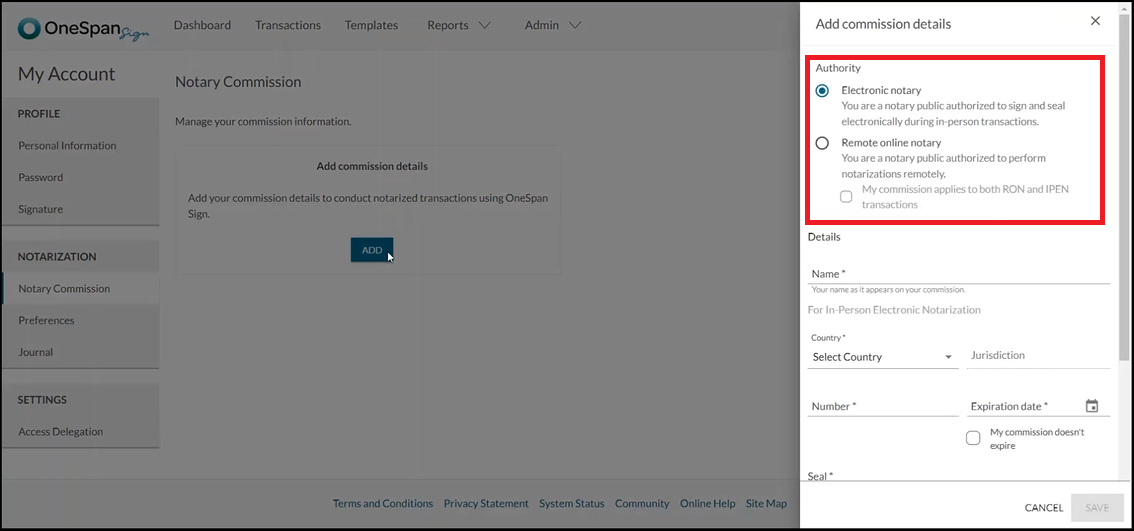
3. The Notary can select different options in the ‘Authority’ section:
- If the Notary can only perform IPEN transactions, they can select ‘Electronic notary’
- If the Notary can perform both IPEN and RON transactions, they can select ‘Remote online notary’
- If their commission applies to both methods, they can add a checkbox to ‘My commission applies to both RON and IPEN transactions’
In this example, the Notary can only perform IPEN transactions, so they will select ‘Electronic notary’.
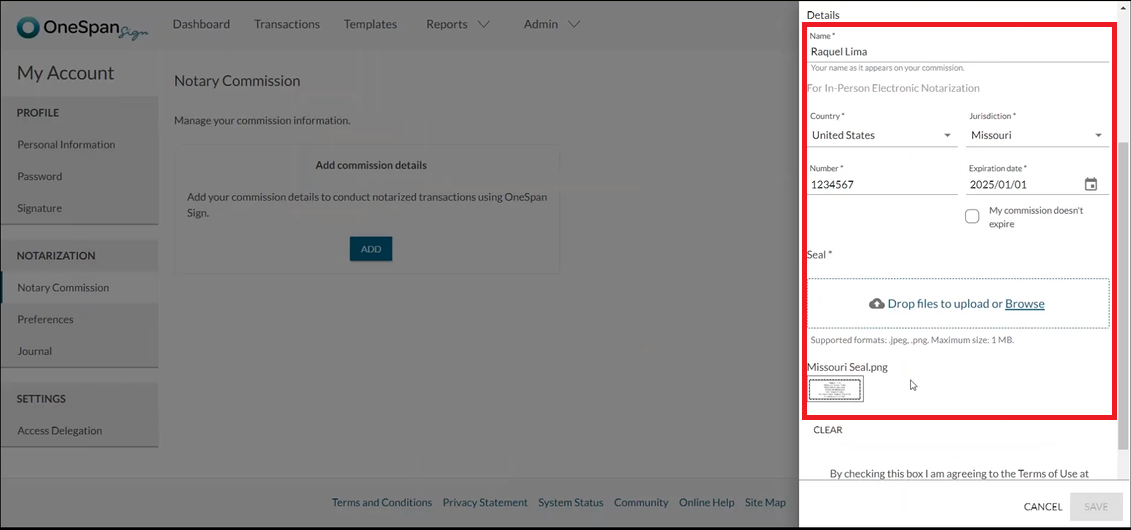
4. The Notary adds their name, country, jurisdiction, commission number, commission expiration date, and uploads their notary seal. The Notary agrees to the ‘Terms of Use’, confirms they are a commissioned notary, and clicks ‘Save’.

5. The Notary’s commission information is saved in OneSpan Sign and they can revisit this page at any time to edit or delete their commission details.
Configuring a Transaction for IPEN
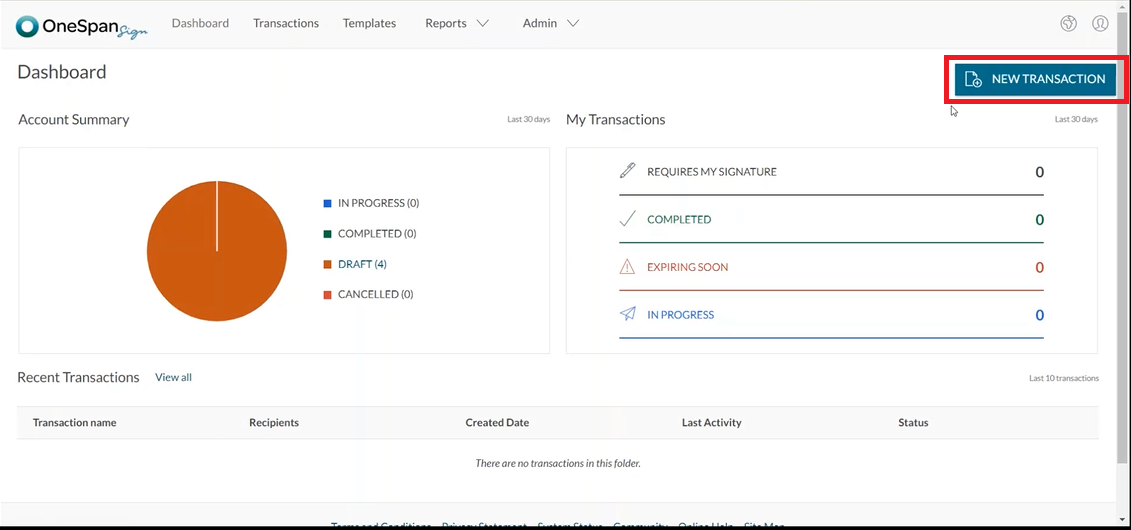
1. Now it’s time for the Notary to prepare the documents for In-person Electronic Notarization. The Notary selects ‘New Transaction’ and enters a name for the transaction.
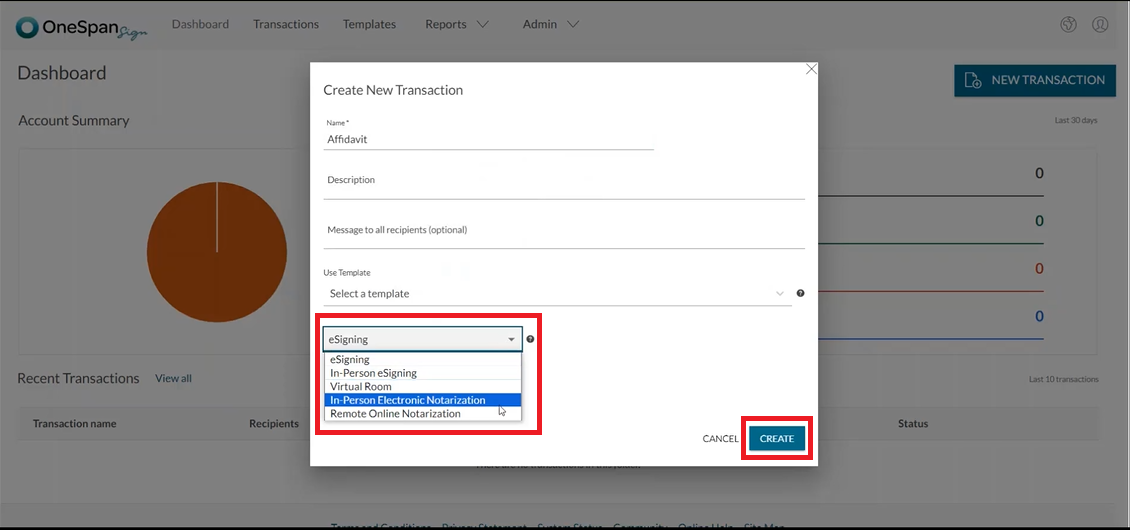
2. In the drop-down, the Notary selects ‘In-Person Electronic Notarization’ as a transaction type and then clicks ‘Create’ to proceed.
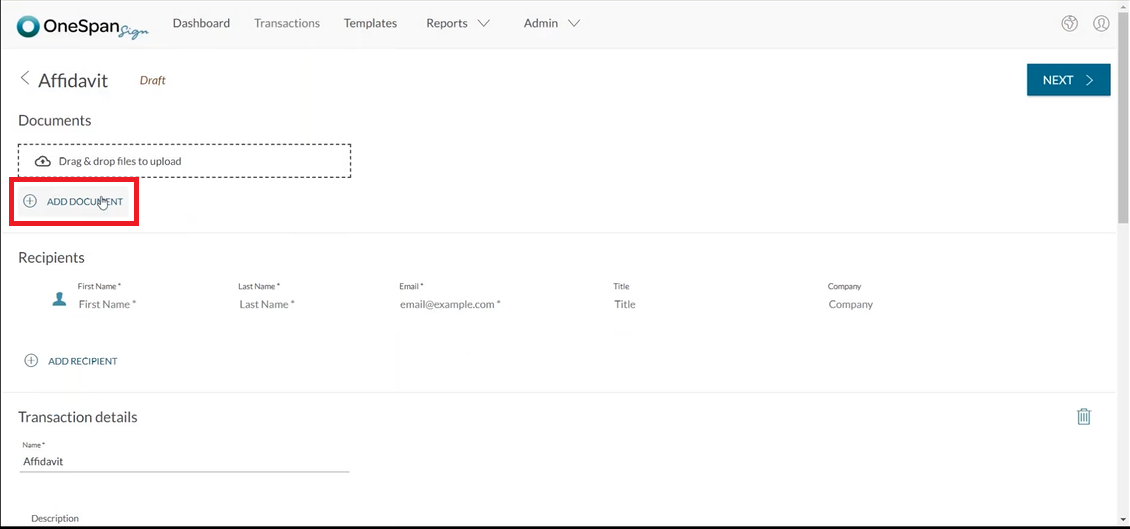
3. To add a document to the transaction, the Notary clicks ‘Add Document’ and uploads a document from their files.
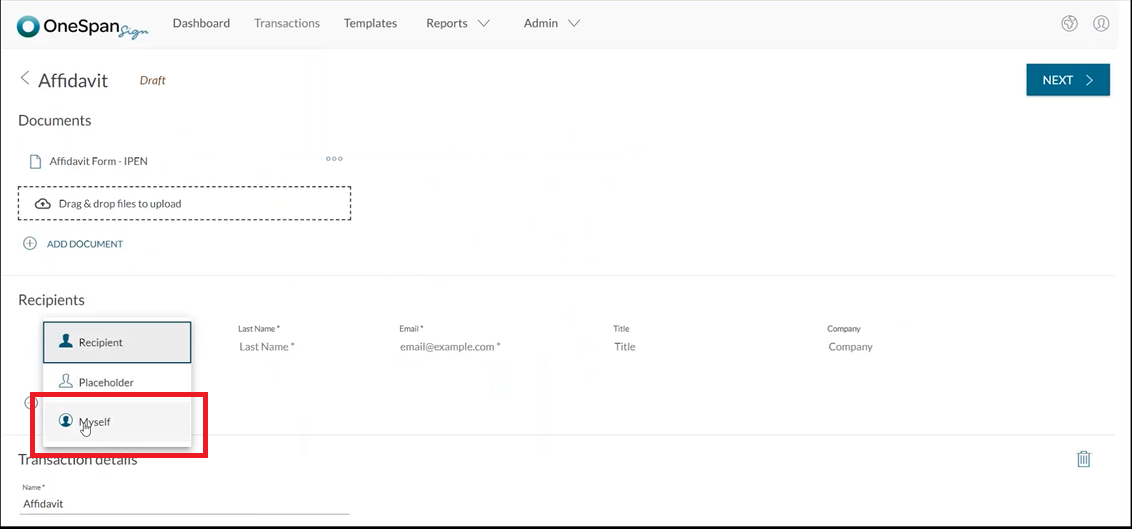
4. The Notary now adds themselves to the transaction and clicks the notary badge next to their name.
5. The Notary adds a signer to the transaction by adding the signer’s first name, last name and email address.
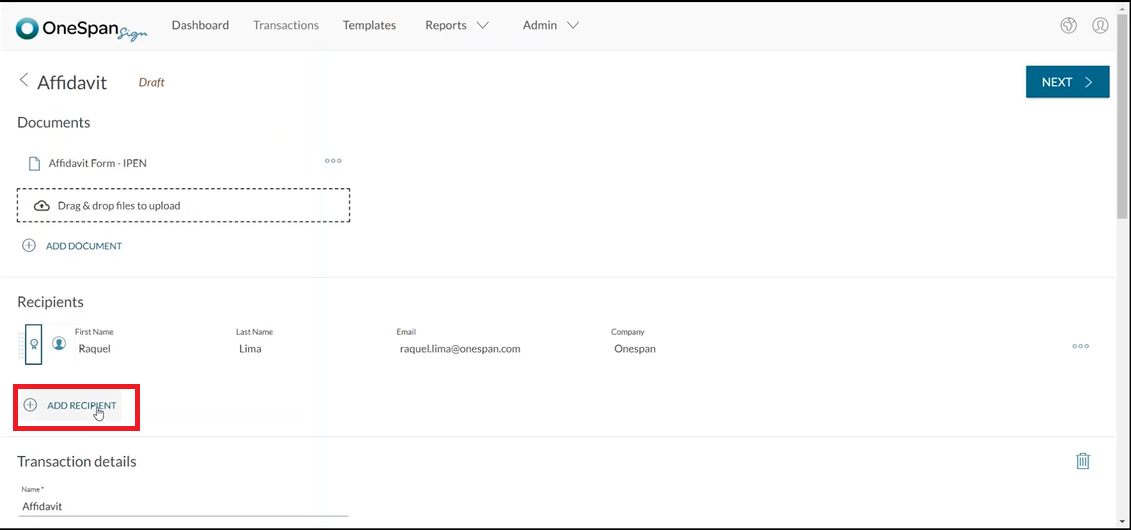
6. They then click ‘Next’ to prepare the document for signing and electronic notarization.
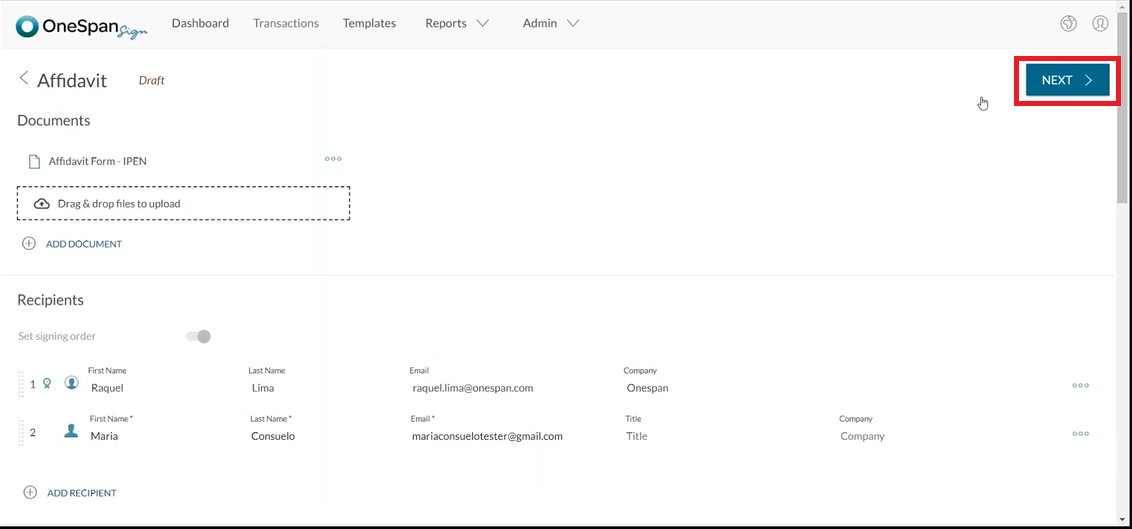
7. To prepare the affidavit, the Notary can drag and drop the signature blocks into the desired areas of the document.
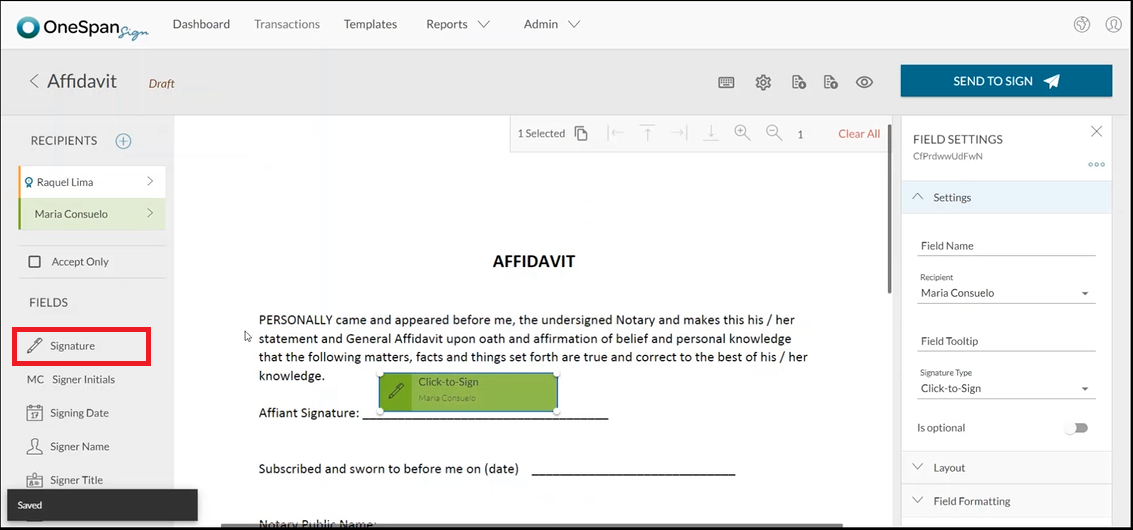
8. The Notary can also scroll down to access additional fields specifically configured for IPEN such as:
- Notary Name
- Notary Commission Number
- Notary Jurisdiction
- Notary Country
- Notary Seal
- Notary Commission Expiration Date
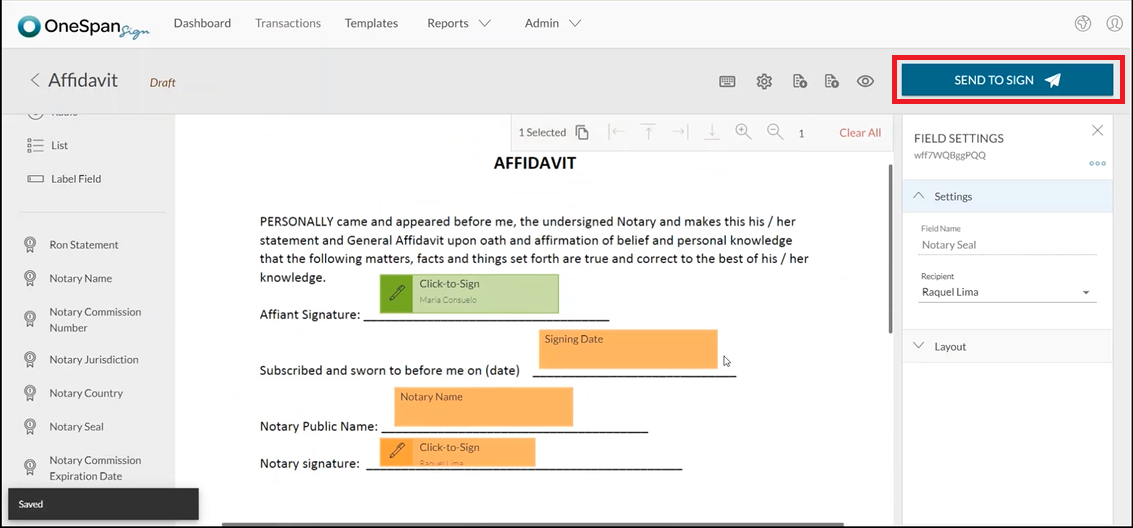
9. Once all the necessary fields have been added, the affidavit is ready to send. The Notary clicks ‘Send to Sign’.
Signing in an IPEN Session
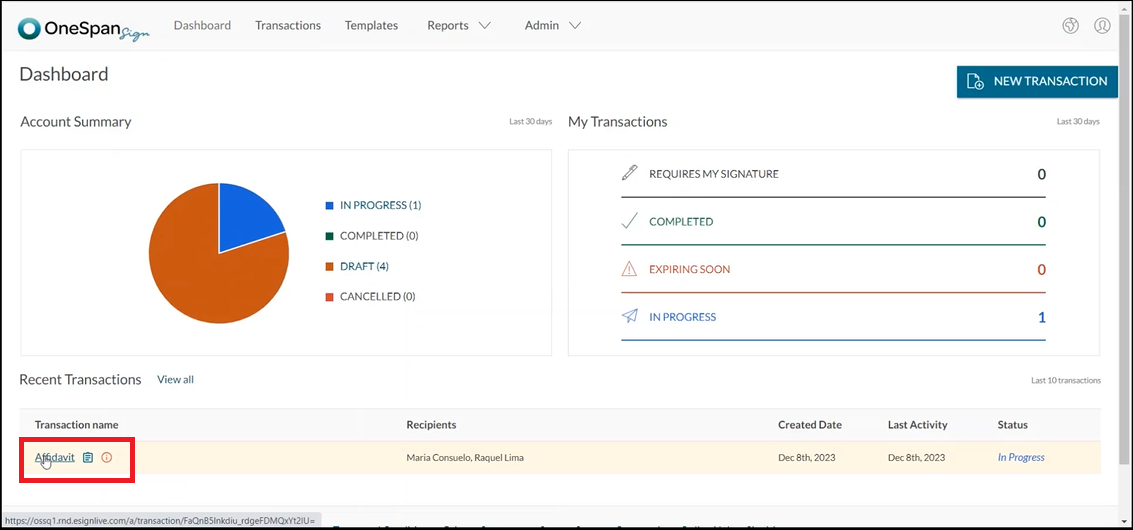
1. When the Notary meets the signer in-person to notarize the affidavit, they access the transaction on their tablet or laptop and then click ‘Sign’.
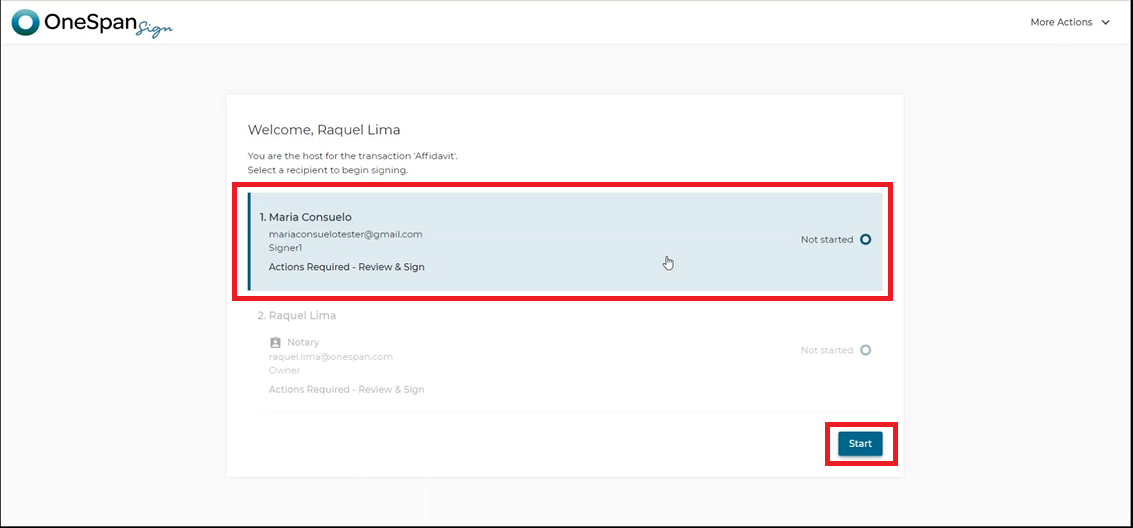
2. The Welcome screen appears showing the actions required for both the signer and Notary in the IPEN session.
To start the electronic notarization, the Notary selects the signer’s name and clicks ‘Start’.
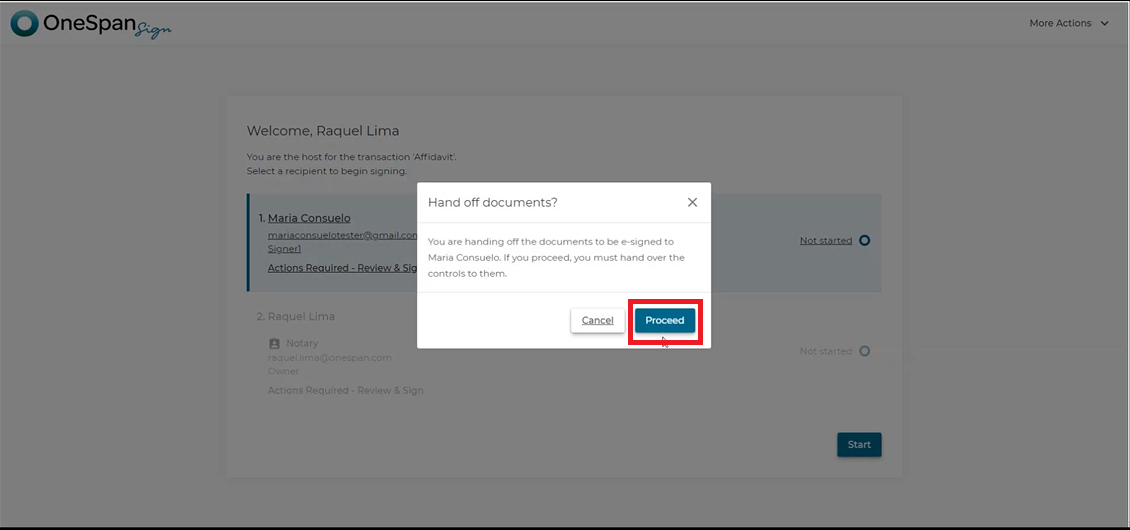
3. The Notary clicks ‘Proceed’ to confirm they are handing off the documents to be e-signed by the signer.
4. The Notary hands the tablet or laptop to the signer. The signer confirms that they are ready to e-sign the documents.
5. The signer reviews the document that needs to be e-signed and clicks sign.
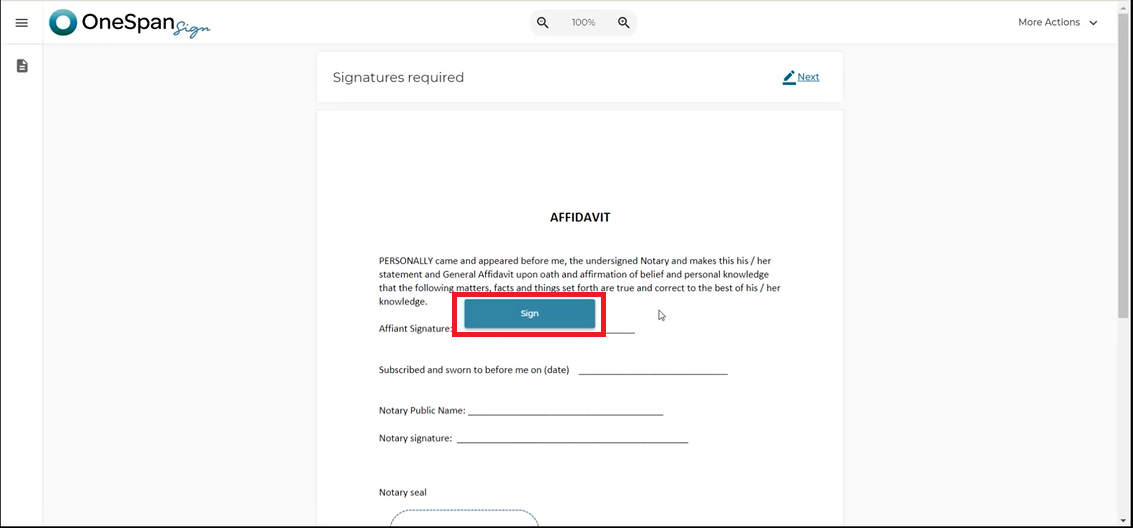
6. Once the signer has completed the signing process, they click ‘Confirm’ and then ‘Done’ to pass control back to the Notary to apply their signature and notary seal.
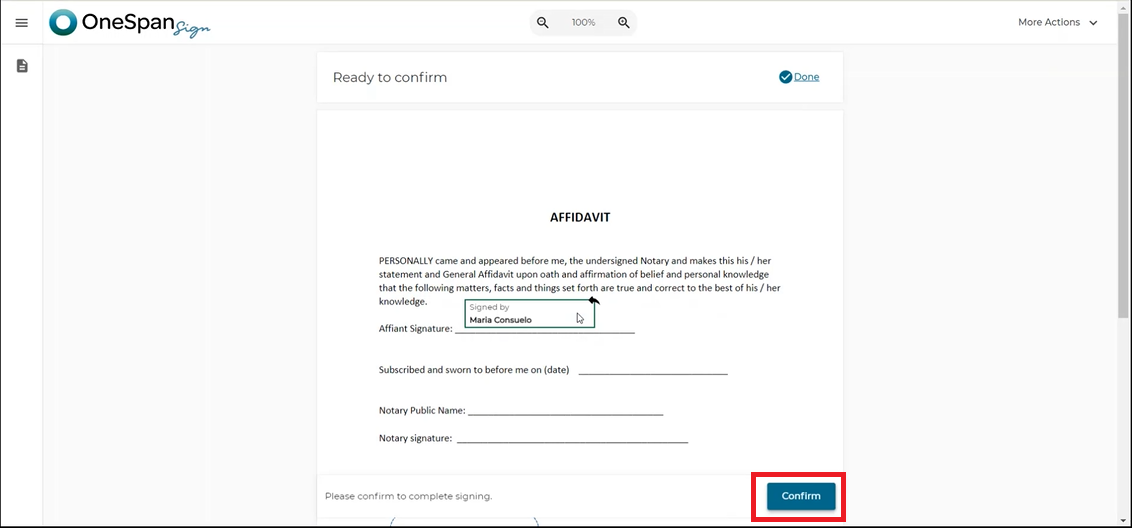
7. The Notary selects themselves and clicks ‘Start’ to proceed with signing and notarizing the document by applying their seal.
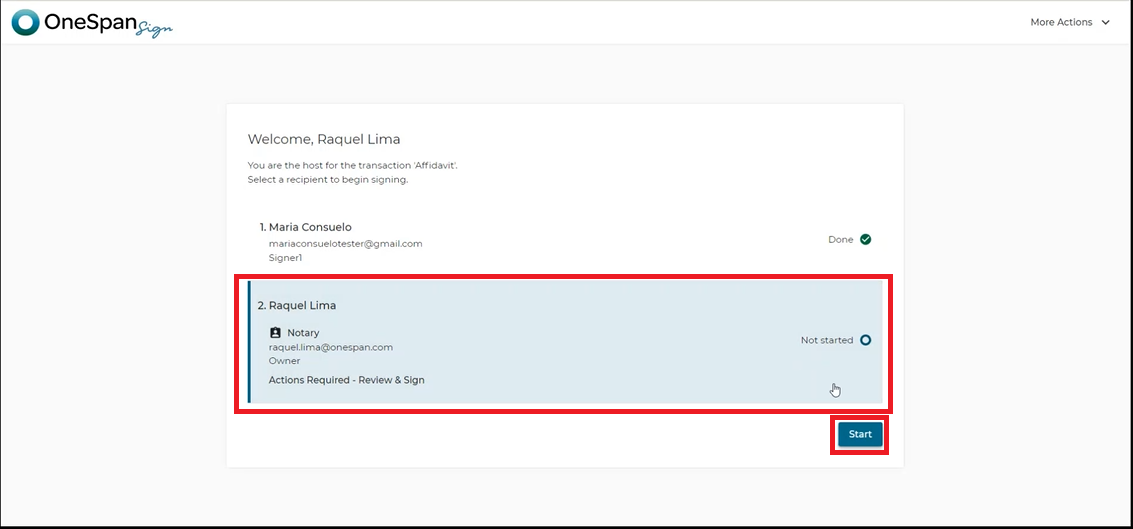
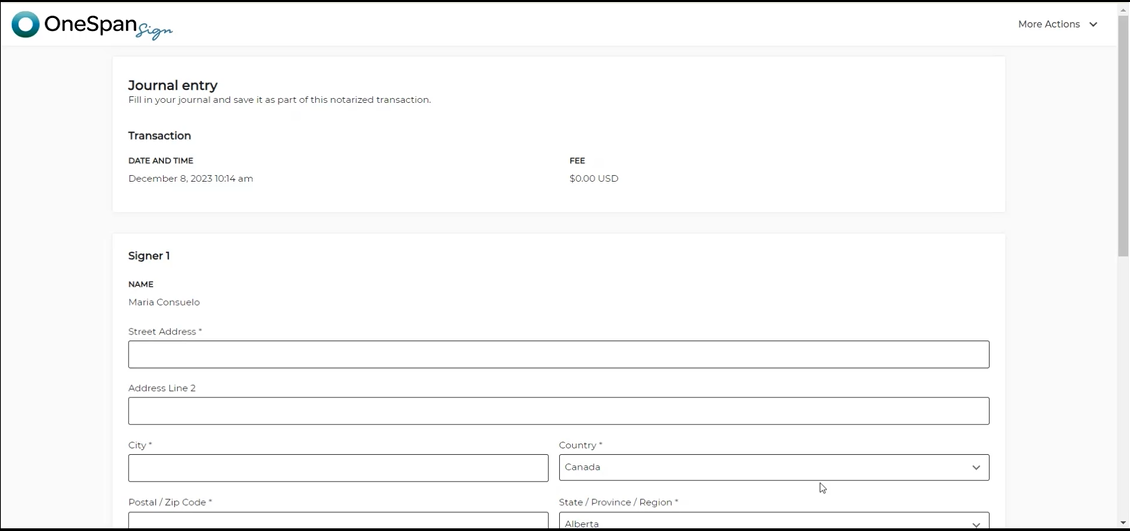
8. The Notary can then fill in additional information about the In-person Electronic Notarization session in the eJournal. This includes information such as:
- Signer street address, city, country, zip code and state
- Identification method
- Notary’s relationship to the signer
- Document type
- Notarial act
- Date of notarization
- And comments
The Notary clicks ‘Save’.
9. And that’s it! The In-person Electronic Notarization session has been successfully completed with OneSpan Notary!
Accessing Electronic Evidence
1. At the end of the session, the notarized affidavit, comprehensive audit trail, and eJournal are available to review and download. The Notary exits signing mode and clicks ‘Download’ to access these assets. The notarized document and audit trail will be contained in a zip file.
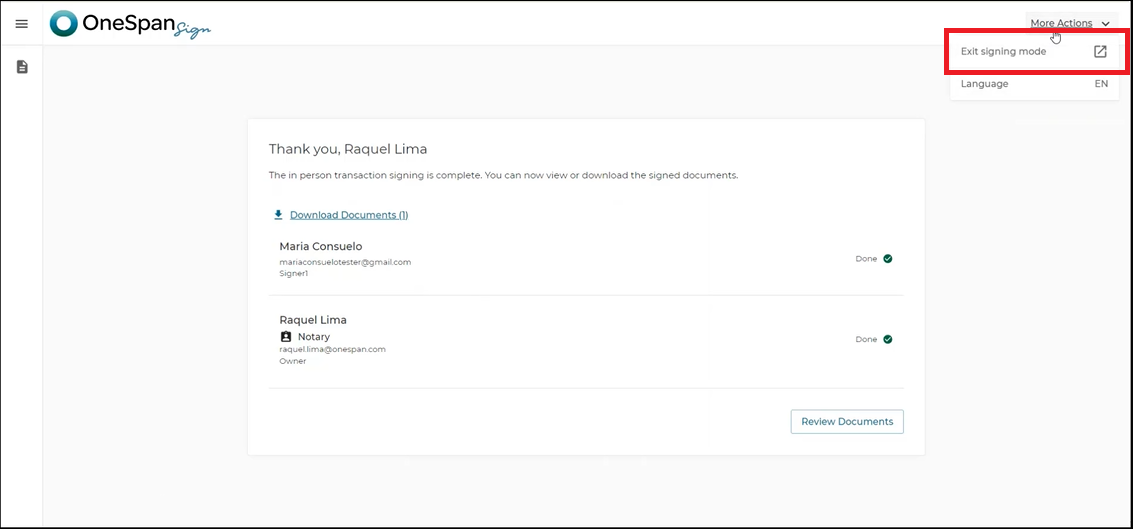
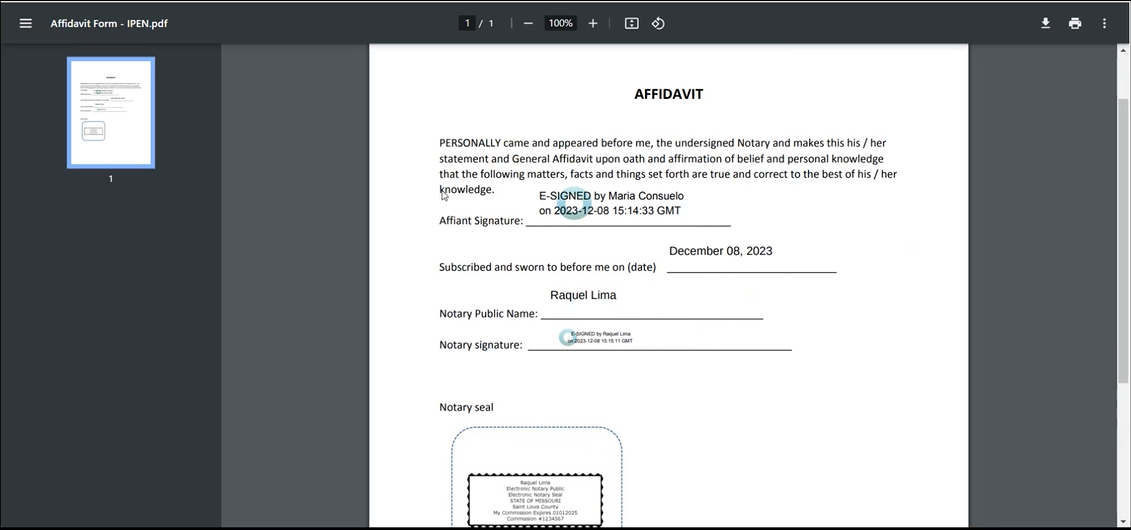
2. The notarized document shows the signer’s e-signature, the date the document was notarized, the notary’s name, signature, and the eNotary electronic seal.
3. The evidence summary contains the audit trail. This captures detailed actions taken throughout the e-signing and notarization process, including:
- Signing privileges passed between notary and signer
- IP address and geolocation details of participants
- E-Signing events and timestamps
- Notaries applying their eNotary electronic seal
- And other actions
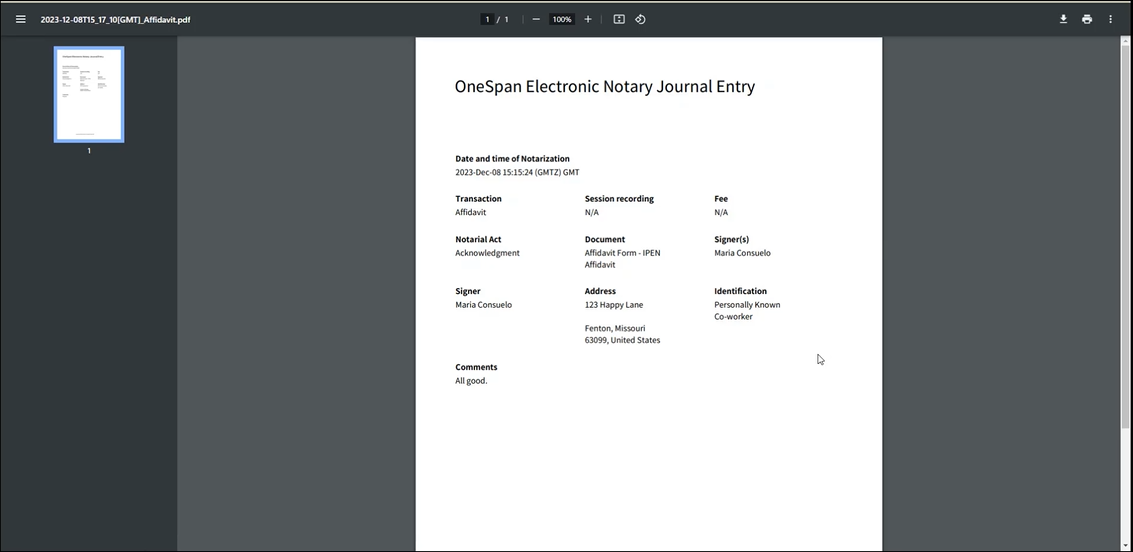
4. The eJournal can only be accessed by the notary. At the end of each In-person Electronic Notarization session the eJournal will be available to the notary in the ‘Account Settings’ section. To access the eJournal the notary clicks ‘My Account’, then selects ‘Journal’ in the left-hand column. They can then download the eJournal for their selected IPEN session.
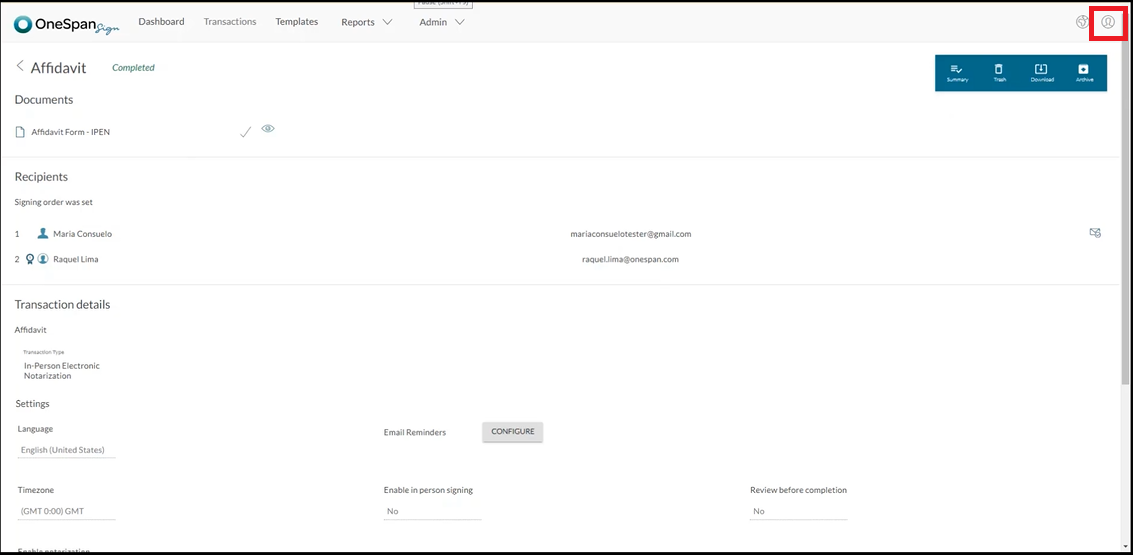
5. All the required information captured during the IPEN session is included in the eJournal. This includes transaction name, notarial act, document type, signer information, identification type, and the notary’s comments.
6. The notary can download and save the electronic evidence to their records at any time.