OneSpan Sign How To: Setting Up Callbacks

If you are using a listener to react to notifications sent by OneSpan Sign when certain events happen with a package, you will need to set up your callback URL within OneSpan Sign and indicate which notifications you would like to subscribe to. You can also set up an optional security key to further secure the callback transaction. In this blog, I will show how to do this with the Java SDK, .NET SDK, and the REST API.
Before You Begin
Before getting started, there are a couple things that will be useful to know before setting one of these up and testing.

OneSpan Developer Community
Join the OneSpan Developer Community! Forums, blogs, documentation, SDK downloads, and more.
Join TodayLocation in the UI
First, you should locate this area in your UI. After you run your code, you will be able to check here to make sure it ran successfully. To find the callback area from the UI, log into OneSpan Sign and go to ACCOUNT in the toolbar. Below the API Key, you will see the Event Notification section.
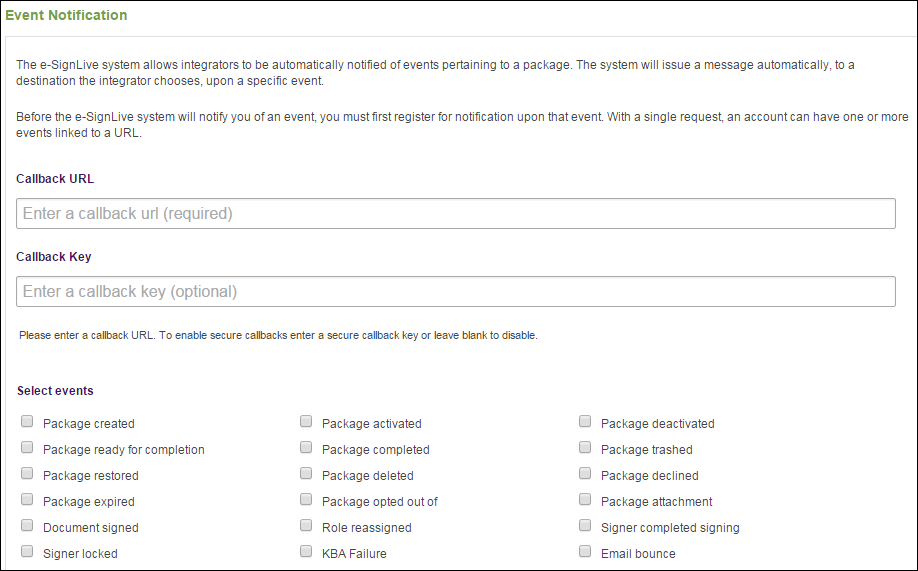
As you will see, this area is completely blank (unless you have already set this up). Of course, you can always just set these values, right here, in the UI. If that is good enough for you, you can stop reading, now.
Available Notifications
Before moving on to the code, it would be good to know all of the notifications available. As you can see in the image above, there are several. The following table lists them as they need to be represented, in your code:
| PACKAGE_ACTIVATE | PACKAGE_EXPIRE |
| PACKAGE_COMPLETE | PACKAGE_OPT_OUT |
| PACKAGE_CREATE | PACKAGE_READY_FOR_COMPLETE |
| PACKAGE_DEACTIVATE | PACKAGE_RESTORE |
| PACKAGE_DECLINE | PACKAGE_TRASH |
| PACKAGE_DELETE | DOCUMENT_SIGNED |
| ROLE_REASSIGN | SIGNER_COMPLETE |
| KBA_FAILURE | EMAIL_BOUNCE |
| PACKAGE_ATTACHMENT | SIGNER_LOCKED |
You can find more information about the contents of each notification, here.
The Code
As I stated above, I will show how to do this with the Java SDK, .NET SDK, and with the REST API. Go ahead and jump to the section you are interested in, below. They will all include the same information only it will be for that specific technology, so no need to scan the ones you are not interested in.
Java SDK
I will start off with the Java SDK. Below is a simple Java class that sets the callback URL, callback key, and subscribes you to three different event notifications. Be sure to change the API_KEY, URL, and KEY to your own values. You can also add more notification subscriptions from the table of options, above.
package com.esignlive.example;

import com.silanis.esl.sdk.EslClient;
import com.silanis.esl.sdk.NotificationEvent;
import static com.silanis.esl.sdk.builder.EventNotificationConfigBuilder.newEventNotificationConfig;

public class SetCallbackURLAndKey {
    private static final String API_KEY = "YOUR_API_KEY";
    private static final String API_URL = "https://sandbox.esignlive.com/api"; // USE https://apps.e-signlive.com/api FOR PRODUCTION
    private static final String URL = "http://my.url.com";
    private static final String KEY = "myCallbackKey";

    public static void main( String[] args ) {
        EslClient eslClient = new EslClient( API_KEY, API_URL );
        eslClient.getEventNotificationService().register(newEventNotificationConfig(URL)
                .withKey(KEY)
                .forEvent(NotificationEvent.PACKAGE_CREATE)
                .forEvent(NotificationEvent.PACKAGE_DECLINE)
                .forEvent(NotificationEvent.PACKAGE_COMPLETE));
    }
}
Go ahead and skip down to the "The Results" section, if you are not interested in doing this with the .NET SDK or REST API.
.NET SDK
Next, I will cover the .NET SDK. Below is a C# class that sets the callback URL, callback key, and subscribes you to three different event notifications. Be sure to change the API_KEY, URL, and KEY to your own values. You can also add more notification subscriptions from the table of options, above.
using System;
using Silanis.ESL.SDK;

namespace SetCallbackUrlAndKey
{
    class SetCallbackUrlAndKey
    {
        private static String apiUrl = "https://sandbox.esignlive.com/api";
        private static String apiKey = "YOUR_API_KEY";
        private static String URL = "http://my.url.com";
        private static String KEY = "myCallbackKey";

        public static void Main(string[] args)
        {
            EslClient eslClient = new EslClient(apiKey, apiUrl);
            eslClient.EventNotificationService.Register(EventNotificationConfigBuilder.NewEventNotificationConfig(URL)
                .WithKey(KEY)
                .ForEvent(NotificationEvent.PACKAGE_CREATE)
                .ForEvent(NotificationEvent.PACKAGE_DECLINE)
                .ForEvent(NotificationEvent.PACKAGE_COMPLETE));
        }
    }
}
Go ahead and skip down to the "The Results" section, if you are not interested in doing this with the REST API.
REST API
Finally, I will show how to do this with the REST API. Below is a simple C# class that performs a POST request to set the callback URL, callback key, and subscribes you to three different event notifications. Be sure to change the API_KEY, URL, and KEY to your own values. You can also add more notification subscriptions from the table of options, above.
using System;
using System.Net;
using System.Net.Http;
using System.Net.Http.Headers;
using System.Text;

namespace SetCallbackUrlAndKeyREST
{
    class SetCallbackUrlAndKeyREST
    {
        private static String apiUrl = "https://sandbox.esignlive.com/api";
        private static String apiKey = "aDhrM0R3a1hJcmtBOkE3V1ljN0d4V3hvRg==";
        private static String URL = "http://my.url.com";
        private static String KEY = "myCallbackKey";

        public static void Main(string[] args)
        {
            string content = "{\"url\":\"" + URL + "\",\"key\":\"" + KEY + "\",\"events\":[\"PACKAGE_CREATE\",\"PACKAGE_DECLINE\",\"PACKAGE_COMPLETE\"]}";
            StringContent json = new StringContent(content, Encoding.UTF8, "application/json");
            HttpClient myClient = new HttpClient();
            myClient.DefaultRequestHeaders.Authorization = new AuthenticationHeaderValue("Basic", apiKey);
            myClient.DefaultRequestHeaders.Add("Accept", "application/json,text/html,application/xhtml+xml,application/xml;q=0.9,*/*;q=0.8");
            var response = myClient.PostAsync(new Uri(apiUrl + "/callback"), json).Result;
        }
    }
}
The Result
If you run the code from any of the three sections above, this is the result you will see if you go back to the Event Notification area in the UI that we looked at in the "Before You Begin" section.
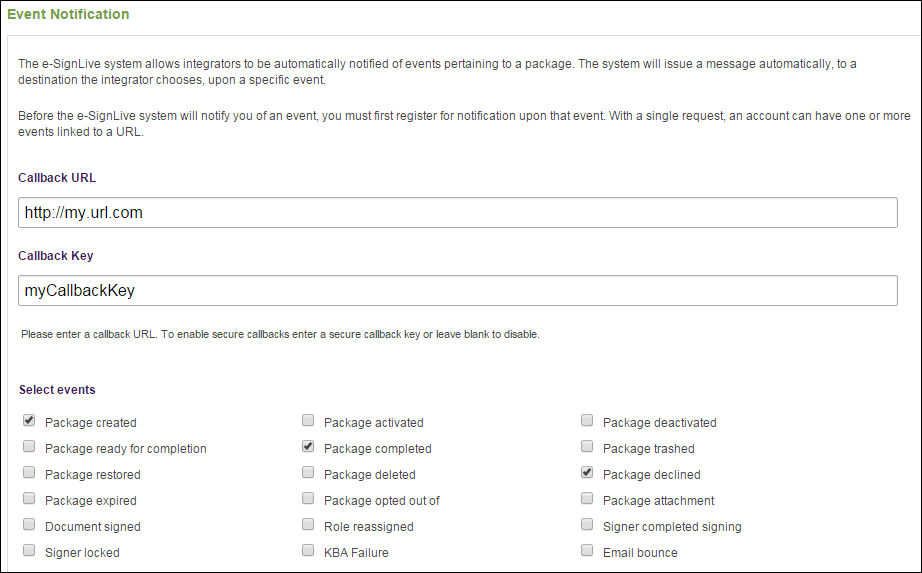
That is it. You now have your callback notifications set up for your listener to react to.
Thanks for reading! If you have any questions or there are any topics you would like to see covered in my blog, feel free to post in the comments section.