OneSpan Sign How To: Creating a Callback Event Notification Listener in Java

In my previous blog, I showed you how to create a simple callback event notification listener in C# and listen for the "PACKAGE_COMPLETE" event in order to download signed documents. In this blog, I will show you how to do the same in Java. Let's get straight into it.
Requirements
Register for Event Notifications
Before the OneSpan Sign system can notify you of an event, you must first register to be notified in case of an event. You can follow this feature guide on how to register for event notifications.
Eclipse IDE for Java EE Developers
For this blog, you will need Eclipse's IDE for Java EE Developers. If you do not already have it, you can download it for free, here.
OneSpan Sign's Java SDK
You can download the Java SDK from the following link. It also provides a link to some examples of using the Java SDK on GitHub. Unzip the SDK to the location of your choice.
Ngrok
In order to receive callback event notifications, you will need a publicly accessible URL to hit and work. Your localhost server on its own will not work. Ngrok is a very simple and easy to use tool that creates a secure tunnel on your local machine along with a public URL you can use for browsing your local site. This saves you the trouble of deploying your web application.
The Code
You can download the example code from the Developer Community Code Share. Go ahead and create a new Dynamic Web Project. If this is your first time working with the Java framework, you can follow this previous blog on how you can get started. Make sure to generate a web.xml deployment descriptor when creating your project.
Once your project has been created, in your Project Explorer, open your "Java Resources" folder. Right-click on "src" and create a new package named "listener". Then, add a new class named ListenerController.java". Below is the code of the action controller to process the event notification.
public class ListenerController extends HttpServlet {

	 private String pkgId = new String();

	@Override
	protected void doPost(HttpServletRequest req, HttpServletResponse resp) throws ServletException, IOException {

		resp.setContentType("text/html");
	    resp.setStatus(HttpServletResponse.SC_OK);

	    StringBuilder builder = new StringBuilder();
	    String aux = "";

	    while ((aux = req.getReader().readLine()) != null) {
	        builder.append(aux);
	    }

	    String text = builder.toString();

	    try {
			JSONObject json = new JSONObject(text);
			pkgId = json.get("packageId").toString();
			System.out.println(pkgId);
		} catch (JSONException e) {
			// TODO Auto-generated catch block
			e.printStackTrace();
		}

	    new Thread(new Runnable() {
	        public void run() {
	        	try {
					DownloadDocuments.download(pkgId);
				} catch (IOException e) {
					// TODO Auto-generated catch block
					e.printStackTrace();
				}
	        }
	    }).start();

	 }
}
In the code above, we use the doPost() method to intercept HTTP POST requests. Once all documents in a package has been signed and the package completed, OneSpan Sign will make a POST request to my registered URL with the following example JSON payload:
{
  "@class": "com.silanis.esl.packages.event.ESLProcessEvent",
  "name": "PACKAGE_COMPLETE",
  "sessionUser": "0787be84-f095-44c7-ba00-787093df86fc",
  "packageId": "KHiRfOXgKK0gpVWwwpFOSNy6o34=",
  "message": null,
  "documentId": null
}
Then, we will use the package id in order to download the signed documents. In your "src" folder, create a new class named "DownloadDocuments.java" with the code below.
public class DownloadDocuments {

	public static void download(String packageId) throws IOException{

		EslClient eslClient = new EslClient("api_key", "https://sandbox.esignlive.com/api");

		byte[] documents = eslClient.downloadZippedDocuments(new PackageId(packageId));

		FileOutputStream stream = new FileOutputStream("C:/Users/hhaidary/Desktop/documents_" + packageId + ".zip");

		try {
		    stream.write(documents);
		} finally {
		    stream.close();
		}

	}

}
The code above utilizes the eslClient to download the signed documents. Make sure to reference the OneSpan Sign Java SDK in this class. Then, create two JSP file named "index.jsp" and "listenerpage.jsp". These two JSP files can be anything. For the purposes of this example, I will keep them as static pages.
<!-- index.jsp -->
<%@ page language="java" contentType="text/html; charset=ISO-8859-1"
    pageEncoding="ISO-8859-1"%>
<!DOCTYPE html PUBLIC "-//W3C//DTD HTML 4.01 Transitional//EN" "http://www.w3.org/TR/html4/loose.dtd">
<html>
<head>
<meta http-equiv="Content-Type" content="text/html; charset=ISO-8859-1">
<title>eSignLive Listener</title>
</head>
<body>
	<div>eSignLive Notifications</div>
	<table></table>
</body>
</html>
<!-- listenerpage.jsp -->
<%@ page language="java" contentType="text/html; charset=ISO-8859-1"
    pageEncoding="ISO-8859-1"%>
<!DOCTYPE html PUBLIC "-//W3C//DTD HTML 4.01 Transitional//EN" "http://www.w3.org/TR/html4/loose.dtd">
<html>
<head>
<meta http-equiv="Content-Type" content="text/html; charset=ISO-8859-1">
<title>Insert title here</title>
</head>
<body>
	<div>Testing some esignlive listener...</div>
</body>
</html>
Finally, you will need to edit your web.xml file in order to map the servlet controller to the "listenerpage.jsp" page. Here's how your web.xml file should look like:
<?xml version="1.0" encoding="UTF-8"?>
<web-app xmlns:xsi="http://www.w3.org/2001/XMLSchema-instance" xmlns="http://java.sun.com/xml/ns/javaee" xsi:schemaLocation="http://java.sun.com/xml/ns/javaee http://java.sun.com/xml/ns/javaee/web-app_3_0.xsd" id="WebApp_ID" version="3.0">
  <display-name>listener</display-name>
  <welcome-file-list>

    <welcome-file>index.jsp</welcome-file>

  </welcome-file-list>
   <servlet>
    <description></description>
    <display-name>ListenerController</display-name>
    <servlet-name>ListenerController</servlet-name>
    <servlet-class>listener.ListenerController</servlet-class>
  </servlet>
  <servlet-mapping>
    <servlet-name>ListenerController</servlet-name>
    <url-pattern>/listenerpage.jsp</url-pattern>
  </servlet-mapping>
</web-app>
Running Your Code
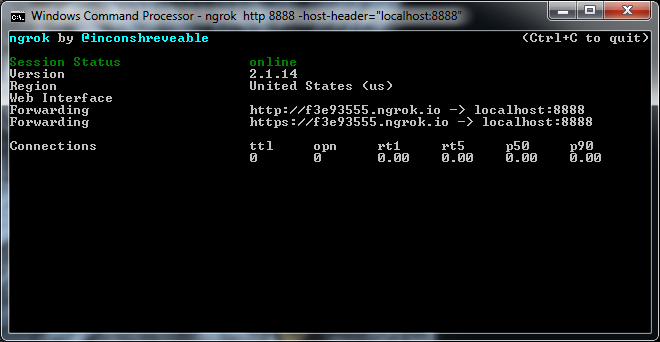
In your Project Explorer, right-click on your project and select Run As > Run on Server. Hit Finish. Then, open a command prompt and change the directory to the location where you saved your ngrok executable. Enter the following command:
ngrok http [port] -host-header="localhost:[port]"
Below is a screenshot of what you can expect after running the command:
Then, login to your OneSpan Sign account and browse to the Admin page. Enter in the "Callback URL" field the URL to your callback listener (i.e. http://f3e93555.ngrok.io/listener/listenerpage.jsp) and register for the "transaction complete" event. Finally, create, send, and complete a test package. You should be able to view the signed documents as a zipped file in the location where you chose to save it in the "DownloadDocuments.java" class.
If you have questions regarding this blog or anything else concerning integrating OneSpan Sign into your application, visit the developer community forums: https://developer.OneSpan.com/. That's it from me. Thank you for reading! If you found this post helpful, please share it on Facebook, Twitter, or LinkedIn.
Haris Haidary
Junior Technical Evangelist
LinkedIn | Twitter

OneSpan Developer Community
Join the OneSpan Developer Community! Forums, blogs, documentation, SDK downloads, and more.
Join Today
