New Signer Experience: Markdown Formatting - Part 2

The new signer experience leverages the “Markdown” language to standardize the UI label’s formatting, which provides you more flexible and powerful options to customize the text styles and has significantly reduced the efforts when rebranding the UI messages.
In this blog, we’ll continue with the commonly used markdown syntax we discussed in Part 1 of this blog and provide a good way to self-check the output effects before you submit your customization. Let’s get started!
Markdown Syntax
In the section below, browse some of the syntax that is widely used in Markdown.
Indentation
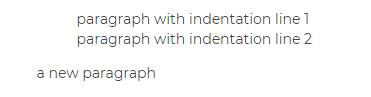
Starting a line with a ">" and a space indents certain characters in front of a paragraph. To end indentation and start a new paragraph, put newline character "\n" twice.
> paragraph with indentation line 1\nparagraph with indentation line 2\n\na new paragraph
Header
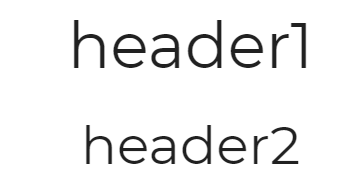
Starting a line with a hash "#" and a space makes a header. The more "#", the smaller the header.
# header1\n
## header2\n
Note: The headers must be preceded by a new line "\n"
Links
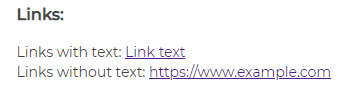
Link text is enclosed by square brackets [], and for inline links, the link URL is enclosed by parenthesis ().
 [Link text](Link URL)
 [click me](https://www.example.com)
To display only the link without link text, enclose the link URL with the greater-than and less-than characters <>.
<Link URL>
<https://www.example.com>
Note: The URL must include "http://" or "https://"
Self-Check the Output
In classic signing experience, sometimes the output could look different than your expectation, which might have caused you some back and forth trying to set up the customized UI labels properly in your account settings.
However with the markdown, it will be much easier to preview the outputs thanks to the open-source third-party libraries and online markdown editors out there.
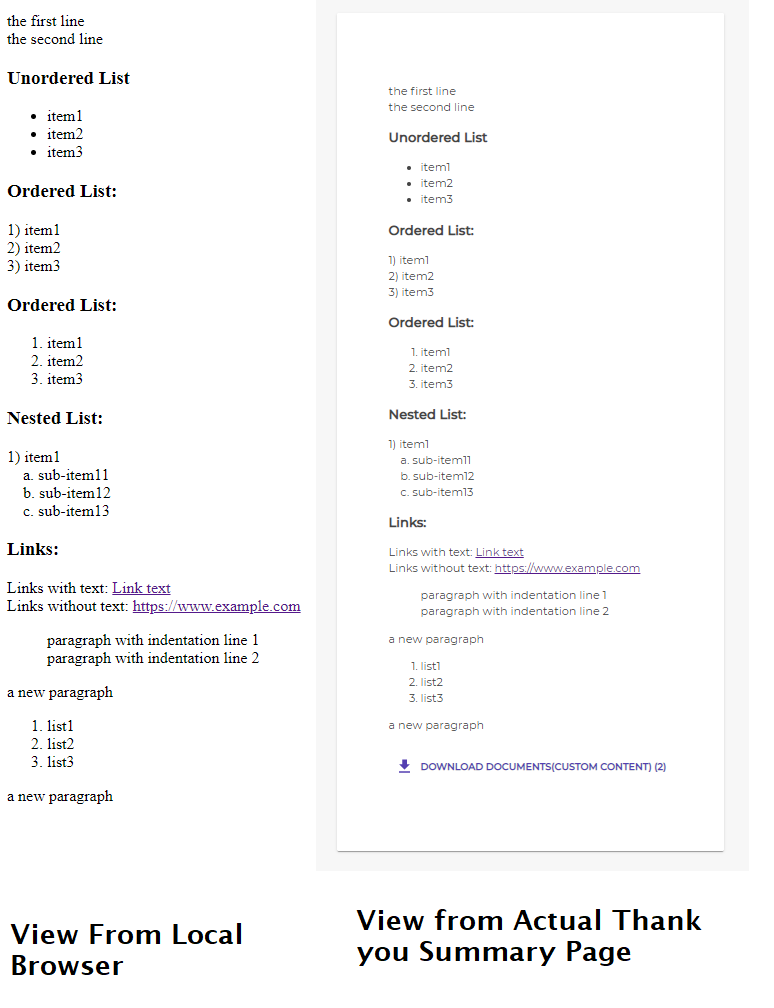
In this blog, I suggest you use a third-party Javascript library “marked” to parse and render the markdown string in a browser. Simply create an HTML file with the code below and open the file with any of the common browsers. This allows you to preview the markdown formats with minimal efforts.
Once the file is opened, the left screenshot below illustrates the view from your local browser. After submitting the same content to your account, the right screenshot is what you will see at the actual thank you summary page during new signer experience, with the identical formats as tested in local.
With this approach and all the markdown syntaxes we’ve covered this blog series, you will be able to bring the markdown’s superiority into full play and create more professional and functional thank you summary page, error pages, and alert bars to better meet your business requirements.
If you have any questions regarding this blog or anything else concerning integrating OneSpan Sign into your application, visit the Developer Community Forums. Your feedback matters to us!

OneSpan Developer Community
Join the OneSpan Developer Community! Forums, blogs, documentation, SDK downloads, and more.
Join Today