OneSpan Sign Developer: Callback Event Notification – Part 4

In the previous entrie in this series, we showcased how to setup a Java Spring Boot web application and how to listen to the OneSpan Sign callback notifications. In this blog, we will achieve the same goal with C# in an ASP.NET Web API Application project by following the recommended flows covered in Part 2.
Callback Event Notification in Action
Before beginning the ASP.NET Web API Application project, be sure you complete the following:
• Register for Event Notifications: Before the OneSpan Sign system can notify you of an event, you must turn on notifications. Follow this feature guide to learn how to register. In our example, we will simply register from the web portal.
• Visual Studio: Any version of Microsoft’s Visual Studio will work. In our example, we’ll use Visual Studio Community 2019 which you can download freely from here.
• Download OneSpan Sign’s .NET SDK: You will also need OneSpan Sign’s .NET SDK. Download and unzip the SDK to the location of your choice.
• Download Ngrok
The Code
The complete source code can be found here. Feel free to directly import the solution or copy all necessary classes to your existing project.
We will need an API controller to handle callback requests sent from OneSpan Sign. Below is the code for the CallbackController to process the event notification.
    public class CallbackController : ApiController
    {
        // POST api/
        public ActionResult Post(JObject jsonResult)
        {
            #region "check callback key if applicable"
            string callbackKey = Request.Headers.GetValues("Authorization").First();
            Debug.WriteLine("callback key: "+callbackKey);
            #endregion

            #region "Extract data from request"
            string name = jsonResult["name"].ToString();
            string sessionUser = jsonResult["sessionUser"].ToString();
            string packageId = jsonResult["packageId"].ToString();
            string message = jsonResult["message"].ToString();
            string documentId = jsonResult["documentId"].ToString();
            string createdDate = jsonResult["createdDate"].ToString();

            OssCallbackVo ossCallbackVo = new OssCallbackVo
            {
                Name = name,
                SessionUser = sessionUser,
                PackageId = packageId,
                Message = message,
                DocumentId = documentId,
                CreatedDate = createdDate
            };

            Debug.WriteLine("callback payload: " + jsonResult.ToString());
            #endregion

            #region "process callback"
            OssCallbackHandler callbackHandlder = new OssCallbackHandler();
            Task.Run(async () => await callbackHandlder.ProcessOssCallback(ossCallbackVo));
            #endregion

            return new HttpStatusCodeResult(200);
        }
    }
In the code above, any POST request targeting the “/api/Callback” route will be handled by our controller.
Once all documents in a package have been signed and the package completed, OneSpan Sign will make a POST request to the registered URL with the following example JSON payload:
{
  "@class": "com.silanis.esl.packages.event.ESLProcessEvent",
  "name": "PACKAGE_COMPLETE",
  "sessionUser": "0787be84-f095-44c7-ba00-787093df86fc",
  "packageId": "KHiRfOXgKK0gpVWwwpFOSNy6o34=",
  "message": null,
  "documentId": null
}
Note:
The “sessionUser” above refers to signer ID, so it’s recommended to set custom ID (in SDK) or signer ID(in REST) when signer creation and store it at your local database.
Then, we will distribute to different service functions depending on the callback event. A service class with asynchronous method was used to handle this business logic.
    public class OssCallbackHandler
    {
        public Task ProcessOssCallback(OssCallbackVo ossCallbackVo)
        {
            switch (ossCallbackVo.Name)
            {
                case C.OssCallbackEvents.PACKAGE_CREATE:
                    break;
                case C.OssCallbackEvents.PACKAGE_ACTIVATE:
                    OssCallback_PACKAGE_ACTIVATE(ossCallbackVo);
                    break;
                case C.OssCallbackEvents.PACKAGE_DEACTIVATE:
                    break;
                case C.OssCallbackEvents.PACKAGE_READY_FOR_COMPLETION:
                    break;
                case C.OssCallbackEvents.PACKAGE_COMPLETE:
                    OssCallback_PACKAGE_COMPLETE(ossCallbackVo);
                    break;
	        ……
            }

            return Task.CompletedTask;
        }

        private void OssCallback_PACKAGE_ACTIVATE(OssCallbackVo ossCallbackVo)
        {
        }

        private void OssCallback_PACKAGE_COMPLETE(OssCallbackVo ossCallbackVo)
        {
            //manipulate package status in your DB

            //download document
            EslClient eslClient = new EslClient(C.OSS.API_KEY, C.OSS.API_URL);
            PackageId pkgId = new PackageId(ossCallbackVo.PackageId);
            byte[] content = eslClient.DownloadZippedDocuments(pkgId);
            string fileLocation = C.SIGNED_DOCUMENTS_STORAGE_PATH + "\\" + pkgId + "_" + DateTime.Now.ToString("yyyy_MM_dd") +"_" + Guid.NewGuid() + ".zip";

            Debug.WriteLine("file save path: " + fileLocation);
            File.WriteAllBytes(@fileLocation, content);
        }
        ……
    }
Now, we have declared all possible stub functions handling callback events in our code. In this example, “PACKAGE_COMPLETE” event was monitored and triggered the corresponding service function. Then eslClient was utilized to download the signed documents.
Finally, all your OneSpan Sign related configurations are stored in Constants.cs file. Simply adjust before running the code.
Perform a Test
Debug/Release your project in Visual Studio. Then, open a command prompt and change the directory to the location where you saved your Ngrok executable. Enter the following command:
ngrok http [port] -host-header="localhost:[port]"
Then, login to your OneSpan Sign account, browse to the Admin page, and modify the domain of your callback URL.
Finally, create, send, and complete a test package. You should be able to view the signed documents as a zipped file in the location of your choice configured at Constants.cs file. The moment OneSpan Sign sends a callback notification to your listener, you’ll see the message below at your output console. 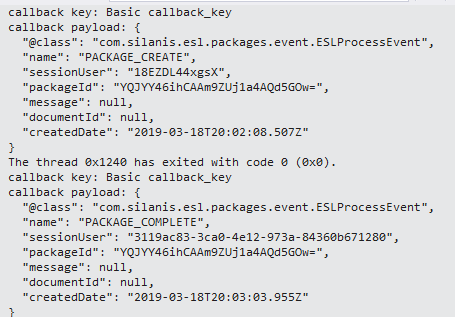
If you have any questions regarding this blog or anything else concerning integrating OneSpan Sign into your application, visit the Developer Community Forums. Your feedback matters to us!
Browse the Other Entries in this Blog series:
• Callback Event Notification – Part1
• Callback Event Notification – Part2
• Callback Event Notification – Part3

OneSpan Developer Community
Join the OneSpan Developer Community! Forums, blogs, documentation, SDK downloads, and more.
Join Today
