OneSpan Sign Developer: Conditional Fields – Part 1

Suppose you have a contract that must be signed digitally and has multiple input fields and signatures. In addition, your contract only requires the signer to provide information and signatures based on certain conditions. In previous versions of OneSpan Sign, you were required to collect this information prior the signing ceremony and redesign your contract accordingly. That asks for extra effort from the customer and inflates the total time it takes to complete the transaction.
However, this is no longer the case with “Conditional Fields”, which allows you to enable or disable fields based on the signer’s responses elsewhere in the document. OneSpan Sign now features better dynamic content generation which will significantly improve the signer’s experience, especially when the signing process includes conditional work flows.
In this blog, we will dive into this new and exciting feature and see how it can be implemented. Let’s get started!
Conditional Fields in Action
Before reading today’s blog, take few minutes and watch our step-by-step video tutorial where we demonstrate how to create Conditional Fields through the sender UI and how the New Signer Experience interacts with the conditional logics.
Note: The Conditional Field feature is turned off at account level by default. If you want to try it on your own account, send a request to our support team, and we will quickly enable this feature for your account.
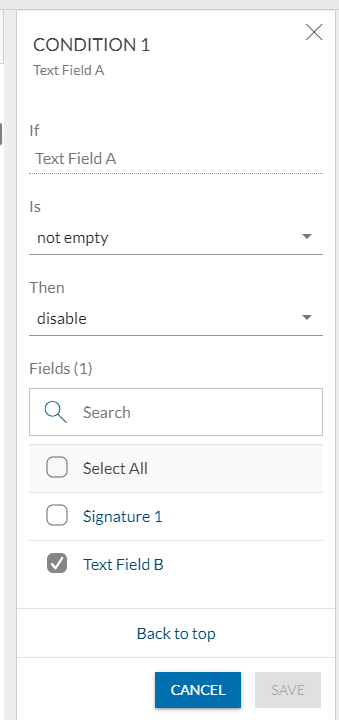
Syntax of the Conditional Logic
In OneSpan Sign, the conditional logic involves testing a condition and then taking an action:
IF {some conditions} THEN {take some action}
For example, the logic statements could be:
• “IF text field A is not empty, THEN disable text field B”
• “IF check box A is checked, THEN make signature A required”
This allows you to better tailor the contract to your exact needs and reduce the chance of signer errors.
The object of a condition could be any of the following:
• “Text Field”
• “Text Area”
• “Checkbox”
• “Radio”
• “List”
From there, you can select three types of actions:
• Enable/Disable: Determines if the selected field will be enabled or disabled
• Make required: Determines if the selected field will be required
• Make optional: Determines if the selected field will be optional
The action is available to all field types except:
• Custom Fields
• Notary Fields
• Auto-populated Fields (e.g., Name, Title, Date)
• Labels
• Attachments
Explore our “Adding Fields” guide for more detailed instructions.
Notes:
• It is important to be aware of that the Conditions CANNOT be applied across documents or across signers, which means you won’t be able to design the flow, “If signer A checked check box, signer B is required to sign”.
• Conditional Fields is now available in the New Signing Experience. You can expect the interface to interact with the conditional logic properly.
• If there are multiple conditions related to a single field, the last one triggered takes effect.
• If you want the signer to skip signing, set the signature as “mark optional” instead of “disable”, to avoid your signing process getting blocked.
• Conditions work on a reverse basis. If there is a condition that enables a field, it means that by default the field is disabled.
• For a list field, this implies that if a list has one option stating that it enables a field, it means that other options for this list will disable this field. Fields after getting disabled will be reverted back to the pre-set value.
Field Events in Audit Trail
Whenever a form field is triggered by the conditional logic, the audit event will record the description of the event and the IDs of both fields in the evidence summary.
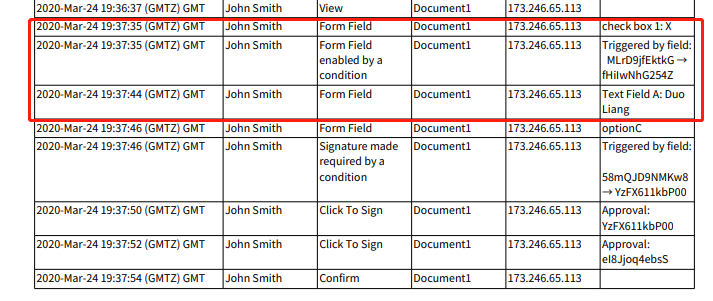
Take the highlighted records for example. The evidence summary audited the event when I checked the “check box 1” > The check box 1 (ID of “MLrD9jEktkG”) triggered the condition and enabled the text field A (ID of “fHilwNhG254Z”) > I entered my name to the text field A.
Time to Get Started
This should provide you with enough information to get started using Conditional Fields. In our next blog, we will walk through the APIs and the SDK functions to help developers integrate with this functionality.
If you have any questions regarding this blog or anything else concerning integrating OneSpan Sign into your application, visit the Developer Community Forums. Your feedback matters to us!

OneSpan Developer Community
Join the OneSpan Developer Community! Forums, blogs, documentation, SDK downloads, and more.
Join Today
