OneSpan Sign Developer – Custom Thank You Dialog

Thank You Dialog is a modal page displayed at the end of the signing ceremony. As an important UI component, the dialog pops up with your company’s logo, the thank you message or further instructions to continue the signing process, and a Handover button to redirect the signing page.
In this blog, we’ll first walk through the UI components in the Thank you Dialog, then I will demonstrate a solution to create your own Thank You Dialog to replace the default one. Let’s get started!
UI Components
Below is a default Thank you Dialog that appears once the transaction has been completed. I have marked where the UI components are customizable. 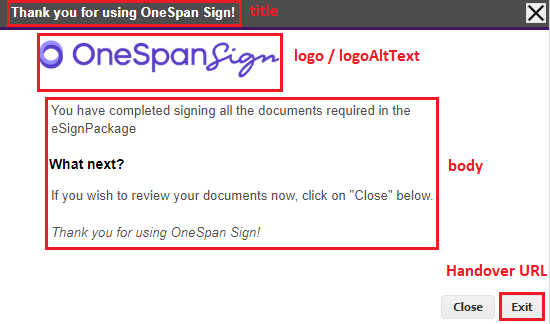
The content displayed in the UI is read from the settings configured at your account level in the format of a JSON:
{
  "body": "You have completed signing all the documents required in the eSignPackage\n\n## What next?\n\nIf you wish to review your documents now, click on \"Close\" below.\n\n_Thank you for using OneSpan Sign!_",
  "logo": "esl",
  "title": "Thank you for using OneSpan Sign!",
  "logoAltText": "eSignLive logo"
}
In order to modify the page, send your updated contents and your customized logo to our support team, so they will help you adjust your account settings.
Note:
1. The “Exit” button represents the Handover URL, which can be set both at account or package level. Read our previous blog “Handover URL” for more integration instructions.
2. The “Close” button and the exit button at right top can’t be removed.
Custom Thank You Dialog
The default Thank You Dialog should be sufficient to handle most of the cases, however there are some known limitations from our daily practice:
- Once you close the Thank You Dialog page, you won’t be able to return
- If your workflow requests the recipient to click on the Handover URL to continue the signing process, and in case the signer closed the Thank you Dialog without reading carefully about the instructions, they can easily get lost about what to do next step.
If you happen to embed the signing ceremony into an iFrame, I will introduce you a solution to create your own Thank You Dialog page. This approach includes the use of Javascript Notifier and provides you with more flexibility to integrate with your own workflow.
Step1: Disable the Default Thank You Dialog
Whether the Thank You Dialog is displayed is determined by a package setting, which can take effect both at the account and package levels. To remove it from the account level, you’d contact our support team, and to disable at the package level, refer to our “Signing Ceremony Customization” guide and search for “Dialog on Completion”.
Step2: Create a Modal Page
In your HTML file, we need to create a modal page replacing the Thank You Dialog.
Step 3: Add Javascript Notifier Code
By firing the “'ESL:MESSAGE:STARTED:SIGNER_COMPLETE” event, your parent window will receive a notification when the signer completed signing, at which time your application will display the customized Thank You Dialog in a modal window instead of replying on the out-of-the-box implementation.
You can download the complete code from this code share.
If you have any questions regarding this blog or anything else concerning integrating OneSpan Sign into your application, visit the Developer Community Forums. Your feedback matters to us!

OneSpan Developer Community
Join the OneSpan Developer Community! Forums, blogs, documentation, SDK downloads, and more.
Join Today