OneSpan Sign Developers: Manage Sender’s Transactions – Part 1

It’s essential for OneSpan Sign integrators to manage all their sender’s transactions, templates, and layouts. Given this common requirement, OneSpan Sign offers a straightforward way to facilitate this request. In this blog, we will walk you through the steps to allow your admin users to create, edit, and send transactions on behalf of other senders. Without further delay, let’s get started!
Before We Begin
Make sure the admin user has sufficient permissions to perform operations on other senders’ transactions.
- If your account has the Roles & Permissions feature enabled, make sure the admin user has been assigned an account role with at least “API Access” and “Manage users' transactions, templates, layouts (API)” permissions
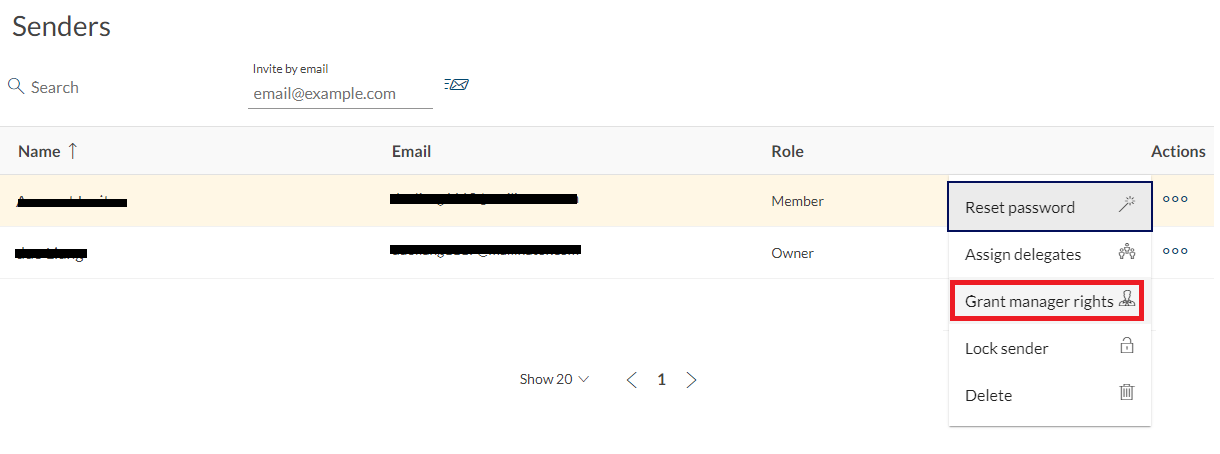
- Otherwise, grant manager rights to your admin user like below screenshot resembles.
Create a Transaction on Behalf of Sender
During transaction/template/layout creation, if you authenticate your API/SDK call as this admin user, you’ll have the option to manually specify another user in your account as the owner. Consequently, your sender has the ownership of the transaction and all behaviors are expected to be the same as that the transaction was directly created by the person.
Take transaction creation for example, for API integrators, additionally add a “sender” node to your request payload with at least email of the transaction owner:
HTTP Request
POST /api/packages
HTTP Headers
Authorization: Basic api_key / Bearer access_token
Accept: application/json
Content-Type: multipart/form-data
Request Payload
{
  "roles": [
    {
      "id": "Role1",
      "signers": [
        {
          "email": "[email protected]",
          "firstName": "1.firstname",
          "lastName": "1.lastname",
          "company": "OneSpan Sign"
        }
      ]
    }
  ],
  "documents": [
    {
      "approvals": [
        {
          "role": "Role1",
          "fields": [
            {
              "page": 0,
              "top": 100,
              "subtype": "FULLNAME",
              "height": 50,
              "left": 100,
              "width": 200,
              "type": "SIGNATURE"
            }
          ]
        }
      ],
      "name": "Test Document"
    }
  ],
  "name": "Example Package",
  "type": "PACKAGE",
  "language": "en",
  "emailMessage": "",
  "description": "New Package",
  "autocomplete": true,
  "sender": {
    "email": "your_sender_email"
  },
  "status": "SENT"
}
For SDK users, you can assign transaction owner with the .WithSenderInfo() function when building the DocumentPackage object. See the sample code below:
Java SDK
DocumentPackage pkg1 = PackageBuilder.newPackageNamed("Create on behalf of sender - " + System.currentTimeMillis())
        .withSigner(SignerBuilder.newSignerWithEmail("[email protected]" )
                .withFirstName("John")
                .withLastName("Smith"))
        .withDocument(DocumentBuilder.newDocumentWithName("document 1")
        		.fromFile("your_file_path")
        		.withSignature(SignatureBuilder.signatureFor("[email protected]")
        				.onPage(0)
        				.atPosition(100, 100)
        				.withSize(250, 75)))
        .withSenderInfo(SenderInfoBuilder.newSenderInfo("your_sender_email"))
        .build();
.NET SDK
DocumentPackage pkg1 = PackageBuilder.NewPackageNamed("Create on behalf of sender - " + DateTime.Now)
        .WithSigner(SignerBuilder.NewSignerWithEmail("[email protected]" )
                .WithFirstName("John")
                .WithLastName("Smith"))
        .WithDocument(DocumentBuilder.NewDocumentWithName("document 1")
        		.FromFile("your_file_path")
        		.WithSignature(SignatureBuilder.SignatureFor("[email protected]")
        				.OnPage(0)
        				.AtPosition(100, 100)
        				.WithSize(250, 75)))
        .WithSenderInfo(SenderInfoBuilder.NewSenderInfo("your_sender_email"))
        .Build();
Note:
- It’s not mandatory to explicitly add the actual sender as a recipient.
- For sender’s information, if only the email is supplied, other data, like sender’s first/last name, company, and title, will be read from the sender profile.
Once you’ve created your transaction/template/layout, there are few noticeable behaviors you may have observed:
- In Web UI, the created transaction will only show up in your sender’s folder, because it’s your sender who has the ownership.
- The admin user won’t be added to the transaction as a signer whereas the owner will.
Looking Forward to Future Installation
By now, we have explored how to grant your admin user proper permissions, and how to manage transactions/templates/layouts on behalf of other senders. In the next blog, we will continue to show you how to manage the lifecycle of transactions owned by other senders, like monitor signing progress, search transactions with certain status, and download signed documents.
If you have any questions regarding this blog or anything else concerning the integration of OneSpan Sign into your application, visit the Developer Community Forums. Your feedback matters to us!

OneSpan Developer Community
Join the OneSpan Developer Community! Forums, blogs, documentation, SDK downloads, and more.
Join Today