OneSpan Sign How To: Create a Callback Event Notification Listener in Node.js

Node.js is an open source runtime built on Chrome’s V8 JavaScript engine for developing server-side web applications. JavaScript is arguably the most popular programming language. Therefore, if you already know JavaScript, you can pick up Node.js fairly easily. The Node.js library is very fast on code execution (Chrome’s V8 JavaScript Engine) and allows for asynchronous, event-driven coding (i.e. non-blocking). This becomes very handy when it comes to building real-time web applications. In this blog, I will show you how to create a simple callback event notification listener in Node.js.
Requirements
Before diving into the code, you will need to install a couple of things. For this blog, you will need Node.js, ngrok, and a text editor.
Node.js You can download the installer from the following link. Node.js is available for Windows, Mac, and Linux.
SublimeText You will also need a text editor. For this blog, I will be using SublimeText. You can download a free copy, here.
Ngrok In order to receive callback event notifications, you will need a publicly accessible URL to hit and work. Your localhost server on its own will not. Ngrok is a very simple and easy to use tool that creates a secure tunnel on your local machine along with a public URL you can use for browsing your local site. This saves you the trouble of deploying your web application.
The Code
You can download the complete example code from the Developer Community Code Share. Create a new .js file using SublimeText named "listener.js" in a location of your choice and copy the code below. I will go over it shortly.
const express = require('express');
const bodyParser = require('body-parser');
const app = express();

app.use(bodyParser.json());
app.use(bodyParser.urlencoded({
  extended: true,
}));

app.post('/event', (req, res) => {

  res.send('OK');

  const theData = req.body;
  console.log(theData);
});

const portToListenOn = 3800;

app.listen(portToListenOn, () => {
  console.log(`Listening for eSignLive notifications on port ${portToListenOn}. Started ${new Date().toString()}`);
});
In my example, I will use the express framework for Node.js. Express is a minimal and flexible Node.js web application framework that provides a robust set of features for web and mobile applications. Optionally, you can add the "body-parser" middleware to parse incoming request bodies in a middleware before your handlers, available under the req.body property.
const express = require('express');
const bodyParser = require('body-parser');
const app = express();

app.use(bodyParser.json());
app.use(bodyParser.urlencoded({
  extended: true,
}));
If you do not have express and body-parser installed, open a command prompt window and change the directory where you saved your "listener.js" file. Then enter the following two lines:
npm install express@latest --save
npm install body-parser@latest --save
Next, I will "route" the OneSpan Sign POST calls to "localhost:3800/event". Routing refers to the definition of application end points (URIs) and how they respond to client requests. In my example, I will simply print the incoming JSON to the console.
app.post('/event', (req, res) => {

  res.send('OK');

  const theData = req.body;
  console.log(theData);
});
Finally, we can start a server and listens on port 3800 for connections.
const portToListenOn = 3800;

app.listen(portToListenOn, () => {
  console.log(`Listening for eSignLive notifications on port ${portToListenOn}. Started ${new Date().toString()}`);
});
Running Your Project
Go ahead and run your local server with Node.js by opening a command prompt and changing the current directory where you saved your "listener.js" file. Then, enter:
node listener.js
In a new command prompt, change the directory to the location where you saved your ngrok executable. Enter the following command:
ngrok http [port] -host-header="localhost:[port]"
Below is a screenshot of what you can expect after running the command:
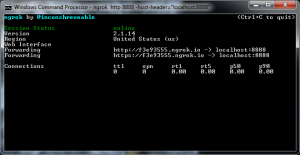
Then, login to your OneSpan Sign account and browse to the Admin page. Enter in the "Callback URL" field the URL to your callback listener (i.e. http://f3e93555.ngrok.io/event) and register for the "transaction complete" event. Finally, create, send, and complete a test package. You should be able to view the JSON sent by eSignLive printed in the command prompt window.
If you have questions regarding this blog or anything else concerning integrating OneSpan Sign into your application, visit the developer community forums: https://developer.OneSpanSign.com/. That's it from me. Thank you for reading! If you found this post helpful, please share it on Facebook, Twitter, or LinkedIn.
Haris Haidary
Junior Technical Evangelist

OneSpan Developer Community
Join the OneSpan Developer Community! Forums, blogs, documentation, SDK downloads, and more.
Join Today