OneSpan Sign How To: Create a Callback Event Notification Listener in Python

Python is one of the most popular general-purpose programming languages available. It is used in many application domains, such as: web applications, software development, desktop GUIs, etc. It’s popularity amongst developers is due to three distinct reasons:
- Readability
- Libraries
- Community
Python emphasizes on the ease of which a user can understand and write code. As a result, its syntax allows developer to write the equivalent concepts in fewer lines of code than Java or C++. Moreover, Python has been around for over two decades. Hence, it has a large standard library proving tools suited to many applications. Last but not least, Python has also a vast community, where you can easily find support. In this blog, I will show you how to create a simple callback event notification listener in Python.
The Code
For this blog, I will be using Python 2.7. If you don’t already have it installed, you can download it from their official website. In order to receive callback event notifications, you will need a publicly accessible URL to hit and work. Your localhost server on its own will not. Ngrok is a very simple and easy to use tool that creates a secure tunnel on your local machine along with a public URL you can use for browsing your local site. This saves you the trouble of deploying your web application. You can also get the complete example code from the Developer Community Code Share.
The first thing you’ll want to do is install the "web.py" module. In short, "web.py" is a framework for Python that allows you to create web applications. Open your command prompt and enter the following line:
$ pip install web.py
Now, in your favorite text editor, create a new file named "listener.py" and save it in a location of your choice. Go ahead and copy the code below. I will go over it in more detail further down.
import web

urls = ('/.*', 'event')

class event:
    def POST(self):
        data = web.data()
        print
        print 'eSignLive Notification:'
        print data
        print
    return 'OK'

if __name__ == '__main__':
    app = web.application(urls, globals())
    app.run()
Let’s go over the code step-by-step. The first line imports the "web.py" module.
import web
Next, we need to define our URL structure. The line below says we want the URL / (i.e. the main landing page http://localhost:8080) to be handled by the class named event.
urls = ('/.*', 'event')
Now we need to write the event class. The POST function in this class will get called by web.py anytime OneSpan Sign makes a POST request (triggered by the events you registered in OneSpan Sign) to the callback URL defined by ngrok. In my example, I will simply print the JSON sent by OneSpan Sign to the command prompt.
class event:
    def POST(self):
        data = web.data()
        print
        print 'eSignLive Notification:'
        print data
        print
    return 'OK'
Finally, we tell web.py to create an application with the URL I listed above, looking up the classes in the global namespace of this file.
if __name__ == '__main__':
    app = web.application(urls, globals())
    app.run()
Running Your Code
Open your command prompt and change the current directory to the location where you saved your "listener.py" file. Then, enter the following line:
python listener.py
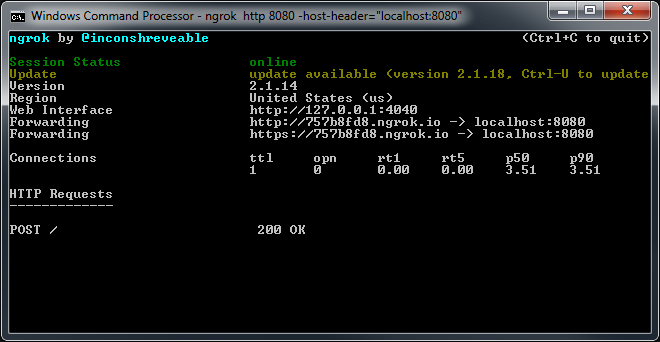
Then, in a new command prompt window, change the current directory to the location when you saved your ngrok executable file and enter the following line:
ngrok http 8080 -host-header="localhost:8080"
Finally, login to your OneSpan Sign account and browse to the Admin page. Enter in the "Callback URL" field the URL to your callback listener (i.e. http://f3e93555.ngrok.io/event) and register for the "transaction complete" event. Finally, create, send, and complete a test package. You should be able to view the JSON sent by OneSpan Sign printed in the command prompt window.

If you have questions regarding this blog or anything else concerning integrating OneSpan Sign into your application, visit the developer community forums: https://developer.OneSpanSign.com. That's it from me. Thank you for reading! If you found this post helpful, please share it on Facebook, Twitter, or LinkedIn.
Haris Haidary
Junior Technical Evangelist

OneSpan Developer Community
Join the OneSpan Developer Community! Forums, blogs, documentation, SDK downloads, and more.
Join Today