OneSpan Sign Release 11.34: API Token for Client Application

OneSpan Sign version 11.34 was recently deployed to the preview and sandbox environment. In this new version, we continuously delivered new features to the New Signer Experience like attachments preview, in-person signing support, and improved navigator. On top of that, developers have embraced exciting features like being able to embed the transaction edit page in an iFrame and the second authentication method for API calls which we will outline in this blog.
You can find the deployment dates for all our environments on our Trust Center page.
Client Application API Token
OneSpan Sign provides simple and flexible API interfaces for your integrated application to consume. Formerly, each inbound call had to provide a secure API Key to authenticate against the API. But this is no longer the case. With 11.34, OneSpan Sign now features an alternative authentication method where you can register Client ID and Secret pairs for your third-party integrations. These pairs in turn can be used to generate a secure but short-lived API token which authenticates your API requests.
Step1: Turn on the Feature
To check whether the feature has been turned on in your account, simply log onto your account owner’s sender portal, hit the “Admin” dropdown in the top menu and select “API Access”. In the API Access page, go to the “Client Apps” section (see below screenshot).
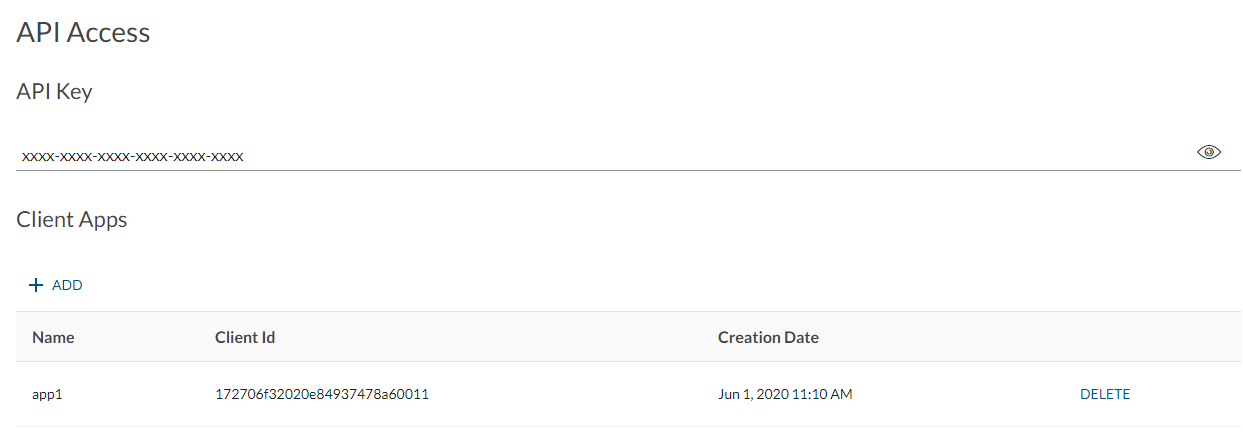
Note: If you can’t find the “Client Apps” section, contact our support team and we will enable the feature for your account.
Step2: Register for the Client Application
The next step is to register a Client ID and Secret pair for your client system. If you have multiple integrated applications, you could create an individual pair for each integration, so that the API traffic for each client application can be logged and monitored separately.
Now, hit the “Add” button, and a “Create Client App” sidebar will be displayed.
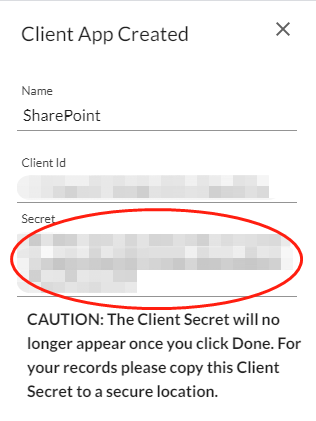
Both the Client ID and Secret are used to retrieve the temporary API Token. The secret will only appear once, therefore it’s important to save this secret to a secure location.
Step3: Request for an Access Token
The Client ID and Secret pair can later be used to request a short-lived access token, using below API call:
HTTP Request
POST /apitoken/clientApp/accessToken
HTTP Headers
Accept: application/json
Content-Type: application/json
Request Payload
{
  "clientId": "your_client_id",
  "secret": "your_client_secret",
  "type": "OWNER"
}
The available options for the field “type” are “OWNER” and “SENDER”. If the latter, “email” field is required:
{
  "clientId": " your_client_id ",
  "secret": " your_client_secret ",
  "type": "SENDER",
  "email": "sender_email"
}
By specifying the type and the email, it determines who the authorized user is when the temporary access token is used later to make API requests.
Example Response
{
    "accessToken": "ed0a81c4391b4db48e33d47ff627a84118cfe166743380026ef9dc868ae486",
    "expiresAt": 1591029428203
}
The access token will be returned from the API response, together with the expiry time represented in a Linux timestamp.
Step 4: Use Access Token to authenticate your API Calls
Before the access token expires, you can always use it to authenticate your API calls. Similar to the usage of the API Key, you’d set HTTP header “Authorization” as "Bearer" followed by the access token generated in Step 3. The package retrieval API here is a good example:
HTTP Request
GET /api/packages/{packageId}
HTTP Headers
Accept: application/json; esl-api-version=11.21
Authorization: Bearer ed0a81c4391b4db48e33d47ff627a84118cfe166743380026ef9dc868ae486
SDK support
For SDK integrators, steps 3 and 4 above are invoked internally which provides you the same seamless experience as before when authenticating with the API Key. A new constructor signature for “EslClient” has been introduced and allows you to specify the API Token related parameters:
public EslClient(ApiTokenConfig apiTokenConfig, String baseURL, boolean allowAllSSLCertificates, ProxyConfiguration proxyConfiguration, boolean useSystemProperties, Map<String, String> headers)
Let’s have a try using it in real practice:
String BASE_API_URL = "https://sandbox.esignlive.com";
String CLIENT_APP_ID = "your_client_id";
String CLIENT_APP_SECRET = "your_client_secret";
EslClient eslClient = new EslClient(ApiTokenConfig
			.newBuilder()
			.clientAppId(CLIENT_APP_ID)
			.clientAppSecret(CLIENT_APP_SECRET)
			.baseUrl(BASE_API_URL)
			.tokenType(TokenType.OWNER)
			//.senderEmail("sender_email")	//no need to specify sender email if type is OWNER
			.build()
		, BASE_API_URL + "/api", false, null, false, new HashMap<String, String>());
String applicationVersion = eslClient.getSystemService().getApplicationVersion();
System.out.println(applicationVersion);
You can build an EslClient object and invoke SDK functions as easy as that. The SDK will help you manage the lifecycle of the generated access token where the SDK will retrieve an API Token stored inside the EslClient object. So for the same EslClient object, the internal Rest client won’t request a new API Token unless the token expires in one minute.
Note:
- Make sure your SDK version is equal to or greater than 11.34.
- If you are migrating from API Key to API Token, you may be more familiar with the other constructor signature: "public EslClient(String apiKey, String baseURL)". If you are confused about what values to pass when converting to the new constructor, refer to the example above where I’ve set all input parameters as default values.
- The base URL required from “ApiTokenConfig” builder should exclude “/api” in the path.
- If an API Token is created for the account owner, then no need to specify sender email.
There it is. After reading through today’s blog, you have better idea how to register the Client Application and generate the API Token to authenticate your API requests.
If you have any questions regarding this blog or anything else concerning integrating OneSpan Sign into your application, visit the Developer Community Forums. Your feedback matters to us!

OneSpan Developer Community
Join the OneSpan Developer Community! Forums, blogs, documentation, SDK downloads, and more.
Join Today