OneSpan Sign for New Users: Check Package Status and Download Files (REST API)

This will be the final post in the "OneSpan Sign for New Users" blog series. Last time, I showed you how to create and send a package with the OneSpan Sign REST API using C# and Microsoft Visual Studio. This week, I will cover some things you can do after sending the package, like:
- Checking the package/signing status
- Downloading the e-signed documents
- Downloading the evidence summary
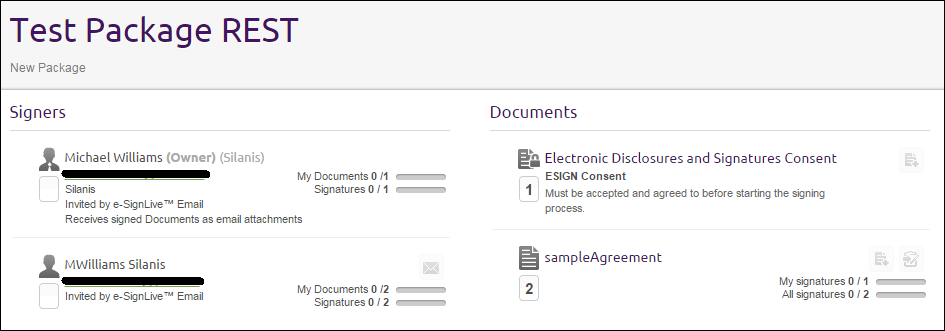
I will pick up right where I left off, in last week’s blog. If you followed along, you had just looked in your OneSpan Sign inbox to see that your document package was created and sent properly after executing the REST call built in the tutorial.
Configuration
Initial Setup
Before you can get started, you will need to set up your environment. For this example, I will be using C# and Microsoft Visual Studio. Go ahead and get a project and .cs file created. I named my project "CheckStatusAndDownloadREST" and my .cs file,
"CheckStatusAndDownloadREST.cs". If you need help getting this set up, see my first .NET SDK blog (you can ignore the .NET SDK portion and skip to the "Downloading Microsoft Visual Studio" and "Create and Configure Your C# Project" sections) for more detailed instructions.

OneSpan Developer Community
Join the OneSpan Developer Community! Forums, blogs, documentation, SDK downloads, and more.
Join TodayLocating the Package ID of your Existing Project
Since the package you are working with was created previously, we need to find the package ID for use in this project. If you select the project from the UI inbox, as seen above, the URL will have the package ID, like this:
https://sandbox.esignlive.com/packages/
In the C# class you created in the last blog, you will see that the package ID was returned in the HTTP response you received from your REST call.
If you were creating a more complex application, you would likely store this package ID for use within other parts of your application, versus looking it up in your OneSpan Sign URLs.
The Code
You are now ready to write the code in your C# class. Copy the following code into your "CheckStatusAndDownloadREST.cs" file (or whatever you named it) that you created above. I will cover the code, in more detail, below.
using Newtonsoft.Json.Linq;
using System;
using System.Collections.Generic;
using System.Diagnostics;
using System.IO;
using System.Net;
using System.Net.Http;
using System.Net.Http.Headers;
using System.Text;

namespace CheckStatusAndDownloadREST
{
   public class CheckStatusAndDownload
   {
      public static void Main(string[] args)
      {
         string apiKey = "YOUR_API_KEY";
         string url = "https://sandbox.esignlive.com/api";

         HttpClient myClient = new HttpClient();
         myClient.DefaultRequestHeaders.Authorization = new AuthenticationHeaderValue("Basic", apiKey);
         myClient.DefaultRequestHeaders.Add("Accept", "application/json,application/zip,text/html,application/xhtml+xml,application/xml;q=0.9,image/webp,*/*;q=0.8");

         //check package status
         var packageStatusResponse = myClient.GetAsync(new Uri(url + "/packages/0487df67-6417-48f8-9575-b520c0f977ff")).Result;
         JObject packageStatusResponseJSON = JObject.Parse(packageStatusResponse.Content.ReadAsStringAsync().Result);
         var packageStatus = packageStatusResponseJSON["status"];
         Debug.WriteLine("Package Status: " + packageStatus);

         //check package signing status
         var signingStatusResponse = myClient.GetAsync(new Uri(url + "/packages/0487df67-6417-48f8-9575-b520c0f977ff/signingStatus")).Result;
         JObject signingStatusResponseJSON = JObject.Parse(signingStatusResponse.Content.ReadAsStringAsync().Result);
         var signingStatus = signingStatusResponseJSON["status"].ToString();
         Debug.WriteLine("Signing Status: " + signingStatus);

         //download documents
         if (signingStatus.Equals("COMPLETED"))
         {
            var downloadZipResponse = myClient.GetAsync(new Uri(url + "/packages/0487df67-6417-48f8-9575-b520c0f977ff/documents/zip")).Result;
            ByteArrayContent content = new ByteArrayContent(downloadZipResponse.Content.ReadAsByteArrayAsync().Result);
            File.WriteAllBytes("C:/Eclipse/myzip.zip", content.ReadAsByteArrayAsync().Result);
            Debug.WriteLine("Zip File Downloaded");

            var evidenceSummaryResponse = myClient.GetAsync(new Uri(url + "/packages/0487df67-6417-48f8-9575-b520c0f977ff/evidence/summary")).Result;
            ByteArrayContent evidenceSummaryContent = new ByteArrayContent(evidenceSummaryResponse.Content.ReadAsByteArrayAsync().Result);
            File.WriteAllBytes("C:/Eclipse/myevidencesummary.pdf", evidenceSummaryContent.ReadAsByteArrayAsync().Result);
            Debug.WriteLine("Evidence Summary Downloaded");
         }
         else
         {
            Debug.WriteLine("Signing not complete");
         }
      }
   }
}
Now, let’s take a closer look at the code. Just like last time, the first couple lines is where the connection info for your OneSpan Sign connection is defined. If you are using the production environment, use the url, https://apps.e-signlive.com/api. Make sure you replace the placeholder text with your API_KEY. You can find this value in the ACCOUNT page when signed into your OneSpan Sign account.
string apiKey = "YOUR_API_KEY";
string url = "https://sandbox.esignlive.com/api";
Next, you will create the HttpClient that you will use to make your GET requests and set the appropriate header authorization and accept values.
|
|
Check the Status
For this section, you will need the packageId that you found above. With that handy, you can set up your GET request to see what the package status is. The possible values are ARCHIVED, COMPLETED, DECLINED, DRAFT, EXPIRED, OPTED_OUT, and SENT. The code below performs a GET request to the url created from the base url defined above with the remainder of the url from the appropriate REST call defined in the documentation (in this case, "/packages/YOUR_PACKAGE_ID"). The content of the response is then parsed into a JObject and the "status" property of the JObject is obtained and written to the Debug output.
|
|
Next, check the signing status of the package. The possible values for this one are ARCHIVED, CANCELED, COMPLETE, DECLINED, EXPIRED, INACTIVE, OPTED_OUT, COMPLETED, and SIGNING_PENDING. This is done exactly the same as the last step except for an addition of "/signingStatus" to the request url. Write the response for this call to the Debug output window, as well.
|
|
Download the Files For the last part, you will check to see if the package is complete. If it is, the zip file of all documents will be downloaded, as well as the evidence summary. After each step, write to the Debug output so that you know the event happened when you test the class in the next step. Also not the additions to the base url for each download.
|
|
Running the Code
With your simple class completed, it is time to execute the C# class. Run the class from the toolbar by clicking the Start button.
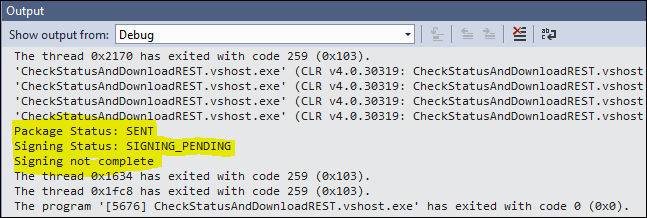
If you have not yet signed your package, your Output should look like the following:
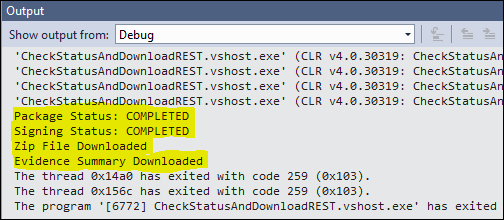
After signing your package, you will get the following in your Output window:
If you now browse to the location where you saved your files, you will see that your files were successfully downloaded.

There you have it. You have successfully checked the status of and downloaded the files from your package.
Thanks for reading! If you have any questions or features you would like to see covered from a new user’s perspective, feel free to post in the comments section. Links to all of the posts from this blog series can be found, below.
– Michael Williams
Twitter | Facebook | LinkedIn
eSignLive for New Users Blog Series
- Create and Send a Package Using the UI
- You Sent a Package, What Now? (UI)
- Create and Send a Package with the Java SDK
- Check Package Status and Download Files with the Java SDK
- Create and Send a Package with the .NET SDK
- Check Package Status and Download Files with the .NET SDK
- Create and Send a Package using REST with C#
- Check Package Status and Download Files using REST with C#
- Create and Send a Package using REST with Java
- Check Package Status and Download Files using REST with Java
