OneSpan Sign for New Users: How to Create and Send Your First Package (REST API)

The completion of the “OneSpan Sign for New Users” series is near. So far, I have covered simple examples of using e-signatures, the OneSpan Sign UI, Java SDK, and .NET SDK. You can see the full list of posts at the bottom of this blog. The final two blogs in the series will cover using the OneSpan Sign REST API, with this one covering, creating and sending a document package.
If you do not have a Sandbox account, see my first blog for how you can get signed up.
Configuration
Before you can get started, you will need to set up your environment. For this example, I will be using C# and Microsoft Visual Studio. Go ahead and get a project and .cs file created. I named my project “CreateAndSendPackageREST” and my .cs file, “CreateAndSendPackageREST.cs”. If you need help getting this set up, see my first .NET SDK blog (you can ignore the .NET SDK portion and skip to the “Downloading Microsoft Visual Studio” and “Create and Configure Your C# Project” sections) for more detailed instructions.

The Beginner's Guide to Electronic Signatures
This essential briefing introduces important legal concepts and key considerations when creating digital business processes with e-signatures.
Download NowCreate and Send a Package
The Code
Since the environment setup and project configuration have been covered in previous blogs, in this series, I will jump right into the code. Open the .cs file you created above and copy in the following code. I will cover the code in more detail below.
usingSystem;usingSystem.Diagnostics;usingSystem.IO;usingSystem.Net;usingSystem.Net.Http;usingSystem.Net.Http.Headers;usingSystem.Text;namespaceCreateAndSendPackageREST{publicclassCreateAndSendPackage{publicstaticvoidMain(string[] args){stringapiKey ="YOUR_API_KEY";stringurl ="https://sandbox.esignlive.com/api";stringjsonString ="{\"roles\":[{\"locked\":false,\"emailMessage\":{\"content\":\"\"},\"attachmentRequirements\": [],\"reassign\":false,\"specialTypes\":[],\"id\":\"Sender\",\"data\":null,\"type\":\"SIGNER\",\"index\":0,\"signers\":[{\"auth\":{\"challenges\": [],\"scheme\":\"NONE\"},\"company\":\"Silanis\",\"firstName\":\"yourFirst\",\"lastName\":\"yourLast\",\"phone\":\"\",\"email\":\"[email protected]\",\"knowledgeBasedAuthentication\":null,\"language\":\"en\",\"title\":\"Silanis\",\"external\":null,\"professionalIdentityFields\": [],\"userCustomFields\":[],\"delivery\":{\"email\":true,\"provider\":false,\"download\":true},\"group\":null,\"signature\":null,\"address\":null,\"data\":null,\"name\":\"\",\"specialTypes\": []}],\"name\":\"Sender\"},{\"locked\":false,\"emailMessage\":{\"content\":\"\"},\"attachmentRequirements\":[],\"reassign\":false,\"specialTypes\":[],\"id\":\"Signer\",\"data\":null,\"type\":\"SIGNER\",\"index\":0,\"signers\":[{\"auth\":{\"challenges\": [],\"scheme\":\"NONE\"},\"company\":\"\",\"firstName\":\"signerFirst\",\"lastName\":\"signerLast\",\"phone\":\"\",\"email\":\"[email protected]\",\"knowledgeBasedAuthentication\":null,\"language\":\"en\",\"title\":\"\",\"external\":null,\"professionalIdentityFields\": [],\"userCustomFields\":[],\"delivery\":{\"email\":false,\"provider\":false,\"download\":false},\"group\":null,\"id\":\"Signer\",\"signature\":null,\"address\":null,\"data\":null,\"name\":\"\",\"specialTypes\":[]}],\"name\":\"Signer\"}],\"documents\": [{\"approvals\":[{\"role\":\"Signer\",\"signed\":null,\"accepted\":null,\"data\":null,\"fields\": [{\"page\":0,\"subtype\":\"FULLNAME\",\"width\":200,\"binding\":null,\"extract\":false,\"extractAnchor\":null,\"left\":175,\"top\":165,\"validation\":null,\"height\":50,\"data\":null,\"type\":\"SIGNATURE\",\"value\":\"\"}],\"name\":\"\"},{\"role\":\"Sender\",\"signed\":null,\"accepted\":null,\"data\":null,\"fields\": [{\"page\":0,\"subtype\":\"FULLNAME\",\"width\":200,\"binding\":null,\"extract\":false,\"extractAnchor\":null,\"left\":550,\"top\":165,\"validation\":null,\"height\":50,\"data\":null,\"type\":\"SIGNATURE\",\"value\":\"\"}],\"name\":\"\"}],\"name\": \"sampleAgreement\"}],\"name\": \"Test Package REST\", \"type\":\"PACKAGE\", \"language\":\"en\", \"emailMessage\":\"\", \"description\":\"New Package\",\"autoComplete\":true,\"status\":\"SENT\"}";StringContent jsonContent =newStringContent(jsonString, Encoding.UTF8,"application/json");byte[] fileByteArray = File.ReadAllBytes("PATH_TO_YOUR_PDF.pdf");ByteArrayContent content =newByteArrayContent(fileByteArray);content.Headers.ContentDisposition =newContentDispositionHeaderValue("form-data");content.Headers.ContentDisposition.Name ="\"file\"";content.Headers.ContentDisposition.FileName ="\"NAME_OF_YOUR_FILE.pdf\"";content.Headers.ContentType =newMediaTypeHeaderValue("application/pdf");MultipartFormDataContent form =newMultipartFormDataContent();form.Add(content,"\"file\"","\"NAME_OF_YOUR_FILE.pdf\"");form.Add(jsonContent,"\"payload\"");HttpClient myClient =newHttpClient();myClient.DefaultRequestHeaders.Authorization =newAuthenticationHeaderValue("Basic", apiKey);myClient.DefaultRequestHeaders.Add("Accept","application/json");varresponse = myClient.PostAsync(newUri(url) +"/packages/", form).Result;Debug.WriteLine(response.Content.ReadAsStringAsync().Result);}}}
Breaking down the code
Now that you have the code copied into your .cs file, I will step through the code, section by section, letting you know where you will need to input information for your package and describing what each section does. As this is a very simple example, everything is done in the main method.Breaking down the Code
In the first couple lines, the connection info for your OneSpan Sign connection is defined. If you’re using the production environment, use the url, https://apps.e-signlive.com/api. Make sure you replace the placeholder text with your API_KEY. You can find this value in the ACCOUNT page when signed into your OneSpan Sign account.
1 string apiKey = "YOUR_API_KEY";

2 string url = "https://sandbox.esignlive.com/api";
The next line is the JSON string that defines your package. Typically, you will probably build your JSON string dynamically vs having a giant static string, like this, but I did it this way to give a good representation of the structure of the JSON you will need to create your package properly. I have left many empty properties in the string that are not necessary for creation so you can see some of the other options that are available and how they are passed in the JSON. I have formatted the JSON for readablility, below.
string jsonString = "{
	\"roles\":[
	{
		\"locked\":false,
		\"emailMessage\":
		{
			\"content\":\"\"
		},
		\"attachmentRequirements\":[],
		\"reassign\":false,
		\"specialTypes\":[],
		\"id\":\"Sender\",
		\"data\":null,
		\"type\":\"SIGNER\",
		\"index\":0,
		\"signers\":[
		{
			\"auth\":
			{
				\"challenges\":[],
				\"scheme\":\"NONE\"
			},
			\"company\":\"Silanis\",
			\"firstName\":\"YOUR_FIRST_NAME\",
			\"lastName\":\"YOUR_LAST_NAME\",
			\"phone\":\"\",
			\"email\":\"[email protected]\",
			\"knowledgeBasedAuthentication\":null,
			\"language\":\"en\",
			\"title\":\"\",
			\"external\":null,
			\"professionalIdentityFields\":[],
			\"userCustomFields\":[],
			\"delivery\":
			{
				\"email\":true,
				\"provider\":false,
				\"download\":true
			},
			\"group\":null,
			\"signature\":null,
			\"address\":null,
			\"data\":null,
			\"name\":\"\",
			\"specialTypes\":[]
		}],
		\"name\":\"Sender\"
	},
	{
		\"locked\":false,
		\"emailMessage\":
		{
			\"content\":\"\"
		},
		\"attachmentRequirements\":[],
		\"reassign\":false,
		\"specialTypes\":[],
		\"id\":\"Signer\",
		\"data\":null,
		\"type\":\"SIGNER\",
		\"index\":0,
		\"signers\":[
		{
			\"auth\":
			{
				\"challenges\":[],
				\"scheme\":\"NONE\"
			},
			\"company\":\"\",
			\"firstName\":\"SIGNER_FIRST_NAME\",
			\"lastName\":\"SIGNER_LAST_NAME\",
			\"phone\":\"\",
			\"email\":\"[email protected]\",
			\"knowledgeBasedAuthentication\":null,
			\"language\":\"en\",
			\"title\":\"\",
			\"external\":null,
			\"professionalIdentityFields\":[],
			\"userCustomFields\":[],
			\"delivery\":
			{
				\"email\":false,
				\"provider\":false,
				\"download\":false
			},
			\"group\":null,
			\"id\":\"Signer\",
			\"signature\":null,
			\"address\":null,
			\"data\":null,
			\"name\":\"\",
			\"specialTypes\":[]
		}],
		\"name\":\"Signer\"
	}],
	\"documents\":[
	{
		\"approvals\":[
		{
			\"role\":\"Signer\",
			\"signed\":null,
			\"accepted\":null,
			\"data\":null,
			\"fields\":[
			{
				\"page\":0,
				\"subtype\":\"FULLNAME\",
				\"width\":200,
				\"binding\":null,
				\"extract\":false,
				\"extractAnchor\":null,
				\"left\":175,
				\"top\":165,
				\"validation\":null,
				\"height\":50,
				\"data\":null,
				\"type\":\"SIGNATURE\",
				\"value\":\"\"
			}],
			\"name\":\"\"
		},
		{
			\"role\":\"Sender\",
			\"signed\":null,
			\"accepted\":null,
			\"data\":null,
			\"fields\":[
			{
				\"page\":0,
				\"subtype\":\"FULLNAME\",
				\"width\":200,
				\"binding\":null,
				\"extract\":false,
				\"extractAnchor\":null,
				\"left\":550,
				\"top\":165,
				\"validation\":null,
				\"height\":50,
				\"data\":null,
				\"type\":\"SIGNATURE\",
				\"value\":\"\"
			}],
			\"name\":\"\"
		}],
		\"name\": \"YOUR_FILE_NAME\"
	}],
	\"name\": \"Test Package REST\",
	\"type\":\"PACKAGE\",
	\"language\":\"en\",
	\"emailMessage\":\"\",
	\"description\":\"New Package\",
	\"autoComplete\":true,
	\"status\":\"SENT\"
}";
The first part of the package JSON string is the “roles” object. Inside this, you can set items like the “id”, “company”, “first name”, “last name”, “email”, and “name” to customize your signer roles. Some of the other notable settings would be “email message”, “title”, and “delivery”.
The next section of the package JSON string is the “documents” object. Inside this, you will set items like the “name” and the “approvals” (signature blocks). In the “approvals”, the main items to set would be the “type”, “subtype”, “role”, “page”, and the location settings. These will define the signatures required in each document.
Finally, the last few settings of the package JSON string that you will want to note are the “name”, “type”, “status”, “emailMessage”, and “autoComplete”. In this example, I set the “status” to “SENT”. Doing this will send the package and notify the signers. If you want to save this package as a draft, make the value “DRAFT”, instead.
The next line of the code will take your JSON string and make the StringContent object that you will pass as the payload in your REST API command.
StringContent jsonContent = new StringContent(jsonString, Encoding.UTF8, "application/json");
The next couple lines will read in your PDF file and use that to create your file ByteArrayContent object for your REST call. Be sure to change the placeholder to the path of your file.
1 byte[] fileByteArray = File.ReadAllBytes("PATH_TO_YOUR_PDF.pdf");

2 ByteArrayContent content = new ByteArrayContent(fileByteArray);
The next several lines define the content disposition header of the pdf file content object.
1 content.Headers.ContentDisposition = new ContentDispositionHeaderValue("form-data");
2 content.Headers.ContentDisposition.Name = "\"file\"";
3 content.Headers.ContentDisposition.FileName = "\"NAME_OF_YOUR_FILE.pdf\"";
4 content.Headers.ContentType = new MediaTypeHeaderValue("application/pdf");
The next block of code is where you create your multipart form and add your content objects created above to pass with your REST call. Be sure to set the file name.
1 MultipartFormDataContent form = new MultipartFormDataContent();
2 form.Add(content, "\"file\"", "\"NAME_OF_YOUR_FILE.pdf\"");
3 form.Add(jsonContent, "\"payload\"");
Next, you will create the HttpClient that you will use to make your POST request and set the appropriate header authorization and accept values.
1 HttpClient myClient = new HttpClient();
2 myClient.DefaultRequestHeaders.Authorization = new AuthenticationHeaderValue("Basic", apiKey);
3 myClient.DefaultRequestHeaders.Add("Accept", "application/json");
Finally, you will make the POST call, passing your form to OneSpan Sign, creating your document package. The Debug line will display the result to the debug output console.
1 var response = myClient.PostAsync(new Uri(url) + "/packages/", form).Result;
2 Debug.WriteLine(response.Content.ReadAsStringAsync().Result);
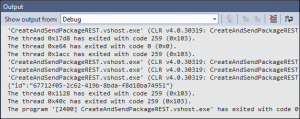
If everything with your REST call is correct, you should get a package id returned as your response, like this one:
If you log in to your OneSpan Sign account, you can see the package has been created as defined in your request:
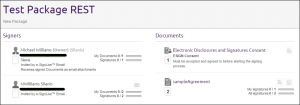
That is it. You have successfully created a new package, including a file, signers, and placing signature boxes with the REST API.
Thanks for reading! If you have any questions or features you would like to see covered from a new user’s perspective, feel free to post in the comments section. Links to all of the posts from this blog series can be found, below. If you want to see more posts from me, see my author page.
– Michael Williams