OneSpan Sign for New Users: How to Create and Send Your First Package (.NET SDK)

So far, I have covered simple examples of using the OneSpan Sign UI and Java SDK. I will now continue on with a couple simple blogs showing the use of the OneSpan Sign .NET SDK. This blog will cover creating and sending a document package. If you do not have a Sandbox account, see my first blog for how you can get signed up.
Requirements
Before you can write your code, you will need to set up your environment to use the .NET SDK.
Downloading the .NET SDK
If you have not yet downloaded the .NET SDK, you will need to do that before you can continue with this guide. The following link will take you to a page where you can download the .NET SDK and also provides a link to some examples of using the .NET SDK on GitHub. Unzip the SDK to the location of your choice.
Downloading Microsoft Visual Studio
For this blog, I will be using Microsoft Visual Studio 2013. If you do not already have it, you can download the community version, for free, at the link, below. I will be using C# as the language with the .NET libraries. You could use any other environment that would allow you to use C# and .NET, but everything in this blog will describe using Visual Studio.
Download Microsoft Visual Studio Community 2013
Create and Send a Package
Now that you have the necessary tools, it is time to get started.

OneSpan Developer Community
Join the OneSpan Developer Community! Forums, blogs, documentation, SDK downloads, and more.
Join TodayCreate and Configure Your C# Project
After opening Visual Studio, go to File -> New -> Project. I chose Windows -> Empty Project from the templates and named my project "CreateAndSendPackage".
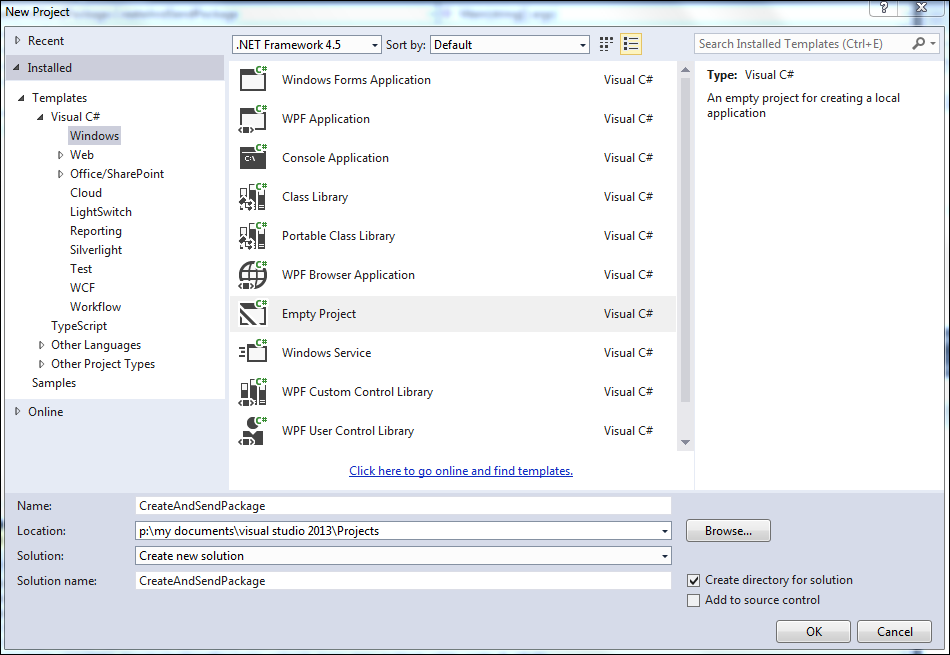
Select OK. You will now see your solution/project in the Solution Explorer.
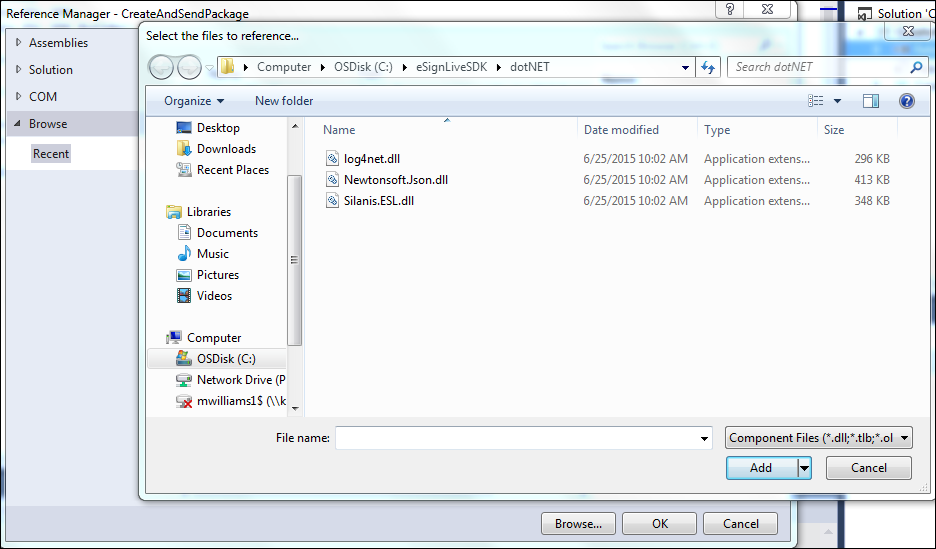
Next, add the .NET SDK as a reference by right clicking on References, in your project, in the Solutions Explorer. Choose "Add Reference…" In the dialog that pops up, choose "Browse", select the "Browse…" button at the bottom, navigate to where you unzipped the .NET SDK, select the three .dll files, and choose Add.
Finally, right click on your project, select Add -> New Item…, select the Code section in the pop-up, choose Code File, name the file whatever you want (I named it "CreateAndSendPackge.cs"), and select Add.
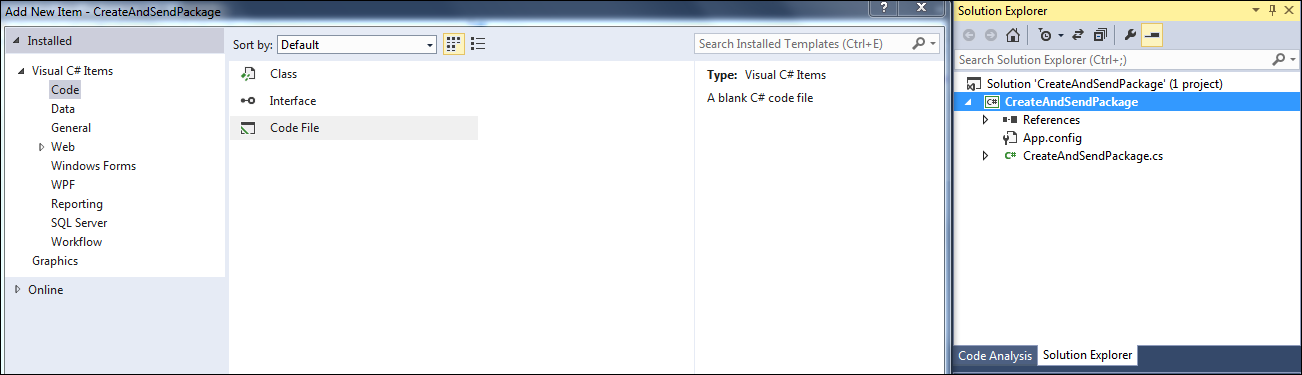
You will now see this file in your project in the Solution Explorer.
The Code
Open the .cs file you just created and enter the following code.
using System;
using System.IO;
using Silanis.ESL.SDK;
using Silanis.ESL.SDK.Builder;

namespace CreateAndSendPackage
{
    class CreateAndSendPackage
    {
        private static String apiUrl = "https://sandbox.esignlive.com/api";
        // USE https://apps.e-signlive.com/api FOR PRODUCTION
        private static String apiKey = "YOUR_API_KEY";

        public static void Main(string[] args)
        {
            EslClient eslClient = new EslClient(apiKey, apiUrl);

            FileStream fs = File.OpenRead("PATH_TO_YOUR_PDF");

            DocumentPackage superDuperPackage = PackageBuilder
              .NewPackageNamed("Test Package .NET")
                .WithSettings(DocumentPackageSettingsBuilder
                    .NewDocumentPackageSettings())
                    .WithSigner(SignerBuilder
                         .NewSignerWithEmail("[email protected]")
                                .WithFirstName("Signer First Name")
                                .WithLastName("Signer Last Name")
                                .WithCustomId("Signer"))
                    .WithSigner(SignerBuilder
                         .NewSignerWithEmail("[email protected]")
                                .WithFirstName("Your First Name")
                                .WithLastName("Your Last Name"))
.WithDocument(DocumentBuilder.NewDocumentNamed("sampleAgreement")
                                  .FromStream(fs, DocumentType.PDF)
                                  .WithSignature(SignatureBuilder
                                       .SignatureFor("[email protected]")
                                         .OnPage(0)
                                         .AtPosition(175, 165))
                                  .WithSignature(SignatureBuilder
                                       .SignatureFor("[email protected]")
                                         .OnPage(0)
                                         .AtPosition(550, 165))
                                  )
                    .Build();

            PackageId packageId = eslClient.CreatePackage(superDuperPackage);
            eslClient.SendPackage(packageId);
        }

    }
}
Looking at the code a bit closer, the first few lines define the libraries you will use.
using System;
using System.IO;
using Silanis.ESL.SDK;
using Silanis.ESL.SDK.Builder;
The next few lines define your connection settings for OneSpan Sign. Be sure to replace YOUR_API_KEY with your API key. You can find this value by logging into OneSpan Sign and going to the ACCOUNT tab.
private static String apiUrl = "https://sandbox.esignlive.com/api";
// USE https://apps.e-signlive.com/api FOR PRODUCTION
private static String apiKey = "YOUR_API_KEY";
For this very simple example, the rest of the code will happen inside the main method. The first thing you do is connect to the OneSpan Sign client using the API URL and API key you defined above.
EslClient eslClient = new EslClient(apiKey, apiUrl);
In the next line, you create a FileStream and read in the file you are wanting to upload with your package. Make sure you replace the placeholder text with the location of your PDF file.
FileStream fs = File.OpenRead("PATH_TO_YOUR_PDF");
Next, the package is created.
DocumentPackage superDuperPackage = PackageBuilder
     .NewPackageNamed("Test Package .NET")
     .WithSettings(DocumentPackageSettingsBuilder.NewDocumentPackageSettings())
Then, the signers are added to the package.
.WithSigner(SignerBuilder.NewSignerWithEmail("[email protected]")
                      .WithFirstName("Signer First Name")
                      .WithLastName("Signer Last Name")
                      .WithCustomId("Signer"))
          .WithSigner(SignerBuilder.NewSignerWithEmail("[email protected]")
                      .WithFirstName("Your First Name")
                      .WithLastName("Your Last Name"))
Next, the document is added, including signature boxes for required signers.
.WithDocument(DocumentBuilder.NewDocumentNamed("sampleAgreement")
                        .FromStream(fs, DocumentType.PDF)
                        .WithSignature(SignatureBuilder
                        .SignatureFor("[email protected]")
                           .OnPage(0)
                           .AtPosition(175, 165))
                       .WithSignature(SignatureBuilder
                       .SignatureFor("[email protected]")
                           .OnPage(0)
                           .AtPosition(550, 165))
                       )
With the package completely defined, you now build the package and send it.
.Build();

PackageId packageId = eslClient.CreatePackage(superDuperPackage);
eslClient.SendPackage(packageId);
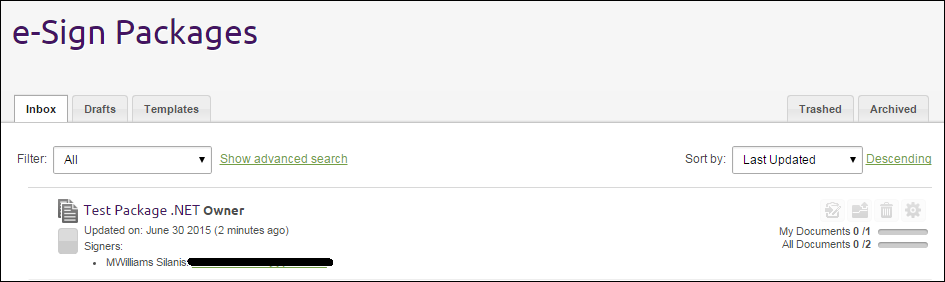
There you have it. Simply execute this code by selecting Start from the toolbar. After doing this, you should be able to log into OneSpan Sign and view the package you just created.
Thanks for reading! If you have any questions or features you would like to see covered from a new user’s perspective, feel free to post in the comments section. Links to all of the posts from this blog series can be found, below. If you want to see more posts from me, see my author page.
– Michael Williams
Twitter | Facebook | LinkedIn
eSignLive for New Users Blog Series
- Create and Send a Package Using the UI
- You Sent a Package, What Now? (UI)
- Create and Send a Package with the Java SDK
- Check Package Status and Download Files with the Java SDK
- Create and Send a Package with the .NET SDK
- Check Package Status and Download Files with the .NET SDK
- Create and Send a Package using REST with C#
- Check Package Status and Download Files using REST with C#
- Create and Send a Package using REST with Java
- Check Package Status and Download Files using REST with Java