How-to guide: Best practices for adding and managing signatures in Google Docs
This tutorial covers methods for adding signatures in Google Docs, as well as ways you can manage those signatures. We’ll also cover important limitations and security considerations, to ensure you’ve got the information you need to decide what’s right for your use case.
Spoiler: If you’re looking for a secure electronic signature option, you should consider a dedicated eSignature solution, as simply inserting a signature into a Google document using the methods outlined below fails to meet important security criteria (also outlined below).
How to insert a signature in Google Docs?
There are a couple of ways you can add a signature to a Google doc. If you already have a signature file at hand, you can use the Insert menu function to add that file to the document. Alternatively, you can use the Drawing tool to create a new signature image.
Draw a signature in Google Docs
A drawing tool has been embedded in Google Docs since 2019, and it allows you to create, insert, and edit drawings within the document interface, via a drawing canvas. Drawing functionality is limited, but once you have created an image of your signature, it is trivial to move, resize, and rotate it as needed. You can also save the image for re-use in other documents.
Insert a signature in Google Docs
You can use the document’s Insert submenu to insert an existing signature image from various locations, including your Google Drive, Gmail, other Google apps, your device storage, or a web location. As with drawings, moving, resizing, and rotating a signature image is straightforward after insertion.
Step-by-step guide for inserting a signature in Google Docs
We’ll walk now through the A-to-Z process of inserting a signature into Google Docs documents, from what you’ll need to get started, through to the final insertion of your signature.
Step 1: Create or open the document in Google Docs
To get started, you’ll need to create a document in Google Docs, or open an existing document.
This step assumes that you already have a Google Account. If you don’t, simply set up a free account by creating a Gmail alias. This will give you access to the full Google Workspace as well as to the Google Workspace Marketplace, where numerous business productivity and educational apps are available for download.
Note that the signature insertion process is device-agnostic - all steps below apply regardless of whether you are using a desktop computer, Android phone, or iPhone.
Step 2: Select the drawing toolbar option
The Drawing Toolbar option in Google Docs allows you to create or insert various graphical elements into your documents.
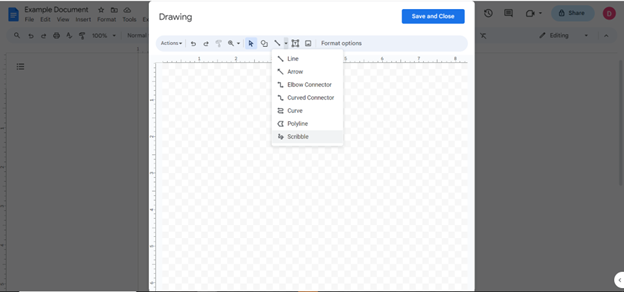
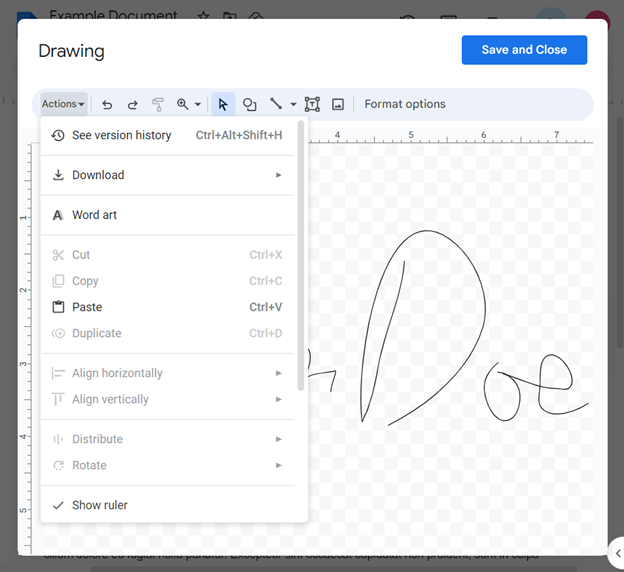
To use it, from the main menu bar, click Insert. Then, select Drawing > + New. A pop-up window containing the Drawing canvas will appear.

Step 3: Draw your handwritten signature or upload an image file of your signature
To draw a signature, follow these simple steps:
- Click the “Select line” down arrow and select Scribble in the line tool. A cursor will appear. Depending on your device, you can now use your mouse, trackpad, finger (in the event of a touchscreen), or stylus to draw a signature.
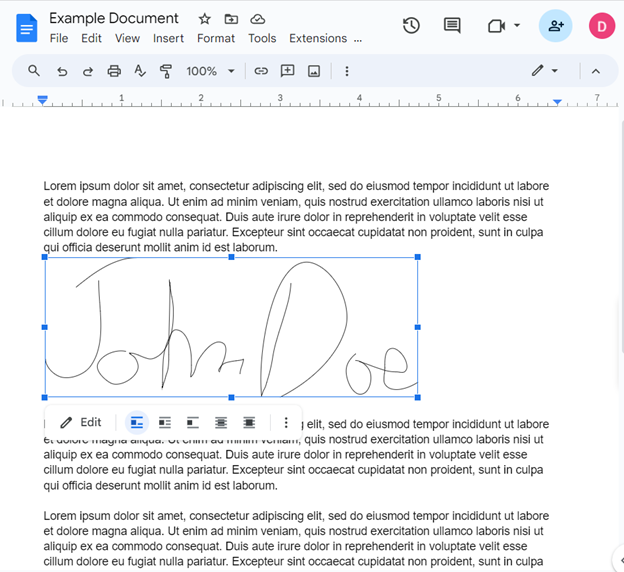
- Click the Save and Close button. Your signature will now appear in the body of your document
To upload an existing image file of a signature in Google Docs, follow these steps:
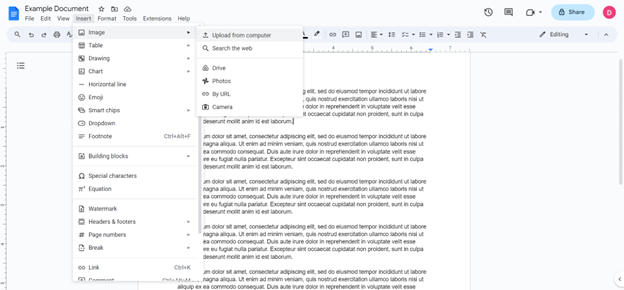
- From the top toolbar, click Insert > Image. You will be presented with source options including upload from device storage, web search, Google Drive, Google Photos, URL, or camera.
- Select your target and insert your signature image file into the document.
Step 4: Adjust the wrapping options and image options
You can adjust how your signature will appear in your document by adjusting any of the following wrapping and image options.
- Size & Rotation: Change the size of your signature image, or rotate it.
- Text Wrapping: Place your signature image in line with the text. Alternatively, you can wrap or break the text.
- Position: Indicate whether you want your signature to move as the text changes (which may be important if you are using a text box or signature fields for signing), or to remain at a fixed point on the page. Note: you will need to select a wrapping option first; otherwise the Position option will be grayed out.
- Recolor: Change the color of your signature.
Step 5: Insert signature into the document
Once you have completed the steps above, your image will be inserted into your Google document.
Signing documents with the Google drawing tool
Once you’ve inserted a signature image into your document, you have a few options for editing the image, and for saving for later re-use.
Editing a signature created with the draw tool
To edit a signature image that you've created using the Google Docs Draw tool, follow these step-by-step instructions.
- Click on the image and then select Edit. The drawing canvas will open.
- To transform your signature image, click on the image and drag any of the square handles. Note that a version history is available, should you want to roll back any of your edits.
- To delete your signature image, select the image and press Delete or Backspace.
Saving and reusing signature for future documents
It is possible to save and reuse a signature for future documents in Google Docs, although it is less straightforward than in most Microsoft Office applications. Follow these step-by-step instructions for the simplest approach:
- Click on the image and then select Edit. The drawing canvas will open.
- In the drawing canvas menu, click the down arrow next to Actions.
- From the drop-down menu, select Download.
- Choose your preferred file format, from PDP, JPEG, PNG, or SVG.
Once you have saved your signature image, you will be able to re-use it in future documents by following the instructions above for inserting a signature into Google Docs.
How to insert a signature in Google Docs using an add-on
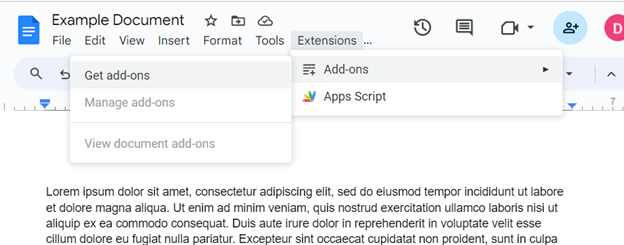
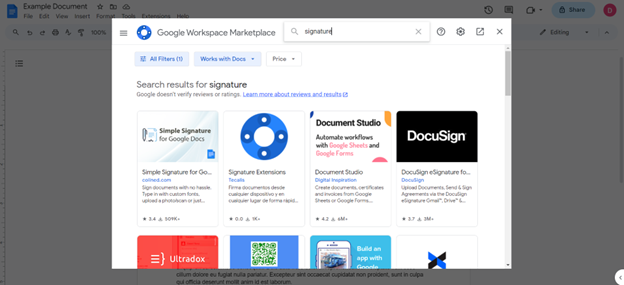
You can also get add-ons to insert a signature in Google Docs. From the top menu of a Google Document, select Extensions > Add-ons > Get add-ons. This will bring you to the Google Workspace Marketplace (this is also accessible via the sidebar of the desktop version of Google Docs).
Search for “signature.” You will then be presented with over two dozen add-ons, including Simple Signature (colined.com), Signature Extensions (Tecalis), Document Studios (Digital Inspirations), PandaDoc, Docusign esignature, etc., with a range of pricing that includes both free and paid.
Browse apps with a healthy degree of paranoia, as add-ons coming from unknown publishers may represent security risks. At a minimum, scrutinize the specific permissions that the add-on is requesting.
The list of is are only visible once you've selected the Google account to be used with the add-on. The list can be quite intensive. Once you have reviewed them, you can tap Allow for installation of the add-on. You will then need to re-open your document to start using the Google Docs add-on.
Key considerations when inserting a signature into Google Docs
As indicated just above, security is a concern when inserting signatures into Google Docs. To understand why, it’s worth taking a step back to examine broader notions of signature security.
Security of electronic signatures vs. digital signatures vs. handwritten signatures
There are key differences between electronic signatures, digital signatures, and handwritten signatures.
A traditional handwritten signature is applied using analog tools, such as a pen, and applied to a physical document, such as a piece of paper.
An electronic signature replicates the purpose and significance of this traditional handwritten signature, but through digital means. Using an electronic signature platform, e-signature software can create and apply an electronic signature to an electronic document.
Finally, a digital signature is a type of signature that has been signed with a digital certificate. This provides proof of the identity of the signing individual. Digital signatures are recognized as being the most secure type of e-signature, as they are cryptographically embedded in a signed document and can be validated..
There are a number of reasons to prioritize the security provided by an e-signature solution such as OneSpan Sign. Here are the top reasons:
- Secure signing: Leading e-signature solutions such as OneSpan Sign provide a high level of identity assurance with identity verification and biometric authentication options. Furthermore, digital signature technology and tamper seals protect the document between signers.
- Secure mobile-friendly technology: OneSpan Sign is designed with mobile in mind and securely supports all manner of mobile devices including Mac iOS iPads, iPhones and Android tablets, and smartphones.
- Compliance: OneSpan Sign complies with ISO/IEC 27001, ISO/IEC 27017, ISO/IEC 27018, SOC 2 Type II, HIPAA, FedRAMP, and other requirements.
Ensure a secure process when inserting a signature into an online document
There is more complexity to e-signatures than first meets the eye, especially when it comes to the customer-facing transactions that are impacting your bottom line.
The primary focus for an e-signature solution is that it should be legally valid — that it complies with e-signatures laws and standards. You should look for an e-signature solution that packages and secures e-signed documents using digital signature technology. The digital signature should be built using private-key infrastructure (PKI) (as opposed to public key infrastructure or public key cryptography). Ideally, the e-signature solution should also apply the digital signature at two levels:
- At the signature level to prevent tampering with the signature itself – this is a feature only offered by OneSpan Sign.
- At the document level to prevent tampering with the document’s contents.
Digital signature security features lock down and tamper-proof the e-signed document, so unauthorized changes can’t slip by unnoticed.
Here is a more comprehensive e-signature security requirements checklist:
- The document must be secured with a digital signature
- Each signature must be secured with a digital signature
- A comprehensive audit trail should include the date and time of each signature
- The audit trail must be securely embedded in the document
- The audit trail must be linked to each signature
- The evidence summary report should include data related to the document review and signing process
- Ability to verify the validity of the signed record offline, without going to a website
- Ability to download a verifiable copy of the signed document with embedded audit trail
- The document must be accessible to all involved parties
The limitations of adding a signature in Google Docs
There are security limitations to adding a signature in Google Docs, mostly related to the security checklist outlined immediately above.
A handful of these limitations may be overcome by some features of certain add-ons, but no Google Doc add-on provides the ability to furnish an audit trail linked to each signature. This is critical, because it’s what binds signing intent to the information that was agreed to at the time of signing. It’s also at the core of OneSpan Sign’s industry-leading security posture.
For the record, it’s worth noting that Google is also beta-testing an “eSignature” feature that allows users to “create documents for signatures and send signature requests in Google Docs.” Google Support information indicates, however, that beta sign-ups are currently closed. Furthermore, the eSignature beta does not currently support signature requests to multiple signees, or to a non-Google Account signer.
Using OneSpan Sign to create and manage signatures
The many benefits of using OneSpan for your signatures
In a nutshell, OneSpan Sign provides advanced e-signing functionality, streamlines the signing process, and offers additional features such as a single, unified audit trail. Here are the top benefits of using OneSpan Sign:
- Superior experience: Unlike most e-signature solutions, OneSpan Sign allows you to put your brand front and center to optimize the signing experience for your clients.
- Get started quickly: You can quickly integrate e-signing and workflow capabilities into your app or website with OneSpan Sign’s open API and fully supported SDKs.
- Enhanced compliance: Verify the validity of signed documents with one-click verification and the most comprehensive audit trails available today.
- Strong identity assurance: Access a broad range of identity verification and authentication options to ensure signers are who they say they are, before providing access to documents.
- Advanced security: Protect your users and electronic documents against fraud with digital signature encryption.
Best practices for setting up and managing eSignatures with OneSpan
E-signature technology is more than just a means of capturing consent. Secure e-signature solutions can streamline agreement workflows, ensure enforceability with audit trails, collect signature submissions in real time, and more.
To achieve these benefits, we suggest that you follow a best-practice workflow for setting up and managing e-signatures with OneSpan Sign.
- Give signers access to the documents.
- Authenticate the signers.
- Present document
- Capture data from participants at the time of signing.
- Provide the ability to insert additional documents into the transaction.
- Capture consent through the act of signing.
- Deliver the signed documents to all parties.
Ready for more information about OneSpan's eSignature integration with Google Workspace? Read the datasheet.

Free trial
Try OneSpan Sign for free for 30 days
See how easy it is to securely create, send, and sign digital agreements.
Try now