OneSpan Developer: Creating a Rule in Risk Analytics

In this blog post, we will explore how to create a new rule in Risk Analytics and see that rule tested in action, using the MyBank Web Portal Interactive Solution. The added rule will enforce a step up authentication, every time a new payee is added to a user's web banking account. This way, when the rule is triggered, the user will be required to provide their fingerprint, through the mobile device registered as a trusted device.
As we will be viewing this rule change using the MyBank Web Portal, you will need to make sure you have access to that demo application. If you do not, check out our previous blog, ”OneSpan Cloud Solutions In Action - MyBank Web Portal Demo, Part I”. To make the rule change, we will be accessing the Risk Analytics Presentation Service. For help with this, please see Part II of the OneSpan Cloud Solutions In Action series.
Create a Rule in Risk Analytics for Adding a New Bill Beneficiary:
Once you have completed the prerequisites and have access to the Risk Analytics Presentation Service, you can proceed with adding the new rule.
First, navigate to DESIGN RULES & ACTIONS > Rule Management, as seen in the below image.
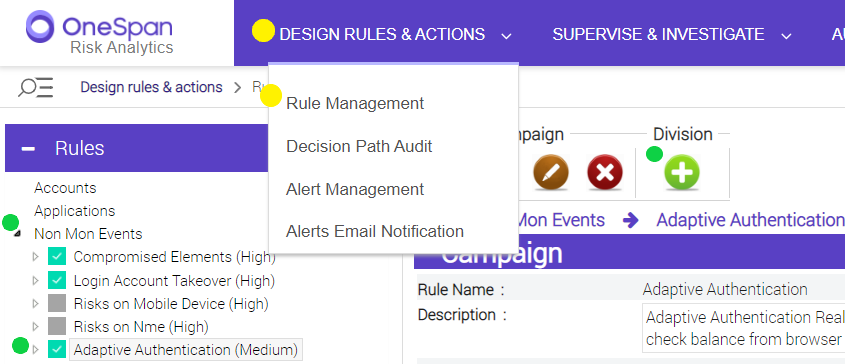
On this page, you will see a “Rules” section, on the left side, as seen in the image above. Expand the “Non Mon Events” and select “Adaptive Authentication (Medium)”.
With “Adaptive Authentication (Medium)” selected, click on the “Add Division” icon.

Once you have done this, you will see the following screen.
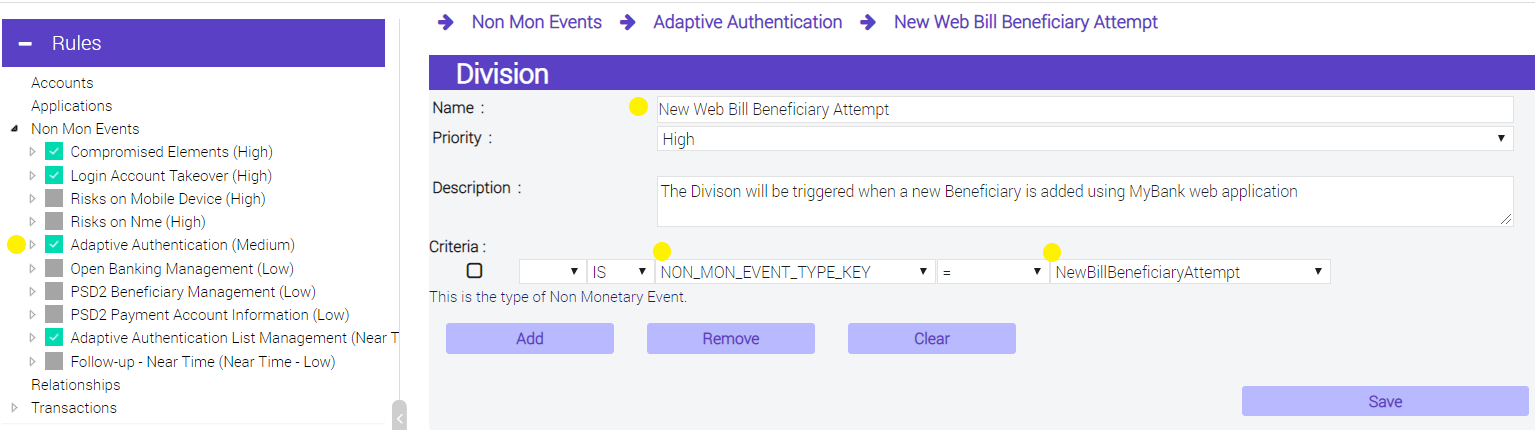
Choose a name for the new division. For this example, we will go with “New Web Bill Beneficiary Attempt”. You will also want to set the priority to “high”, so that this division will be matched before lower priority ones.
Next, set the criteria for the division to be “NON_MON_EVENT_TYPE_KEY” and the value to “NewBillBeneficiaryAttempt” as seen in the above image. Click “Save” and then “Done”.
Select the newly added division from the “Rules” panel and activate it on by clicking the orange toggle icon.

After clicking the toggle icon, you will see the status change to “Active” on your screen.
Now, we are ready to add our new rule. With the division we created above still selected, click on the “Add Rule” icon.

Name the rule “BillBeneficiaryAddition”, set its priority to high, and click “Save & Next” to finish the first step of the rule creation process.

Next, steps 2 to 5 for creating History criteria, Match Criteria, Match Key, and Create Action.are advanced Risk Analytics options to refine the criteria and customize the rule, they are not required for this specific scenario. Select “No” then click “Save & Next” for each of these steps.
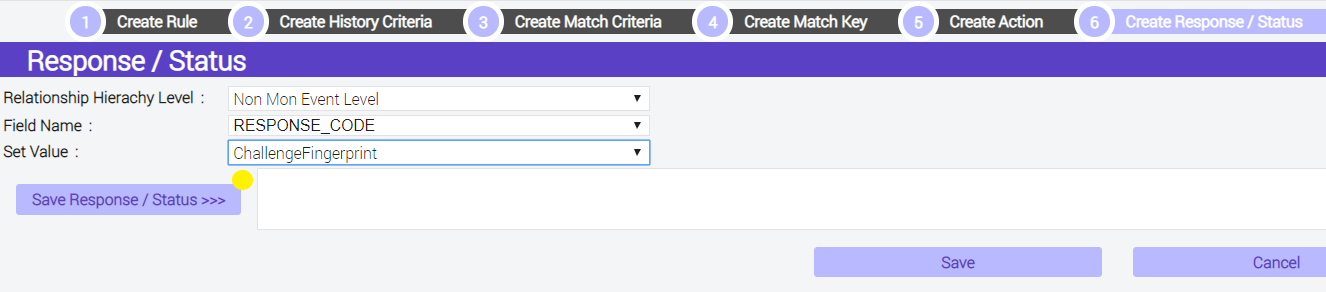
In step 6, “Create Response/Status”, set the Response value to “ChallengeFingerprint” from the dropdown list. Click “Save Response / Status >>>” This will set up a fingerprint authentication for each time you add a new payee to your bank account, and the response type will be tacked onto the white box on the right. Your configuration should look like the image below.
Click “Save” to confirm the creation of the “BillBeneficiaryAddition” rule. Finally, toggle it to active using the orange icon as we did for the division, above.
Test Your New Rule
With this new rule enacted, whenever you try to add a bill payee to your MyBank account, you will be required to provide your fingerprint on your trusted device. Let’s test the setup and add a payee through the web version of MyBank:
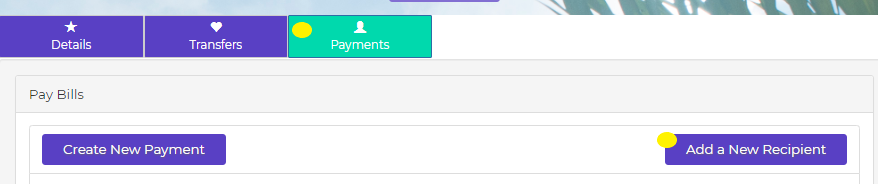
Login to MyBank and switch to the “Payments” tab from the homepage, then click on “Add a New Recipient” as shown below.
From the “Payments” tab, type the recipient name and account number in the “Account Name” and “Account Number” boxes, then click “Create”. You will instantly receive a push notification on your trusted device. Follow the notification and OneSpan Mobile Security Suite will collect your fingerprint to authenticate the legitimacy of the activity before the payee is finally added to your recipients list.
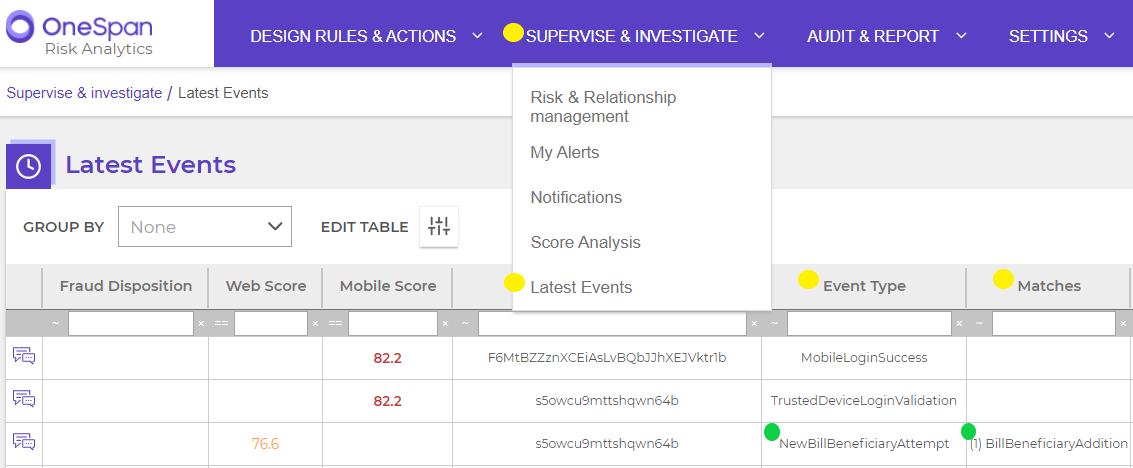
Finally, you could check the latest events from the example above and see which event were triggered and which rules were matched. This could be displayed from “SUPERVISE &INVESTIGATE” > “Latest Events” in the menu bar of the Risk Analytics presentation service as in the screenshot below.
Congratulations! You have now successfully added and tested a new rule to your Risk Analytics service. To learn more about adding rules, visit our Risk Analytics documentation. If you have any questions, you can ask them in the Community Portal forums.

OneSpan Developer Community
Join the OneSpan Developer Community! Forums, blogs, documentation, SDK downloads, and more.
Join Today
