OneSpan Sign Release 11.39: Signing Overview Page

OneSpan Sign version 11.39 was recently deployed to the preview and sandbox environment. In this latest version, we enhanced the overview page experience during New Signer Experience, supported the SMS authentication for in-person transactions, deprecated Internet Explorer 11 in New Signer Experience and suggested senders move to more modern web browsers, and enabled more features by default for new accounts, including Conditional Fields, Optional Signature, Mobile Capture, Delegation, etc. For a complete list of product updates, check the 11.39 Release Note. Also refer to our Trust Center and find the deployment dates for all our environments.
In this blog, we will demonstrating the overview page in New Signer Experience and walk through the steps to fully customize the layouts and the wordings in the page. Let’s get started!
Overview Page in New Signer Experience
With the New Signer Experience, a new overview page will be presented to the recipient at the beginning of the signing ceremony, which outlines the current signing progress and the tasks pending to perform during the signing experience. Additionally, account owners can also customize the content and provide descriptive instructions to facilitate a recipient’s signing experience.
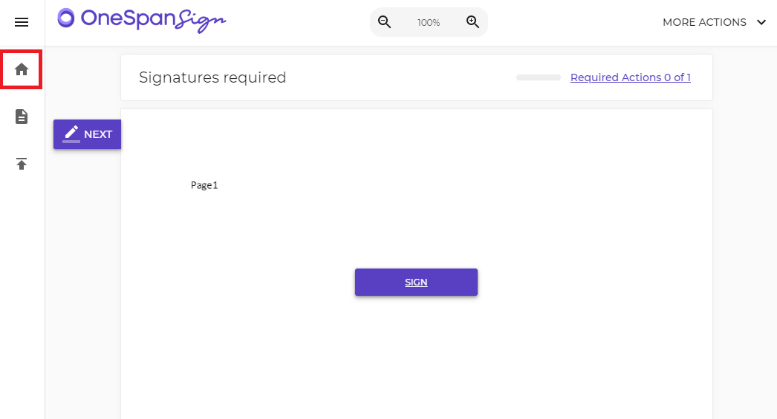
At any point during signing, signers can simply hit the Home button in left panel and return to the overview page. The page will be updated in real time indicating the progress they’ve made.
Note:
- This feature is only available in New Signer Experience
- The Overview page is only available for regular signing scenarios. For in-person and notarized transactions, a Welcome Page with the ability to switch between signers will be presented instead.
In order to correctly leverage the feature, follow the sections below.
Step 1: Enable Overview Page
To show or hide the overview page option in the New Signer Experience determined by a package setting:
"settings" > "ceremony" > "showNseOverview" : true/false
This setting will be set to false by default, unless you specify the value at the package level or contact our Support Team to update the default package settings at the account level.
If you are developing with our SDKs in a version later than 11.39, the visibility of the overview page can also be configured via SDKs:
Java SDK
DocumentPackage pkg = PackageBuilder.newPackageNamed("Example Package created by Java SDK")
	        ……
		.withSettings(DocumentPackageSettingsBuilder.newDocumentPackageSettings()
				.withShowNseOverview()
                              //.withoutShowNseOverview()
				)
		.build();
.NET SDK
DocumentPackage pkg = PackageBuilder.NewPackageNamed("Example Package created by .NET SDK")
	        ……
		.WithSettings(DocumentPackageSettingsBuilder.NewDocumentPackageSettings()
				.WithShowNseOverview()
                              //.WithoutShowNseOverview()
				)
		.Build();
Step 2: Modify the Page Layout
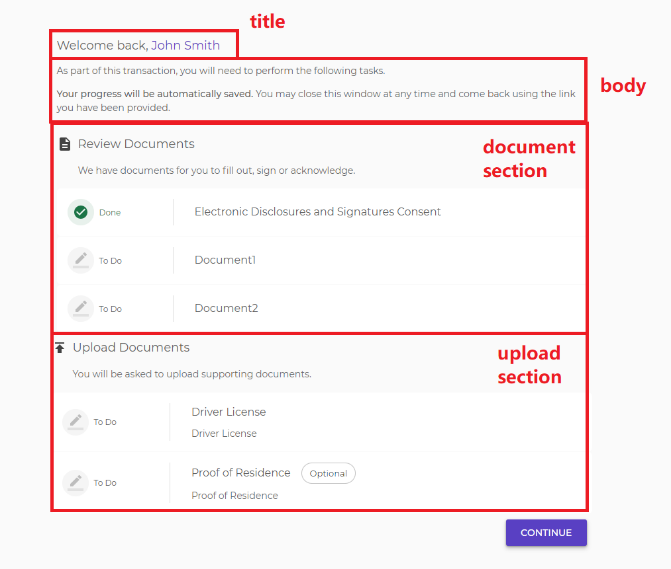
The screenshot below resembles the four UI components of the overview page. You have the full flexibility to show/hide the each element via the newly introduced account signing UI options API:
HTTP Request
PATCH /api/account/admin/signingUiOptions
HTTP Headers
Accept: application/json
Content-Type: application/json
Authorization: Basic api_key
Example Payload
{
  "overviewOptions": {
    "title": true,
    "body": true,
    "documentSection": true,
    "uploadSection": true
  }
}
Step 3: Customize the UI labels
In this section, we will walk through the customizable UI labels in the overview page. Once you have prepared the wording and properly formatted the text, fill in the Branding Migration forms to help inform our support team how you want to customize your interface, or alternatively submit a support ticket to configure these customizations.
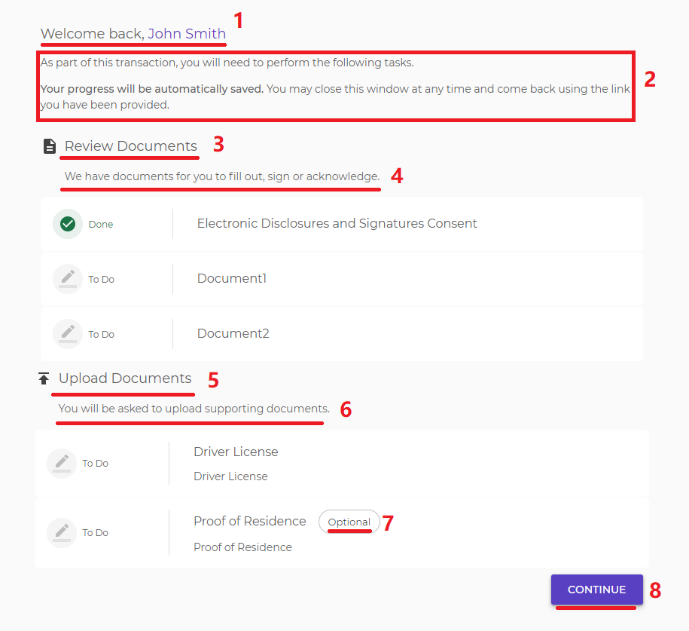
- The title of the overview page: For the first access, the default label is "Welcome, **{signerFullName}**", while for the subsequent accesses, the label updates to "Welcome back, **{signerFullName}**". You can customize the UI labels respectively for these two scenarios. On top of {signerFullName}, there are two additional placeholders {transactionName} and {senderFullName} that you can used as a parameter in this paragraph.
- The content body of the Overview page: With the powerful markdown language, you can format and beautify the descriptions by providing step by step instructions and even including external links for signers to have further reading.
- The title of the documents section
- The text displayed for the documents section
- The title of the uploads section
- The text displayed for the uploads section
- The "Optional" label when the attachment requirement is not mandatory
- The continue button which navigates the signer to the actual Signing Ceremony: The button reads “GET STARTED” when it’s the first access and reads “CONTINUE” when the transaction has started to be signed. Both UI labels can be modified.
Note:
- All contents in above UI labels, expect 7 and 8, support Markdown formatting. If you are not familiar with the Markdown syntax or you are looking for a way to effectively self-check the output, review our previous blog series on “Markdown Formatting”. (Part 1 and Part 2)
- It only counts the “subsequent access” when there’s at least one document in progress or done
There it is. In this blog, we have covered all aspects of the Overview Page during New Signer Experience. Stay tuned, and we will bring you more release updates in future installments.
If you have any questions regarding this blog or anything else concerning integrating OneSpan Sign into your application, visit the Developer Community Forums. Your feedback matters to us!

OneSpan Developer Community
Join the OneSpan Developer Community! Forums, blogs, documentation, SDK downloads, and more.
Join Today