OneSpan Sign Developer: Creating a Radio Button Field

When creating transactions, you may want to capture information from your recipient during the signing ceremony. With OneSpan Sign, you can do so by placing fields, such as textfields and checkboxes, on your documents.
In this blog, we will dive into the radio button field, how to create it in both SDK and REST method, and important considerations when creating a radio button. Without further ado, let's get started.
Radio Button Field
One of the most common field type in OneSpan Sign are radio buttons. They can be grouped together by associating each with a common Group Name. Within a group, you have the capability to require your signer to make a selection as well as pre-select a radio button as a default choice.
After the ceremony, the radio button selected will be replicated by an “X” on the document after it’s processed by OneSpan Sign.
SDK example
Here are some SDK snippets shows you how to create a radio button field:
Java version:
Field radio1 = FieldBuilder.radioButton("group1")
		           .withId(new FieldId("signer1_group1_radio1"))
		           .withName(("signer1_group1_radio1")
	               .withSize(15,15)
	               .onPage(0)
	               .atPosition(100,100)
                   .withValue(true)					//selected by default
                   .withValidation(FieldValidatorBuilder.basic().required())	//add a required validator
                .build();
.Net version:
Field radio1 = FieldBuilder.RadioButton("group1")
                         .WithId(("signer1_group1_radio1")
      		             .WithName(("signer1_group1_radio1")
                         .WithSize(15,15)
                         .OnPage(0)
                         .AtPosition(100,100)
                         .WithValue(true)				         //selected by default
                         .WithValidation(FieldValidatorBuilder.Basic().Required())  //add a required validator
               .Build();
As we discussed above, multiple radio buttons can share a same group name, and this group can only be bound to a single signer. The Field Id is suggested following a meaningful naming convention.
By default, signers are not required to make a selection. If you want to force your signer to do so, add a Required Field Validator to the field so that it adds a “required” field in your field JSON. With multiple fields in a group, this line only needs to be added to one of them, but we recommend adding it to all fields.
In order to pre-select one of several combos, you can set your field value by true/”true”/”x”/”X”, comparing with false/”false”/”” to start deselected. Since we are using an SDK, it’s suggested to simply use a Boolean true setting to prevent error input. If you mistakenly set true values for multiple buttons in a group, OneSpan Sign will recognize the last added field as a default selected one.
REST example
A JSON example creating a radio button field, which is equivalent to the above SDK code, shows as below:
{
   "id":"signer1_group1_radio1",
   "name":"signer1_group1_radio1",
   "type":"INPUT",
   "subtype":"RADIO",
   "page":0,
   "height":15,
   "width":15,
   "left":100,
   "top":100,
   "value":"X",
   "validation":{
      "required":true,
      "enum":[
         "group1"
      ]
   }
}
As you can see, in order to give a field extra information, required attribute, and your radio group name are put in the “validation” attribute.
Interesting Fact
If you are using REST to develop your application and you want to retrieve the radio buttons metadata in your package JSON (GET /api/packages/{packageId}), you need to include the following header parameter to take advantage of extended form fields:
Accept: application/json; esl-api-version=11.18 (any version after 10.6)
While, if you use API call (GET /api/packages/{packageId}/approvals/{approvalId}) to retrieve your Approval metadata, you don’t need to carry this header parameter. In short, it’s recommended to carry this to keep the same request header as SDK does. (In SDK, this parameter is added by default)
You can refer to Release Note 10.6.1 for more information.
With Extraction Methods
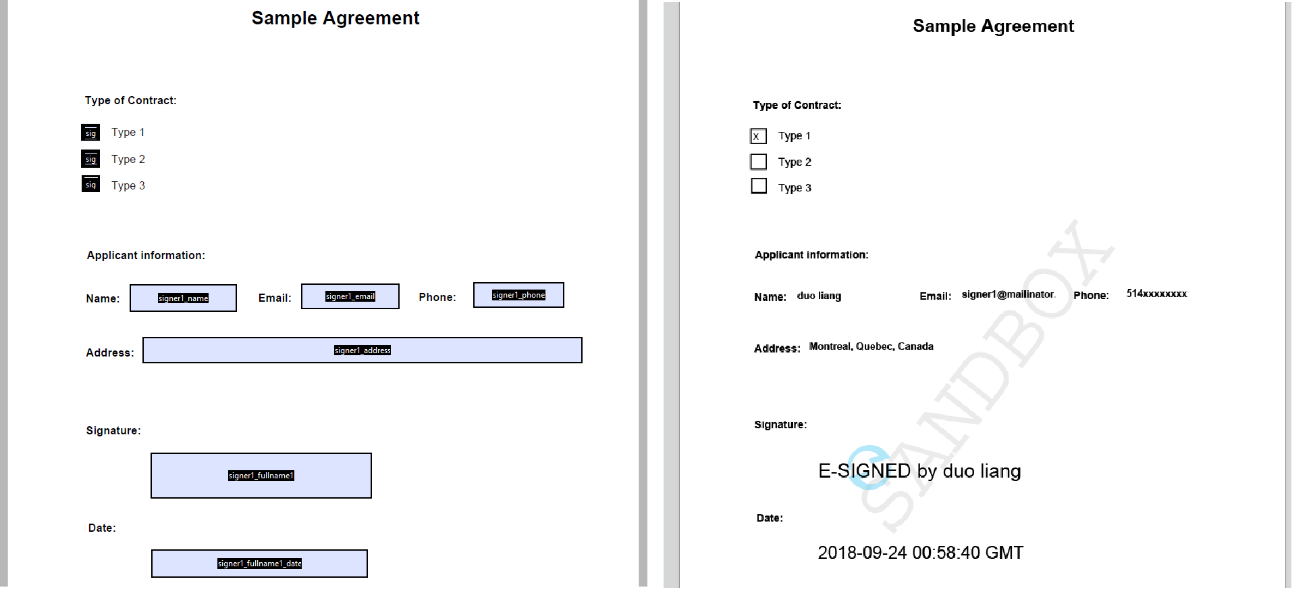
Currently, radio button type is not supported in Document Extraction yet. Therefore, we will choose Position Extraction to locate all of our fields, along with Field Injection Feature to fill in signer’s information to build our demo example.
The form field names on the fields are shown in the image on the left below. You can find the screenshot of the signed document on the right.
The example is based on Java SDK and these are the core code you can refer to when you are also using Position Extraction and Field Injection Feature:
DocumentPackage documentPackage = PackageBuilder.newPackageNamed("Test Package with Radio Button Fields")
					.withSigner(SignerBuilder.newSignerWithEmail(signerInfo.get("email")).withCustomId("signer1")
							.withFirstName(signerInfo.get("firstname")).withLastName(signerInfo.get("lastname")))
					.withDocument(DocumentBuilder.newDocumentWithName("Sample contract")
							.fromFile("your file path")
							.enableExtraction()
							.withSignature(SignatureBuilder.signatureFor(signerInfo.get("email"))
									.withPositionExtracted().withName("signer1_fullname1")
									.withField(FieldBuilder.signatureDate().withPositionExtracted()
											.withName("signer1_fullname1_date"))
									.withField(radio1).withField(radio2).withField(radio3))
							.withInjectedField(FieldBuilder.textField().withName("signer1_name")
									.withValue(signerInfo.get("firstname") + " " + signerInfo.get("lastname")))
							.withInjectedField(FieldBuilder.textField().withName("signer1_email")
									.withValue(signerInfo.get("email")))
							.withInjectedField(FieldBuilder.textField().withName("signer1_phone")
									.withValue(signerInfo.get("phone")))
							.withInjectedField(FieldBuilder.textField().withName("signer1_address")
									.withValue(signerInfo.get("address"))))
					.build();
			PackageId packageId = eslClient.createPackageOneStep(documentPackage);
You can find the complete code and the document I was using in the example here.
Through today’s blog, we are getting familiar with the common usage of Radio Button Field. By applying position extraction to radio button, we can effectively build a transaction with it.
If you have any questions regarding this blog or anything else concerning integrating OneSpan Sign into your application, visit the Developer Community Forums. Your feedback matters to us!